
Lexmark X264dn Support Question
Lexmark X264dn Support Question
Find answers below for this question about Lexmark X264dn.Need a Lexmark X264dn manual? We have 8 online manuals for this item!
Question posted by alizzy on August 13th, 2014
How To Install Photoconductor Kit For Lexmark X264
The person who posted this question about this Lexmark product did not include a detailed explanation. Please use the "Request More Information" button to the right if more details would help you to answer this question.
Current Answers
Related Lexmark X264dn Manual Pages
Wireless Setup Guide - Page 6
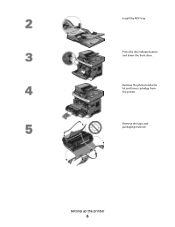
Setting up the printer
6 Press the door release button and lower the front door. Remove the tape and packaging material.
Remove the photoconductor kit and toner cartridge from the printer.
Install the ADF tray.
Wireless Setup Guide - Page 7
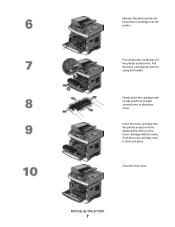
Insert the toner cartridge into the photoconductor kit by aligning the rollers on the base of the photoconductor kit. Pull the toner cartridge up the printer
7 Close the front door.
Firmly shake the ... into the printer. Press the button on the toner cartridge with the tracks.
Reinsert the photoconductor kit and toner cartridge into place. Setting up and out using the handle.
User's Guide - Page 150
... status of this printer.
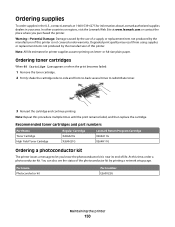
Recommended toner cartridges and part numbers
Part Name Toner Cartridge High Yield Toner Cartridge
Regular Cartridge X264A21G X264H21G
Lexmark Return Program Cartridge X264A11G X264H11G
Ordering a photoconductor kit
The printer issues a message to redistribute toner.
3 Reinsert the cartridge and continue printing.
or A4-size plain paper. Ordering toner...
User's Guide - Page 152
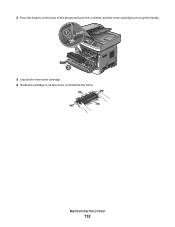
Maintaining the printer
152
2 Press the button on the base of the photoconductor kit, and then pull the toner cartridge out using the handle.
1 2
3 Unpack the new toner cartridge. 4 Shake the cartridge in all directions to distribute the toner.
User's Guide - Page 153
... clicks into place when correctly installed.
6 Close the front door.
5 Install the new toner cartridge by aligning the rollers on the toner cartridge with the arrows on the display. Replacing the photoconductor kit
The printer automatically notifies you should immediately order a new photoconductor kit. You can also see the status of the photoconductor kit by showing 84 PC...
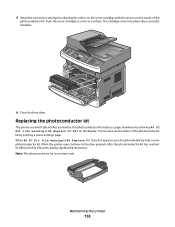
User's Guide - Page 154
... the front door by pressing the button on the left side of the printer and lowering the front door. 2 Pull the photoconductor kit and toner cartridge out of the printer as a unit by pulling on the toner cartridge
handle.
1
2 3
3 Place the unit on a flat, clean surface.
4 Press the ...
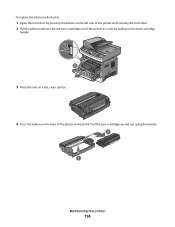
User's Guide - Page 155
...the unit with the tracks. Push the toner cartridge until it clicks into place.
7 Install the unit into the photoconductor kit by aligning the arrows on the toner cartridge with the arrows in the printer. Extended light...
Maintaining the printer
155
Warning-Potential Damage: When replacing a photoconductor kit, do not leave it will go.
Push the unit as far as it exposed to touch the...
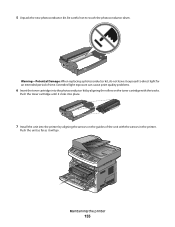
User's Guide - Page 156

Maintaining the printer
156 To reset the counter, see the
instruction sheet that came with the new photoconductor kit. Warning-Potential Damage: Resetting the photoconductor counter without replacing the photoconductor may damage your printer and void your warranty.
9 Close the front door. 8 After you replace the photoconductor kit, reset the photoconductor counter.
User's Guide - Page 158
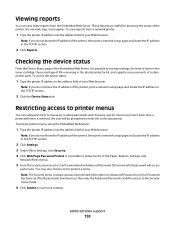
..., the level of toner in the toner cartridge, the percentage of life remaining in the photoconductor kit, and capacity measurements of certain printer parts.
Restricting access to printer menus
You can view some... your Web browser.
To view reports from the Embedded Web Server. Checking the device status
From the Device Status page of your Web browser. Note: If you do not know the IP...
User's Guide - Page 161
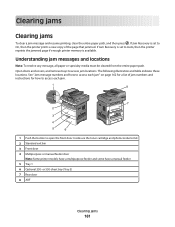
The following illustration and table indicate these locations. Inside are the toner cartridge and photoconductor kit. 2 Standard exit bin 3 Front door 4 Multipurpose or manual feeder door
Note: Some printer models have a multipurpose feeder and some have a manual feeder 5 Tray 1 6 Optional 250- ...
User's Guide - Page 162
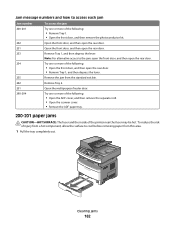
... paper jams
CAUTION-HOT SURFACE: The fuser and the inside of the following :
• Remove Tray 1. • Open the front door, and then remove the photoconductor kit.
Try one or more of the printer near the fuser may be hot. Open the multipurpose feeder door. Open the front door, and then open...
User's Guide - Page 182
... menu item is near exhaustion. Try one or more of the following:
• Replace the photoconductor kit. • Press to continue printing.
56 Standard USB port disabled
Try one or more of the...back on.
• Press to clear the message and continue printing.
58 Too many flash options installed
Try one or more of the following:
• The printer discards any data received through the...
User's Guide - Page 183
Troubleshooting
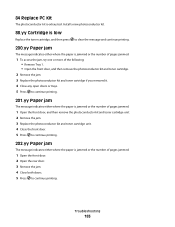
183 Install a new photoconductor kit.
88.yy Cartridge is low
Replace the toner cartridge, and then press to ...of the following: • Remove Tray 1. • Open the front door, and then remove the photoconductor kit and toner cartridge.
2 Remove the jam. 3 Replace the photoconductor kit and toner cartridge if you removed it. 4 Close any open doors or trays. 5 Press to continue...
User's Guide - Page 232
... 179 Toner is low 179 Unsupported USB device, please
remove 179 Unsupported USB hub, ...drive 60 from Macintosh 60 from Windows 60 installing printer software 25, 95 menu settings page...Lexmark packaging 38 Lexmark products 38 toner cartridges 38 WEEE statement 212 reducing a copy 73
Index
232
Remove packaging material, check 179 Remove paper from standard output bin 179 replacing
photoconductor kit...
Maintenance Guide - Page 7

... under warranty. Recommended toner cartridges and part numbers
Part Name Toner Cartridge High Yield Toner Cartridge
Regular Cartridge X264A21G X264H21G
Lexmark Return Program Cartridge X264A11G X264H11G
Ordering a photoconductor kit
The printer issues a message to redistribute toner.
3 Reinsert the cartridge and continue printing.
Note: All life estimates for information about...
Maintenance Guide - Page 10

...While the printer may continue to function properly after the photoconductor kit has reached its official end-of the
photoconductor kit. Maintaining the printer
10 Replacing the photoconductor kit
The printer automatically notifies you should immediately order a new photoconductor kit. Note: The photoconductor kit is one item only. 5 Install the new toner cartridge by aligning the rollers on the...
Maintenance Guide - Page 12
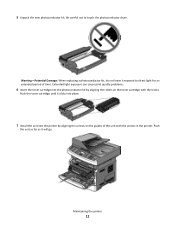
... the toner cartridge until it clicks into place.
7 Install the unit into the photoconductor kit by aligning the arrows on the toner cartridge with the...unit with the tracks. Push
the unit as far as it exposed to touch the photoconductor drum. Warning-Potential Damage: When replacing a photoconductor kit, do not leave it will go.
Extended light exposure can cause print quality problems...
Service Manual - Page 26
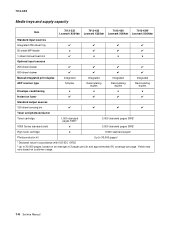
...trays and supply capacity
Item
7013-235
7013-432
7013-436
7013-43W
Lexmark X264dn Lexmark X363dn Lexmark X364dn Lexmark X364dw
Standard input sources Integrated 250-sheet tray 50-sheet MP feeder 1-...SWE¹ 3,500 standard pages SWE¹
High toner cartridge
x
9,000 standard pages¹
Photoconductor kit
Up to 30,000 pages²
¹ Declared value in accordance with ISO/IEC 19752
...
Service Manual - Page 33

...of radiation Liquid crystal display Liquid Crystal Module Laser Diode Light emitting diode Long edge feed Lexmark Embedded Solution (applications) Laser Scanning Unit Low Voltage Low voltage power supply Magenta Megabyte Motor Driver Control Multifunction Device Multifunction Printer Message handling Motor interface Millimeter Modified modified read Multipurpose feeder Modem ready Masked Read Only...
Service Manual - Page 73

...
Action
Make sure the toner cartridge and PC Kit are installed correctly and that the laser beam is plugged into the LVPS/HVPS. Inspect the fuser for signs of these voltages can be measured, but the contacts and continuities can be a result of page
FRU Photoconductor kit (not a FRU)
Fuser
Transfer roll
HVPS or...
Similar Questions


How To Reset The Message Of A Photoconductor Kit On Lexmark X264dn
(Posted by jadtrini 10 years ago)


Where To Buy Photoconductor Kit For X264dn Lexmark Printer
(Posted by mrwcjac 10 years ago)

Photoconductor Kit Price X364
What is the price for a photoconductor kit for the Lexmark X364 dn?
What is the price for a photoconductor kit for the Lexmark X364 dn?
(Posted by stcookmortgage 12 years ago)