
Lenovo U350 Support Question
Lenovo U350 Support Question
Find answers below for this question about Lenovo U350 - IdeaPad 2963 - Pentium 1.3 GHz.Need a Lenovo U350 manual? We have 3 online manuals for this item!
Question posted by ahaskin on May 21st, 2014
Installing Memory In A All In One C200
The person who posted this question about this Lenovo product did not include a detailed explanation. Please use the "Request More Information" button to the right if more details would help you to answer this question.
Current Answers
Answer #1: Posted by bengirlxD on May 21st, 2014 11:18 AM
bengirlxD

Member since:
November 5th, 2012 Points: 6,395,085

Member since:
November 5th, 2012 Points: 6,395,085
Here is the link to the ram memory installation guide provided by Lenovo:
http://support.lenovo.com/en_IN/product-and-parts/detail.page?&LegacyDocID=MIGR-67106
Feel free to resubmit the question if you didn't find it useful.
Answer #2: Posted by TechSupport101 on May 21st, 2014 12:25 PM
TechSupport101

Member since:
May 24th, 2013 Points: 12,171,305
Member since:
May 24th, 2013 Points: 12,171,305
Hi. To install a SO-DIMM, do the following:
Note: There are two types of the cover of the memory slot.
If the cover is secured with one screw:
- Turn off the computer; then disconnect the ac adapter and all cables from the computer.
- Close the computer display, and turn it over.
- Remove the battery.
- Remove the screw (1) on the cover of the memory slot, and remove the cover (2).
If the SO-DIMM is already in the memory slot, remove it to make room for the new one by pressing out on the latches on both edges of the socket at the same time. Be sure to save it for future use. - Find the notch on the side of the SO-DIMM you are installing.
Attention: To avoid damaging the SO-DIMM, do not touch its contact edge. - With the notched end of the SO-DIMM toward the right side of the socket, insert the SO-DIMM into the socket at an angle of about 20 degrees (1); then press it firmly (2).
- Pivot the SO-DIMM downward until it snaps into place.
- Make sure that the SO-DIMM is firmly fixed in the slot and cannot be moved easily.
- Replace the cover of the memory slot by aligning the front side of the cover first (1), and closing the cover (2). Then tighten the screw (3).
Attention: After adding or upgrading an SO-DIMM, be sure to close the cover of the memory slot before using your computer. Never use the computer with the cover open. - Reinstall the battery.
- Turn the computer over again, and reconnect the cables.
To make sure that the SO-DIMM is installed correctly and recognized, do as follows:
- Turn the computer on.
- While the initial screen is displayed, press F1. The BIOS Setup Utility screen opens. The "Memory" item shows the amount of memory you can utilize.
If the cover is secured with three screws:
- Turn off the computer; then disconnect the ac adapter and all cables from the computer.
- Close the computer display, and turn it over.
- Remove the battery.
- Remove the screws (1) on the cover of the memory slot, and remove the cover (2).
If the SO-DIMM is already in the memory slot, remove it to make room for the new one by pressing out on the latches on both edges of the socket at the same time. Be sure to save it for future use.
- Find the notch on the side of the SO-DIMM you are installing.
Attention: To avoid damaging the SO-DIMM, do not touch its contact edge. - With the notched end of the SO-DIMM toward the right side of the socket, insert the SO-DIMM into the socket at an angle of about 20 degrees (1); then press it firmly (2).
- Pivot the SO-DIMM downward until it snaps into place.
- Make sure that the SO-DIMM is firmly fixed in the slot and cannot be moved easily.
- Replace the cover of the memory slot by aligning the front side of the cover first (1), and closing the cover (2). Then tighten the screws (3).
Attention: After adding or upgrading an SO-DIMM, be sure to close the cover of the memory slot before using your computer. Never use the computer with the cover open. - Reinstall the battery.
- Turn the computer over again, and reconnect the cables.
To make sure that the SO-DIMM is installed correctly and recognized, do as follows:
- Turn the computer on.
- While the initial screen is displayed, press F1. The BIOS Setup Utility screen opens. The "Memory" item shows the amount of memory you can utilize.
Related Lenovo U350 Manual Pages
Windows 7 Upgrade Guide - Page 1
... Windows can upgrade your critical files and data to Widows® 7 while keeping previous files, settings, and programs. To perform in -place upgrade and clean install. This product key should
be upgraded*, you can be on the COA label supplied with this upgrade disc and looks similar to this upgrade •...
Windows 7 Upgrade Guide - Page 2

... Next.
5 On the Which type of Windows operating
system. The installation program should start automatically.
2 On the Install Windows page, click Install now. 3 On the Get important updates for the new operating system...desktop.
* To determine if your current Windows version can restore them after the installation. Insert the Windows® 7 upgrade disc into the optical drive. If you can ...
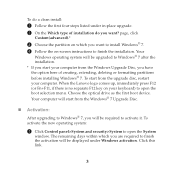
Windows 7 Upgrade Guide - Page 3
...
3 Choose the partition on which you are required to finish the installation. Click this link.
3 Your computer will be upgraded to Windows® 7 after the installation. * If you start your computer from the Windows® 7 ...optical drive as the first boot device. To do a clean install:
1 Follow the first four steps listed under Windows activation. To start from the Windows Upgrade Disc, ...
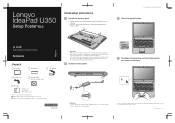
Lenovo IdeaPad U350 Setup Poster V2.0 - Page 1
....0_EN_p1
3 Press the power button
Read the safety notices and important tips in the unlocked position can damage the latch mechanism. Lenovo IdeaPad U350
Setup Poster V2.0
Initial setup instructions
1 Install the battery pack
1. Attempts to the AC adapter firmly, poor connections may contain items that the battery latch is in China
3
...
Lenovo IdeaPad U350 Setup Poster V2.0 - Page 2
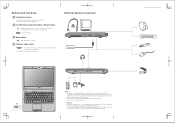
... more energy-saving than CCFL backlight technology. The LCD applied LED backlight technology which adopts LED as the light source and is not guaranteed. Lenovo IdeaPad U350 SP V2.0_EN_p2 Follow the instructions shipped with the devices when connecting them to your computer. *If OneKey Rescue System is only for
evaluating the...
Lenovo IdeaPad U350 UserGuide V1.0 - Page 3

... be any mistakes that the information provided in using this manual, you as our customer. We have you can get information on the system configuration, installation steps and the basic operating systems. We strongly recommend that of our equipment, the hardware and software components might need some uncontrolled omissions while printing...
Lenovo IdeaPad U350 UserGuide V1.0 - Page 4
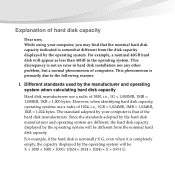
..., a nominal 40GB hard disk will be different from the disk capacity displayed by the operating system will appear as less than 40GB in hard disk installation nor any other problem, but a normal phenomenon of computers.
Lenovo IdeaPad U350 UserGuide V1.0 - Page 7
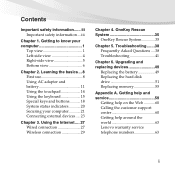
... 1 Left-side view 4 Right-side view 5 Bottom view 6
Chapter 2. Upgrading and replacing devices 49
Replacing the battery 49 Replacing the hard disk drive 51 Replacing memory 55
Appendix A. Getting to know your computer 21 Connecting external devices..... 23
Chapter 3.
Lenovo IdeaPad U350 UserGuide V1.0 - Page 12
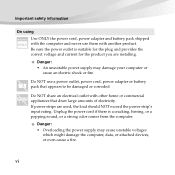
Be sure the power outlet is a cracking, hissing, or a popping sound, or a strong odor comes from the computer. If power strips are installing. Danger: • Overloading the power supply may damage your computer or cause an electric shock or fire. Important safety information
On using Use ONLY the ...
Lenovo IdeaPad U350 UserGuide V1.0 - Page 14

... Do NOT attempt to service a product yourself unless instructed to http://consumersupport.lenovo.com. Disconnect the attached power cords, battery pack, and all instructions when installing or replacing parts. viii For a list of service and support phone numbers, go to do so by the customer support center or your documentation. Closely...
Lenovo IdeaPad U350 UserGuide V1.0 - Page 19

...; Listening to music at high volume over extended periods of time may damage your computer
Right-side view
a bc
d
e
Memory card slot Insert memory cards (not supplied) here.
Note: For details, see "Using memory cards (not supplied)" on page 23.
Microphone jack Connects to an external microphone. Headphone jack Connects to USB devices...
Lenovo IdeaPad U350 UserGuide V1.0 - Page 21
...
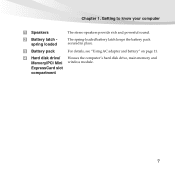
Battery latch spring loaded
Battery pack
Hard disk drive/ Memory/PCI Mini ExpressCard slot compartment
The stereo speakers provide rich and powerful sound.
The spring-loaded battery latch keeps the battery pack secured in place. Houses the computer's hard disk drive, main memory and wireless module.
7 For details, see "Using AC adapter...
Lenovo IdeaPad U350 UserGuide V1.0 - Page 52
... should I need to replace one of the following: the hard disk drive, memory, or the keyboard. See "Appendix B.
Customer replaceable units (CRUs)" on page...Chapter 1 and 2. See http://consumersupport.lenovo.com.
Where can I prevent problems with your computer, see Lenovo IdeaPad U350 Setup Poster. Use and care information" on page iii of my new computer?
How can find the detailed...
Lenovo IdeaPad U350 UserGuide V1.0 - Page 55
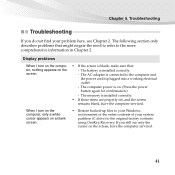
... to refer to the more comprehensive information in Chapter 2. Troubleshooting
Troubleshooting
If you still see Chapter 2. The battery is installed correctly.
• If these items are properly set, and the screen remains blank, have the computer serviced.
41 Chapter...factory contents using OneKey Recovery.
The AC adapter is on the screen. The memory is installed correctly. -
Lenovo IdeaPad U350 UserGuide V1.0 - Page 69
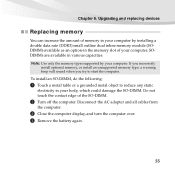
... of your body, which could damage the SO-DIMM. If you incorrectly
install optional memory, or install an unsupported memory type, a warning beep will sound when you try to reduce any static
electricity in your computer. To install an SO-DIMM, do the following:
1 Touch a metal table or a grounded metal object to start the computer...
Lenovo IdeaPad U350 UserGuide V1.0 - Page 71
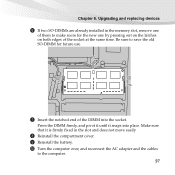
... save the old SO-DIMM for future use. Chapter 6. Upgrading and replacing devices
6 If two SO-DIMMs are already installed in the slot and does not move easily.
8 Reinstall the compartment cover. 9 Reinstall the battery. 0 Turn the computer... DIMM firmly, and pivot it until it is firmly fixed in the memory slot, remove one by pressing out on the latches on both edges of the DIMM into place.
Lenovo IdeaPad U350 UserGuide V1.0 - Page 72
Upgrading and replacing devices
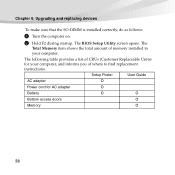
To make sure that the SO-DIMM is installed correctly, do as follows:
1 Turn the computer on. 2 Hold F2 during startup. The following table provides a list of CRUs (Customer Replaceable Units) for AC adapter
O
Battery
O
O
Bottom access doors
O
Memory
O
58 The BIOS Setup Utility screen opens. Chapter 6.
The
Total...
Lenovo IdeaPad U350 UserGuide V1.0 - Page 83
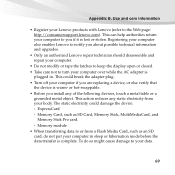
... card, do so might cause damage to you install any static electricity from a Flash Media Card, such as SD Card, Memory Stick, MultiMediaCard, and
Memory Stick Pro card. - Use and care information
• Register your computer to your data.
69 This could damage the device. - ExpressCard - Memory module • When transferring data to notify...
Lenovo IdeaPad U350 UserGuide V1.0 - Page 118
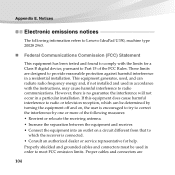
...digital device, pursuant to Part 15 of the following information refers to Lenovo IdeaPad U350, machine type 20028 2963.
„ Federal Communications Commission (FCC) Statement
This equipment has been ... in a particular installation. This equipment generates, used, and can radiate radio frequency energy and, if not installed and used in a residential installation. Appendix E. Notices...
Lenovo IdeaPad U350 UserGuide V1.0 - Page 131
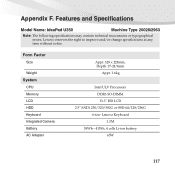
Appendix F. Features and Specifications
Model Name: IdeaPad U350
Machine Type 20028/2963
Note: The following specifications may contain technical inaccuracies or typographical errors. Lenovo reserves the right to improve and/or change specifications at any time without notice.
Form Factor Size
Weight System
CPU Memory LCD HDD Keyboard Integrated Camera Battery AC Adapter
Appr. 328...
Similar Questions

How To Install Memory For Lenovo Ideapad Tablet A1-07
(Posted by fliana 9 years ago)

Servis Manual For Lenovo Ideapad U350
I am looking for a free hardware manual for notebook IdeaPad U350. Notebook overhead itself, (probab...
I am looking for a free hardware manual for notebook IdeaPad U350. Notebook overhead itself, (probab...
(Posted by mrst1 10 years ago)

How Can I Install Onekey Theater Software On My Pc
(Posted by drsaru143 12 years ago)

What Is The Maxium Ddr3 Capacity For Lenovo 3000 H220 10028?
Why I cannot add a 4G DDR3 1333 to Lenovo 3000 H220 10028? The machine cannot boot!
Why I cannot add a 4G DDR3 1333 to Lenovo 3000 H220 10028? The machine cannot boot!
(Posted by stemcell 12 years ago)