Lenovo IdeaPad Z560 Support Question
Lenovo IdeaPad Z560 Support Question
Find answers below for this question about Lenovo IdeaPad Z560.Need a Lenovo IdeaPad Z560 manual? We have 6 online manuals for this item!
Question posted by keimu on February 16th, 2014
How To Remove Harddrive From Lenovo Ideapad Z560
The person who posted this question about this Lenovo product did not include a detailed explanation. Please use the "Request More Information" button to the right if more details would help you to answer this question.
Current Answers
Related Lenovo IdeaPad Z560 Manual Pages
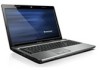
Lenovo IdeaPad Z460/Z465/Z560/Z565 UserGuide V1.0 - Page 42
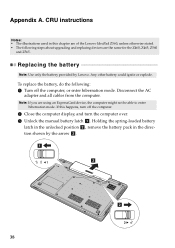
Any other battery could ignite or explode.
If this chapter are of the Lenovo IdeaPad Z560, unless otherwise stated. • The following : 1 Turn off the computer.
2 Close the... mode. Note: If you are the same for the Z460, Z465, Z560
and Z565. Holding the spring-loaded battery
latch in the unlocked position b , remove the battery pack in this happens, turn the computer over. 3 Unlock ...
Lenovo IdeaPad Z560/Z565 Hardware Maintenance Manual - Page 3
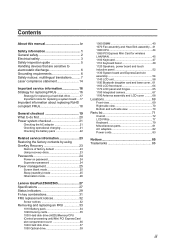
... password 24 Power management 25 Screen blank mode 25 Sleep (standby) mode 25 Hibernation mode 26
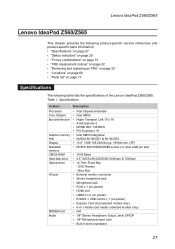
Lenovo IdeaPad Z560/Z565 27 Specifications 27 Status indicators 29 Fn key combinations 31 FRU replacement notices 32
Screw notices 32 Removing and replacing an FRU 33
1010 Battery pack 34 1020 Dummy cards 35 1030 Hard disk...
Lenovo IdeaPad Z560/Z565 Hardware Maintenance Manual - Page 25
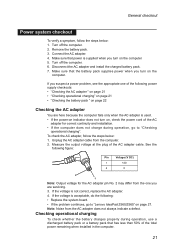
... 2. Checking operational charging
To check whether the battery charges properly during operation, go to "Lenovo IdeaPad Z560/Z565" on , check the power cord of the AC
adapter for the AC adapter pin ...8226; If the problem continues, go to "Checking
operational charging". Connect the AC adapter. 4.
Remove the battery pack. 3. To check the AC adapter, follow the steps below : 1. Measure ...
Lenovo IdeaPad Z560/Z565 Hardware Maintenance Manual - Page 31
DVD Rambo - Lenovo IdeaPad Z560/Z565
Lenovo IdeaPad Z560/Z565
This chapter presents the following table lists the specifications of the Lenovo IdeaPad Z560/Z565: Table 1. Blue Ray • External monitor connector...combinations" on page 31 •• "FRU replacement notices" on page 32 •• "Removing and replacing an FRU" on page 33 •• "Locations" on page 69 •&#...
Lenovo IdeaPad Z560/Z565 Hardware Maintenance Manual - Page 37
... computer until you have made sure that pertain to observe the following general rules: 1. Lenovo IdeaPad Z560/Z565
Removing and replacing an FRU
This section presents exploded figures with one hand or using an electrostatic discharge (ESD) strap (P/N 6405959) to remove and replace the FRU. An untrained person runs the risk of the interconnecting cables...
Lenovo IdeaPad Z560/Z565 Hardware Maintenance Manual - Page 39
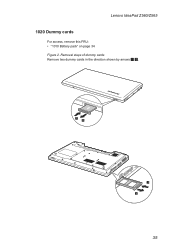
Removal steps of dummy cards
Remove two dummy cards in the direction shown by arrows 1 2.
1 2
1 2
35 Lenovo IdeaPad Z560/Z565 1020 Dummy cards
For access, remove this FRU: •• "1010 Battery pack" on page 34 Figure 2.
Lenovo IdeaPad Z560/Z565 Hardware Maintenance Manual - Page 41
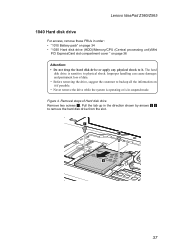
... drop the hard disk drive or apply any physical shock to remove the hard disk drive from the slot.
1 1
2
37 Removal steps of data. • Before removing the drive, suggest the customer to physical shock. Lenovo IdeaPad Z560/Z565
1040 Hard disk drive
For access, remove these FRUs in order: •• "1010 Battery pack" on page...
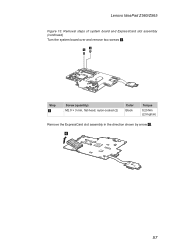
Lenovo IdeaPad Z560/Z565 Hardware Maintenance Manual - Page 43
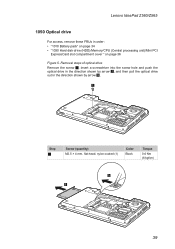
... optical drive
Remove the screw 1, insert a screwdriver into the screw hole and push the optical drive ...1030 Hard disk drive (HDD)/Memory/CPU (Central processing unit)/Mini PCI
ExpressCard slot compartment cover " on page 36
Figure 5. Lenovo IdeaPad Z560/Z565
1050 Optical drive
For access, remove these FRUs in the direction shown by arrow 3.
1
Step
1
Screw (quantity) M2.5 × 4 mm, flat-head...
Lenovo IdeaPad Z560/Z565 Hardware Maintenance Manual - Page 45
..., flat-head, nylon-coated (5)
Color Black
M2.0 × 3.2 mm, with spring, nylon-coated (4) Silver
Torque
0.6 Nm (6 kgfcm) 2.0~2.5 Nm (2.0~2.5 kgfcm)
41
Lenovo IdeaPad Z560/Z565
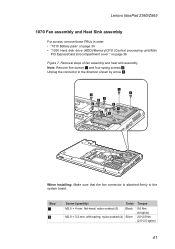
1070 Fan assembly and Heat Sink assembly
For access, remove these FRUs in the direction shown by arrow 3.
1
1 1
1 2
2
2
1
2
3
When installing: Make sure that the fan connector is attached firmly to...
Lenovo IdeaPad Z560/Z565 Hardware Maintenance Manual - Page 47
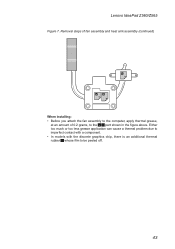
... additional thermal rubber whose film to the a b part shown in the figure above. Removal steps of fan assembly and heat sink assembly (continued)
c
a
b
When installing:
•• Before you attach the fan assembly to the computer, apply thermal grease, at an amount of 0.2 grams, to be peeled off.
43 Lenovo IdeaPad Z560/Z565
Figure 7.
Lenovo IdeaPad Z560/Z565 Hardware Maintenance Manual - Page 49
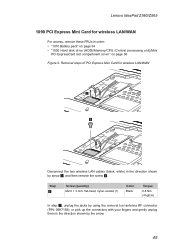
... PCI Express Mini Card for wireless LAN/WAN
For access, remove these FRUs in the direction shown by arrow 1, and then remove the screw 2.
Lenovo IdeaPad Z560/Z565 1090 PCI Express Mini Card for wireless LAN/WAN
1
2
Disconnect the two wireless LAN cables (black, white) in the direction shown
by the arrow.
...
Lenovo IdeaPad Z560/Z565 Hardware Maintenance Manual - Page 51
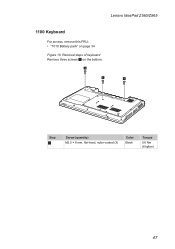
Removal steps of keyboard
Remove three screws 1 on page 34
Figure 10. Lenovo IdeaPad Z560/Z565
1100 Keyboard
For access, remove this FRU: •• "1010 Battery pack" on the bottom.
1
1
1
Step
1
Screw (quantity) M2.5 × 8 mm, flat-head, nylon-coated (3)
Color Black
Torque
0.6 Nm (6 kgfcm)
47
Lenovo IdeaPad Z560/Z565 Hardware Maintenance Manual - Page 53
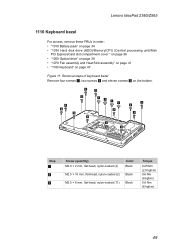
Lenovo IdeaPad Z560/Z565
1110 Keyboard bezel
For access, remove these FRUs in order: •• "1010 Battery pack" on page 34 •• "1030 Hard disk ...
M2.5 × 8 mm, flat-head, nylon-coated (11) Black
Torque
0.25 Nm (2.5 kgfcm) 0.6 Nm (6 kgfcm) 0.6 Nm (6 kgfcm)
49 Removal steps of keyboard bezel
Remove four screws 1, two screws 2 and eleven screws 3 on page 47
Figure 11.
Lenovo IdeaPad Z560/Z565 Hardware Maintenance Manual - Page 55
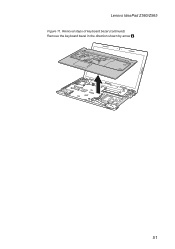
Lenovo IdeaPad Z560/Z565
Figure 11. Removal steps of keyboard bezel (continued)
Remove the keyboard bezel in the direction shown by arrow 8.
2 8
51
Lenovo IdeaPad Z560/Z565 Hardware Maintenance Manual - Page 57
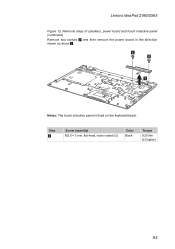
Removal steps of speakers, power board and touch inductive panel (continued)
Remove two screws 2 and then remove the power board in the direction shown by arrow 3.
2 2
3
Notes: The touch inductive panel is fixed on the keyboard bezel. Step
2
Screw (quantity) M2.0 × 3 mm, flat-head, nylon-coated (2)
Color Black
Torque
0.25 Nm (2.5 kgfcm)
53 Lenovo IdeaPad Z560/Z565
Figure 12.
Lenovo IdeaPad Z560/Z565 Hardware Maintenance Manual - Page 59

Lenovo IdeaPad Z560/Z565
Figure 13. Step
2
Screw (quantity) M2.5 × 4 mm, flat-head, nylon-coated (4)
Color Black
Torque
0.6 Nm (6 kgfcm)
55 Removal steps of system board and ExpressCard slot assembly (continued)
Remove four screws 2 and detach a connector in the direction shown by arrow 3.
2 2
2 2
3
When installing: Make sure that the connector is attached firmly.
Lenovo IdeaPad Z560/Z565 Hardware Maintenance Manual - Page 61
Removal steps of system board and ExpressCard slot assembly (continued)
Turn the system board over and remove two screws 5.
5 5
Step
5
Screw (quantity) M2.0 × 3 mm, flat-head, nylon-coated (2)
Color Black
Torque
0.25 Nm (2.5 kgfcm)
Remove the ExpressCard slot assembly in the direction shown by arrow 6.
6
57 Lenovo IdeaPad Z560/Z565
Figure 13.
Lenovo IdeaPad Z560/Z565 Hardware Maintenance Manual - Page 65
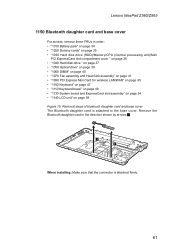
...bluetooth daughter card and base cover The Bluetooth daughter card is attached firmly.
61 Remove the
Bluetooth daughter card in order: •• "1010 Battery pack" ... page 54 •• "1140 LCD unit" on page 58 Figure 15. Lenovo IdeaPad Z560/Z565
1150 Bluetooth daughter card and base cover
For access, remove these FRUs in the direction shown by arrows 1.
1 1
When installing: Make ...
Lenovo IdeaPad Z560/Z565 Hardware Maintenance Manual - Page 69
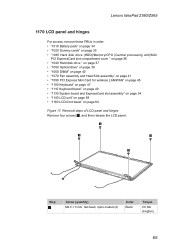
... then release the LCD panel.
1
1
1
1
Step
1
Screw (quantity) M2.5 × 5 mm, flat-head, nylon-coated (4)
Color Black
Torque
0.6 Nm (6 kgfcm)
65 Lenovo IdeaPad Z560/Z565
1170 LCD panel and hinges
For access, remove these FRUs in order: •• "1010 Battery pack" on page 34 •• "1020 Dummy cards" on page 35 •...
Lenovo IdeaPad Z560/Z565 Hardware Maintenance Manual - Page 71

... make sure the connector is attached firmly. Detach the connector in the figure above.
67 Removal steps of integrated camera Note: The integrated camera is stuck on page 65 Figure 18.
Lenovo IdeaPad Z560/Z565
1180 Integrated camera
For access, remove these FRUs in order: •• "1010 Battery pack" on page 34 ••...
Similar Questions


How Do I Restore My Lenovo Ideapad Z560 To Factory Settings?
(Posted by robbirebel 10 years ago)

Lenovo Ideapad Z560 Is Suddenly Turned Off And Won't Turn On
Suddenly, my lenovo ideapad turned off and won't turn on. I unpluged the ac adapter and took off the...
Suddenly, my lenovo ideapad turned off and won't turn on. I unpluged the ac adapter and took off the...
(Posted by mohhanan 11 years ago)