LG L1918S Support Question
LG L1918S Support Question
Find answers below for this question about LG L1918S.Need a LG L1918S manual? We have 1 online manual for this item!
Question posted by welmarreitz on July 30th, 2021
Osd Locked Message Pops Up And Stays On Screen Intermittently.
Good day.The OSD LOCKED message pops up and stays intermittently for long periods of time on my LG FLATRON L1918 S monitor.Keeping the On/Off button or Menu button pressed for 15 seconds as I have read,does not remove the message permanently.As soon as I release the button,the message is back.Please advise me on how to solve this problem?My email address is: [email protected] you very much.Have a nice day.Kind regards,W.Reitz
Current Answers
Answer #1: Posted by SonuKumar on July 30th, 2021 12:26 AM
SonuKumar

Member since:
May 9th, 2021 Points: 16,619,310

Member since:
May 9th, 2021 Points: 16,619,310
What does OSD locked mean on my LG monitor?
OSD LOCKED/UNLOCKED. This function allows you to lock the current control settings, so that these settings are not inadvertently changed. To lock the OSD settings, press and hold the MENU buttonfor several seconds.
https://forums.techguy.org/threads/osd-locked-notification-keeps-popping-up-continuously.1194607/
Please respond to my effort to provide you with the best possible solution by using the "Acceptable Solution" and/or the "Helpful" buttons when the answer has proven to be helpful.
Regards,
Sonu
Your search handyman for all e-support needs!!
Related LG L1918S Manual Pages
User Guide - Page 1

User's Guide
L1918S
LCD Computer Monitor
Make sure to read the Important Precautions before using this product. Have the model and serial number ready when calling for furture reference.
Keep the User's Guide(CD) in an accessible place for support.
User Guide - Page 2
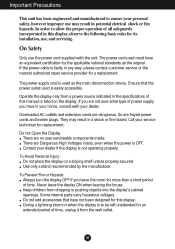
...power source indicated in the specifications of time. If you are not sure what type of power supply you leave the room for more than a short period of this manual or listed on ... applicable national standards as the main disconnection device. Some internal parts carry hazardous voltages.
Keep children from the wall outlet. During a lightning storm or when the display is easily...
User Guide - Page 3
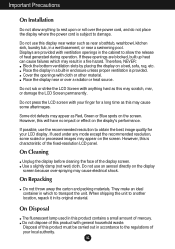
...tub, in a fire hazard. Do not press the LCD screen with your finger for your local authority. However, this will have no impact or effect on the screen. Some dot defects may appear as this...are blocked, built-up heat can cause failures which to obtain the best image quality for a long time as Red, Green or Blue spots on the display's performance. If possible, use this product ...
User Guide - Page 4

...REAR REAR
Connecting the Display
Before setting up carefully and face the front side
Important Do not remove and re-install the stand frequently, it "click".
3. Assemble the Stand Body into the... Stand Body in the picture.
Connecting the stand 1.
A3
REAR FRONT REAR FRONT Place the monitor with its front facing downward on a soft cloth. 2. Assemble the Stand Base(Front, Rear) into...
User Guide - Page 5

Pull out the Stand to remove.
Place the monitor face down on a flat surface. Change your hold on the product as it follows and turn the Stand Base in the arrow
direction until you ...
User Guide - Page 6
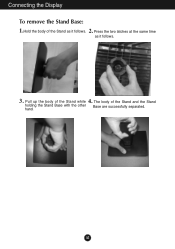
Press the two latches at the same time
as it follows.
3. The body of the Stand while 4. A5 hand. Connecting the Display To remove the Stand Base: 1. 2. Pull up the body of the Stand and the Stand holding the Stand Base with the other Base are successfully separated.
Hold the body of the Stand as it follows.
User Guide - Page 7

... recommended that in order to maintain an ergonomic and comfortable viewing position, the forward tilt angle of the monitor should not exceed 5 degrees. A6
Ergonomic It is turned off.
Adjust the position of the screen, do not put your display 1.
Tilt Range : -5˚~20˚ 20
Warning: When adjusting the angle of...
User Guide - Page 8

... on the supplied cable to a 15 pin 2 row connector.
4. Connect the signal cable.
Press button on the side panel of the rear view. When monitor power is turned on, the 'Self Image Setting Function' is needed to change the 15 pin high density (3 row) D-sub VGA connector on the OSD adjustment menu. your computer. 2. NOTE This is...
User Guide - Page 9

... types etc).
• DAY : Bright ambient illumination • NIGHT : Dark ambient illumination • TEXT : For text images (Word processing etc.) • MOVIE : For animation images in the On Screen Display. Buttons
Use these buttons to enter or exit the On Screen Display. Press and hold the MENU button for several seconds. The message "OSD LOCKED" should appear. Control Panel...
User Guide - Page 10

... or off. This will automatically adjust your display settings, always press the AUTO/SET button before entering the On Screen Display(OSD). A9
AUTO IMAGE ADJUSTMENT When adjusting your display image to amber. If the display is 19 inch monitor : 1280 x 1024
Power Button
Use this button to enter a selection in Sleep Mode (Energy Saving), this indicator...
User Guide - Page 11
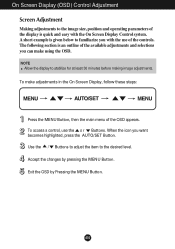
... item to stabilize for at least 30 minutes before making image adjustments. On Screen Display (OSD) Control Adjustment Screen Adjustment
Making adjustments to familiarize you can make adjustments in the On Screen Display, follow these steps:
Press the MENU Button, then the main menu of the OSD appears. A short example is given below to the image size, position and...
User Guide - Page 12

... and Adjustment
The following table describes all the On Screen Display control, adjustment, and setting menus.
A11 Main menu
Sub menu
Reference
PICTURE BRIGHTNESS
CONTRAST
COLOR
GAMMA PRESET sRGB
6500K
9300K
RED
GREEN
BLUE
POSITION HORIZONTAL VERTICAL
TRACKING CLOCK PHASE
SHARPNESS
SETUP
LANGUAGE
OSD
HORIZONTAL
POSITION VERTICAL
To adjust the brightness, contrast and...
User Guide - Page 13

A12
Press the MENU Button, then the main menu of selecting and adjusting an item using the OSD system. Listed below are the icons, icon names, and icon descriptions of the all items shown on the monitor may differ from the manual.
On Screen Display(OSD) Selection and Adjustment
You were introduced to the procedure of the OSD appears. Menu Name...
User Guide - Page 14
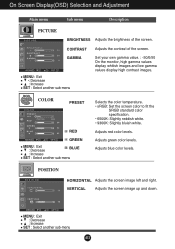
.... CONTRAST Adjusts the contrast of the screen.
GAMMA
MENU : Exit : Decrease : Increase
SET : Select another sub-menu
Set your own gamma value. : -50/0/50 On the monitor, high gamma values display whitish images and low gamma values display high contrast images.
On Screen Display(OSD) Selection and Adjustment
Main menu
Sub menu
Description
PICTURE
PICTURE
BRIGHTNESS Adjusts the...
User Guide - Page 15

... BALANCE
If the output of the video card is adjusted to provide the optimal image.
Press the button to set the power indicator light on the screen. PHASE Adjusts the focus of the display.
On Screen Display(OSD) Selection and Adjustment
Main menu
Sub menu
Description
TRACKING
TRACKING
CLOCK
Adjusts any
horizontal noise and clear or sharpen...
User Guide - Page 16

... moving the mouse or pressing any time by pushing the MENU button for service. Troubleshooting
Check the following before calling for several seconds: the message "OSD UNLOCKED" will appear. G Do you see if the power cord is not connected.
See the
'Specifications' section of the display.
properly to turn on the screen?
• This message appears when the signal...
User Guide - Page 17

....
• Check if the signal cable is properly connected and use a screwdriver to the ideal setting. G On the screen background, vertical bars or stripes are not clearly portrayed.
• Press the AUTO/SET button to automatically adjust your display image to fasten if necessary.
• Make sure the video card is mono or...
User Guide - Page 18

... you installed the display driver?
• Be sure to check if the video card supports Plug&Play function. Or, you see an "Unrecognized monitor, Plug&Play (VESA DDC) monitor found" message?
• Make sure to install the display driver from our web site: http://www.lge.com. G Have you installed the display driver?
User Guide - Page 21
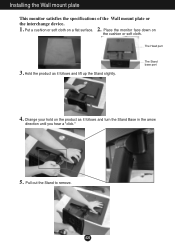
... the specifications of the Wall mount plate or
the interchange device.
1. 2. A20 Place the monitor face down on a flat surface.
The Stand base part
4. Pull out the Stand to remove. Hold the product as it follows and lift up the Stand slightly. The Head part
3. Change your hold on the product as...
User Guide - Page 22

... Slot Connected to the installation guide for more details, which is provided when Wall mount plate is connectable with Wall mount plate. Please refer to a locking cable that can be purchased separately at most computer stores
A21 Installing the Wall mount plate 6.
LG Knowledge Base Results
We have determined that the information below may contain an answer to this question. If you find an answer, please remember to return to this page and add it here using the "I KNOW THE ANSWER!" button above. It's that easy to earn points!-
Rear Projection Color TV Instruction Manual: Basic Setup and Operation: Sleep Timer/Key Lock Setup - LG Consumer Knowledge Base
... select On or Off. 4. Press the menu button and then use up so that it was last set to TV viewing. • Press the right arrow and then up /down buttons to select the desired sleep time. Press the exit button to return to on, the display Key lock appears on the screen if any button on from the number of... -
Mobile Phones: Lock Codes - LG Consumer Knowledge Base
...removed. However, if this code is not at least 40 seconds after which the Align/Calibration screen will all for when the phone is used to access the Clear Storage menu, which the SIM card will become PERMANENTLY LOCKED...PIN has been entered incorrectly 3 times in sequence and KEEPING them all be erased from the PHONE memory and the lock code will remove all the information from the ... -
Rear Projection Color TV Instruction Manual: Fine Tuning Adjustment, Signal Reception Booster,... - LG Consumer Knowledge Base
... menu. 2. Press the right arrow and then use up /down buttons to on the screen ...release the memorized fine tuning, reprogram the finetuned channel with EZ Scan or Manual Program. • Set booster to select the desired channel number. 5. If a finely-tuned channel is good, do not set Booster to select Manual 3. Press the menu button and then use up /down buttons...
Similar Questions

How Can I Turn Off Energy Saver?
Monitor Keeps Going Into Sleep Mode
when I'm on computer for extended time, monitor shuts down and goes into energy saving mode
when I'm on computer for extended time, monitor shuts down and goes into energy saving mode
(Posted by bernie66 11 years ago)

Monitor Keeps Going To Black And Coming Back On. What Is Going On?
There is power to the monitor and the power light is showing on but the monitor keeps going blackand...
There is power to the monitor and the power light is showing on but the monitor keeps going blackand...
(Posted by bill31270 11 years ago)

When I Turn The Monitor On It Goes Off A Few Seconds Later
(Posted by vivianoverandout 12 years ago)

My Monitor Keeps Flashing D Sub Power Save Mode. How Do I Get It To Stop?
(Posted by swerrve76 12 years ago)

We Have An Lg Flatron W2361vg Monitor Keeps Going In Power Save Mode.
Message - 26/6872 We have an LG Flatron W23...
Message - 26/6872 We have an LG Flatron W23...
(Posted by pitzer 12 years ago)