Kodak ESP Office 6150 Support Question
Kodak ESP Office 6150 Support Question
Find answers below for this question about Kodak ESP Office 6150 - All-in-one Printer.Need a Kodak ESP Office 6150 manual? We have 5 online manuals for this item!
Question posted by rmaLa on February 1st, 2014
How To Remove Printhead Kodak 6150
The person who posted this question about this Kodak product did not include a detailed explanation. Please use the "Request More Information" button to the right if more details would help you to answer this question.
Current Answers
Answer #1: Posted by TommyKervz on February 1st, 2014 5:14 AM
TommyKervz

Member since:
January 10th, 2013 Points: 17,776,813

Member since:
January 10th, 2013 Points: 17,776,813
Greetings.
To replace the printhead in your all-in-one printer (Go here for figures):
- Make sure the printer is on.
Important: If you have an ESP 3250 or ESP 5250 printer, go to step 2. For all other models go to step 5. - On the printer control panel, press Home.
- Select Maintenance, then press OK.
- Select Install Ink Cartridges, then press OK.
If Install Ink Cartridges is not an available selection, upgrade the firmware.- Locate and select the firmware download for your printer.
- Follow the instructions to install the firmware.
- Lift the access door and wait for the carriage to move to the access position.
- Remove the black and color ink cartridges, and set them aside.
- Remove the the printhead from the carriage.
- Remove the new printhead from its bag.
- Remove the orange cap(s).
Important: Click here to watch a video for your printer. - Install the new printhead into the carriage.
- Push firmly against the target label on the printhead until you hear a loud click.
- Insert the color ink cartridge into the printhead, and press down until you hear the cartridge click into place.
- Insert the black ink cartridge into the printhead, and press down until you hear the cartridge click into place.
- Close the access door.
Important: ESP 3 all-in-one printers do not require calibration. - Follow the instructions on the LCD to calibrate your printer.
Important: Be sure to use KODAK Ink Cartridges. Your all-in-one printer is designed to work with KODAK Ink Cartridges. Kodak is not responsible for the compatibility or performance of either non-Kodak brand ink cartridges or refilled ink cartridges. You can purchase KODAK Ink Cartridges from the KODAK Store.
Related Kodak ESP Office 6150 Manual Pages
User guide - Page 15
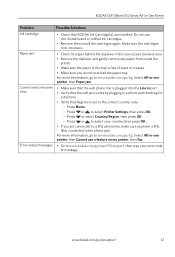
...you are installed. KODAK ESP Office 6100 Series All-in the tray is free of tears or creases. • Make sure you do not overload the paper tray. Press to select Printer Settings, then press...in -one printer, then Cannot use non-Kodak brand or refilled ink cartridges.
• Remove, then install the cartridges again. Cannot send or receive a fax
• Make sure that KODAK Ink Cartridge(s)...
Extended user guide - Page 17

...an ESP Office 6150 printer), you are connecting to another KODAK All-in-One Printer
If you are connecting to a newer model printer (for example, you already have an ESP 7 printer and now you must install the software for the newer model.
On a computer with WINDOWS OS:
1. Click Print & Fax. 3. KODAK ESP Office 6100 Series All-in-One Printer
Connecting to another ESP Office 6150 printer or...
Extended user guide - Page 27

Left paperedge guide Front paper-edge guide
www.kodak.com/go/aiosupport
21 Make sure the left . 4. Remove any paper from the tray. 3. KODAK ESP Office 6100 Series All-in-One Printer
Loading photo paper
The paper tray capacity is to the far left paper-edge guide is 40 sheets of photo paper. Move the front paper...
Extended user guide - Page 29

... the paper tray. Make sure the left . 4. To load envelopes:
1. Remove any paper from the tray. 3. Left paperedge guide Front paper-edge guide
www.kodak.com/go/aiosupport
23
Move the front paper-edge guide forward. KODAK ESP Office 6100 Series All-in-One Printer
Loading envelopes
The paper tray capacity is to the far left...
Extended user guide - Page 31
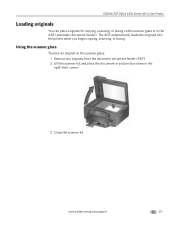
KODAK ESP Office 6100 Series All-in-One Printer
Loading originals
You can place originals for copying, scanning, or faxing on the scanner glass: 1. Remove any originals from the automatic document feeder (ADF). 2. The ADF automatically feeds the originals into the printer when you begin copying, scanning, or faxing. Close the scanner lid. www.kodak.com/go/aiosupport...
Extended user guide - Page 34
...Eastman Kodak Company ESP Office 6100
Series AiO is
selected, then click Properties. 4.
Open the document you want to print, then select File > Print. 3. In the Print dialog box, make sure that the printer ... not work on bar-coded photo paper (the bar code is on your computer and printer LCD, remove the
printed pages from a computer with MAC OS using the duplexer:
1.
When a message...
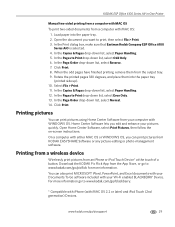
Extended user guide - Page 35
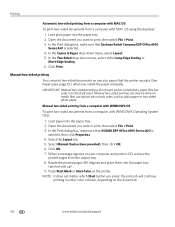
...KODAK Pic Flick App from a computer with MAC OS:
1. For more information. KODAK ESP Office 6100 Series All-in-One Printer...
Manual two-sided printing from a computer with MAC OS
To print two-sided documents from the App Store, or go to www.kodak.com/go/picflick for more information go to www.kodak... Wi-Fi-enabled BLACKBERRY Device. In the Copies &...
Extended user guide - Page 47
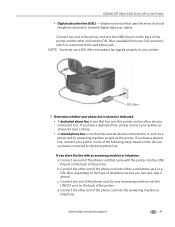
... is connected to the same phone line.
Connect one that came with an answering machine or telephone: a. KODAK ESP Office 6100 Series All-in one end of the phone cord for step 2 above ). If you have a ...phone cord into the LINE IN port on the devices you have connected to the wall phone jack. Connect the other end of the printer.
Connect one of the following ways, based ...
Extended user guide - Page 59
... all times to help prevent damage to www.kodak.com/go/recycle. www.kodak.com/go to the printhead. If you use harsh or abrasive cleaners on the printer or any of its parts.
• To clean the printer, wipe the outside with the printer.
8 Maintaining Your Printer
Your printer requires little maintenance.
Do not use a power strip...
Extended user guide - Page 61

... (rubbing)
alcohol on a soft cloth, then wipe thoroughly with a cloth moistened with mild soap and warm water.
5. www.kodak.com/go/aiosupport
55 Dry the document backing with a lint-free cloth. 4.
Dry the glass with a chamois or soft cloth. KODAK ESP Office 6100 Series All-in the printer. When you finish cleaning, plug in -One...
Extended user guide - Page 63
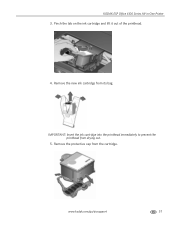
Pinch the tab on the ink cartridge and lift it out of the printhead.
4.
IMPORTANT: Insert the ink cartridge into the printhead immediately to prevent the printhead from the cartridge. Remove the protective cap from drying out.
5. KODAK ESP Office 6100 Series All-in-One Printer 3. www.kodak.com/go/aiosupport
57 Remove the new ink cartridge from its bag.
Extended user guide - Page 65

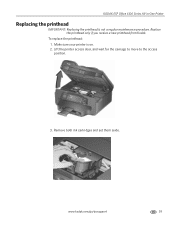
... maintenance procedure. Lift the printer access door, and wait for the carriage to move to the access position.
3. To replace the printhead: 1. www.kodak.com/go/aiosupport
59
Remove both ink cartridges and set them aside.
KODAK ESP Office 6100 Series All-in-One Printer
Replacing the printhead
IMPORTANT: Replacing the printhead is on. 2. Replace the printhead only if you receive...
Extended user guide - Page 67

www.kodak.com/go/aiosupport
61 Remove the two plastic protective shields.
8. Place the new printhead into the carriage.
9.
Push firmly against the target label of the printhead until you hear a loud snap. KODAK ESP Office 6100 Series All-in-One Printer 7.
Extended user guide - Page 90
...Printer access door, 1 performance, monitoring and adjusting, 64 settings, configuring, 4 supplies
maintaining, 53 recycling, 53 Printhead removing, 60 replacing, 59 Printing, 27 documents, 27 from a wireless device,...Removing the printhead, 60 Replacing ink cartridges, 56 Rings to answer, 43
S
Safety information, 76 Scan button, 2 Scanner glass, 1
cleaning, 54 Scanner lid, 1 Scanning
84
www.kodak...
Extended User Guide - Page 35
KODAK ESP Office 6100 Series All-in-One Printer
Manual two-sided printing from a computer with MAC OS
To print two-sided documents from a computer with your Wi-Fi enabled BLACKBERRY Device. In the Pages to Print drop-down list, select Odd Only. 6. In the Page Order drop-down list, select Paper Handling. 5. When the odd...
Extended User Guide - Page 63

Pinch the tab on the ink cartridge and lift it out of the printhead.
4.
IMPORTANT: To prevent the printhead from the cartridge. www.kodak.com/go/aiosupport
57 Remove the protective cap from drying out, insert the ink cartridge into the printhead immediately.
5. KODAK ESP Office 6100 Series All-in-One Printer 3. Remove the new ink cartridge from its bag.
Extended User Guide - Page 65
Remove both ink cartridges and set them aside.
To replace the printhead: 1. www.kodak.com/go/aiosupport
59 Lift the printer access door, and wait for the carriage to move to the access position.
3. Replace the printhead only if you receive a new printhead from Kodak. KODAK ESP Office 6100 Series All-in-One Printer
Replacing the printhead
IMPORTANT: Replacing the printhead is on. 2. ...
Extended User Guide - Page 67

Remove the two plastic protective caps.
8. Place the new printhead into the carriage.
9.
www.kodak.com/go/aiosupport
61 Push firmly against the target label of the printhead until you hear a loud snap. KODAK ESP Office 6100 Series All-in-One Printer 7.
Extended User Guide - Page 92

... hostname, 9 maintaining, 53-65 settings, configuring, 4 supplies recycling, 53
printer connection, changing USB to Ethernet, 14 USB to wireless, 12
printhead, 1 removing, 60 replacing, 59-63
printing, 27-29 documents, 27 from a wireless device, 29 from BLACKBERRY Device, 29 from iPhone, 29 from iPod Touch Device, 29 pictures, 29 speed, 70 two-sided documents automatically, 27...
Extended User Guide - Page 93
removing printhead, 60 replacing ink cartridges...42-45 scanning, 39 software Documents To Go, 29 for BLACKBERRY Device, 29 for iPhone, 29 for iPod Touch Device, 29 Home Center Pic Flick App, 29 support, 73 updating... print quality, 67 printer not detected, 66 printhead carriage jam, 66 wireless connectivity, 66
two-sided printing automatic, 27-28 manual, 28-29
U
updating printer firmware, 63 software,...
Similar Questions

How To Get Printhead Unjammed In A Kodak Esp Office 6150
(Posted by ggghjkl 9 years ago)

How To Remove Printhead Carriage Jam
(Posted by pamshaneg 9 years ago)
How To Clear Printhead Carriage Jam On Kodak Esp Office 2150
(Posted by biglandry 10 years ago)

How To Remove Printhead Carriage Of Kodak Esp 5250
(Posted by luodela 10 years ago)

How Do I Remove A Printer Carriage Kodak Esp Office 6150
(Posted by madonn 10 years ago)