Kodak ESP 7250 Support Question
Kodak ESP 7250 Support Question
Find answers below for this question about Kodak ESP 7250 - All-in-one Printer.Need a Kodak ESP 7250 manual? We have 4 online manuals for this item!
Question posted by goodssemi on May 28th, 2014
Why Is Does It Say My Kodak 7200 Printer Is Disconnected
The person who posted this question about this Kodak product did not include a detailed explanation. Please use the "Request More Information" button to the right if more details would help you to answer this question.
Current Answers
Related Kodak ESP 7250 Manual Pages
User guide - Page 2

... online, send us an e-mail, or call for :
• Frequently Asked Questions (FAQs) • software or firmware upgrades • Extended User Guide • and more! 2 KODAK ESP 7200 Series All-in-One Printer
Your KODAK All-in-One Printer combines ease-of-use and affordable inks to www...
User guide - Page 5
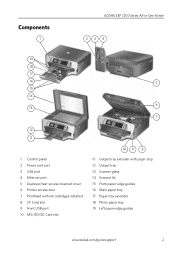
Components
1
KODAK ESP 7200 Series All-in-One Printer 23 4
19
18
17
16
5
15
14
6 13
7
12 11
1 Control panel 2 Power cord port 3 USB port 4 Ethernet port 5 Duplexer/rear-access cleanout cover 6 Printer access door 7 Printhead with ink cartridges installed 8 CF Card slot 9 Front USB port ... 17 Paper tray extender 18 Photo paper tray 19 Left paper-edge guides
www.kodak.com/go/aiosupport
2
User guide - Page 7
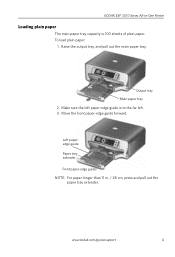
KODAK ESP 7200 Series All-in . / 28 cm, press and pull out the
paper tray extender. Output tray Main paper tray 2. Make sure... paperedge guide Paper tray extender Front paper-edge guide NOTE: For paper longer than 11 in -One Printer
Loading plain paper
The main paper tray capacity is to the far left. 3.
www.kodak.com/go/aiosupport
4 Raise the output tray, and pull out the main paper tray.
User guide - Page 9
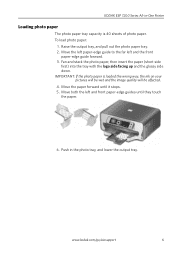
...up and the glossy side down.
Move the paper forward until they touch
the paper.
6. www.kodak.com/go/aiosupport
6 Move the left paper-edge guide to the far left and front paper-edge... Printer
Loading photo paper
The photo paper tray capacity is loaded the wrong way, the ink on your
pictures will be wet and the image quality will be affected. 4. To load photo paper:
1. KODAK ESP 7200 ...
User guide - Page 11
...
2. The printer prints a single 4 x 6 in -One Printer
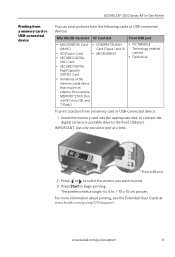
Printing from a memory card or USB-connected device
You can print pictures from the following cards or USB-connected devices:
MS/XD...device:
1. www.kodak.com/go /esp7250support. Press or to select the picture you want to begin printing.
For more information about printing, see the Extended User Guide at a time. KODAK ESP 7200...
User guide - Page 13
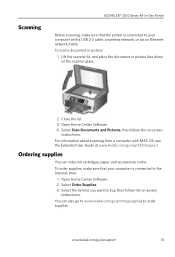
Scanning
KODAK ESP 7200 Series All-in-One Printer
Before scanning, make sure that the printer is connected to buy, then follow the on-screen
instructions. Select Scan ...a computer with a USB 2.0 cable, a wireless network, or via an Ethernet network/cable.
www.kodak.com/go /esp7250support. To order supplies, make sure that your computer with MAC OS, see the Extended User Guide at ...
User guide - Page 14
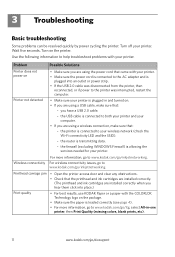
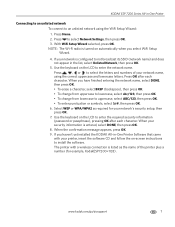
... strip. • If the USB 2.0 cable was disconnected from the printer, then
reconnected, or if power to the printer was interrupted, restart the computer.
• Make sure your printer is connected to your printer. Wireless connectivity For wireless connectivity issues, go to www.kodak.com/go /inkjetnetworking. the printer is allowing the
services needed for your wireless...
User guide - Page 15
...contact and have the following information available:
- KODAK ESP 7200 Series All-in-One Printer
Problem
Possible Solutions
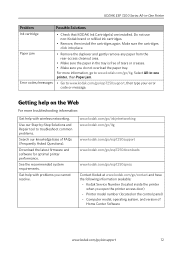
Ink cartridge
• Check that KODAK Ink Cartridge(s) are installed. www.kodak.com/go/inkjetnetworking www.kodak.com/go/itg
www.kodak.com/go/esp7250support
www.kodak.com/go/esp7250downloads
www.kodak.com/go/esp7250specs
Contact Kodak at www.kodak.com/go /aiosupport
12
User guide - Page 17

... remaining warranty term of the original Product, or 90 days after the duration of any written or implied warranty is longer. KODAK ESP 7200 Series All-in-One Printer
Warranty Information
Limited Warranty
Kodak warrants Kodak consumer electronic products and accessories ("Products"), excluding batteries, to be free from malfunctions and defects in both materials and workmanship...
Extended user guide - Page 9

... this icon to start Home Center Software.
www.kodak.com/go/aiosupport
3 On a computer with WINDOWS Operating System (OS), you can use Home Center Software to scan, order supplies, configure your printer, or check for printer software updates. KODAK ESP 7200 Series All-in-One Printer
Home Center Software
KODAK Home Center Software is added to your desktop...
Extended user guide - Page 11

... Setup Wizard
You can obtain your SSID from the wireless access point, most commonly a router, using the WiFi Setup Wizard: 1.
KODAK ESP 7200 Series All-in-One Printer
Connecting to a wireless network
To connect your printer to an 802.11 wireless (Wi-Fi) network, refer to select Network Settings, then press OK. 3.
With WiFi Setup...
Extended user guide - Page 13
.../WPA2 as the name of your network name, using the WiFi Setup Wizard:
1.
www.kodak.com/go/aiosupport
7 KODAK ESP 7200 Series All-in-One Printer
Connecting to an unlisted network To connect to select the letters and numbers of the printer plus a number (for your network's security setup, then press OK.
7. NOTE: The Wi-Fi...
Extended user guide - Page 15
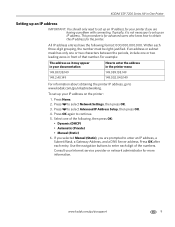
... you selected Manual (Static), you are prompted to select Advanced IP Address Setup, then press OK. 4.
www.kodak.com/go /inkjetnetworking. KODAK ESP 7200 Series All-in-One Printer
Setting up an IP address
IMPORTANT: You should only need to set up an IP address for your documentation
149.89.138.149
149.2.40....
Extended user guide - Page 17
KODAK ESP 7200 Series All-in-One Printer
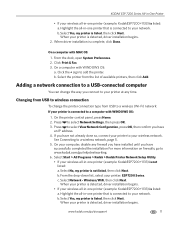
• If your printer is connected to a computer with WINDOWS OS:
1. b. When driver installation is not listed, then click Next. From the dock, open System Preferences. 2. On a computer with ...
Extended user guide - Page 18
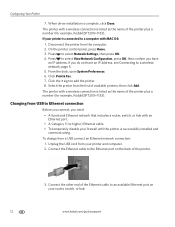
... cord from the list of the Ethernet cable to a wireless network, page 5. 5. Connect the other end of available printers, then click Add.
Disconnect the printer from a USB connect an Ethernet network connection: 1. Press to add the printer. 8. Click Print & Fax. 7.
Connect the Ethernet cable to select View Network Configuration, press OK, then confirm you...
Extended user guide - Page 19
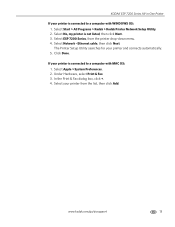
... with MAC OS: 1. The Printer Setup Utility searches for your printer and connects automatically. 5.
Ethernet cable, then click Next. Select your printer from the printer drop-down menu. 4. If your printer is not listed, then click Next. 3. In the Print & Fax dialog box, click +. 4. KODAK ESP 7200 Series All-in-One Printer
If your printer is connected to a computer with...
Extended user guide - Page 21
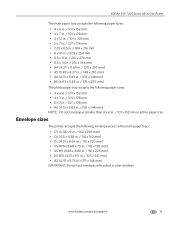
Envelope sizes
The printer accepts the following paper sizes: • 4 x 6 in. / 101 x 152 mm • 4 x 7 in. / 101 x 178 mm • 5 ... 4 x 6 in. / 101 x 152 mm in .) (111 x 146 mm)
IMPORTANT: Do not load envelopes with cutout or clear windows.
KODAK ESP 7200 Series All-in-One Printer
The main paper tray accepts the following paper sizes: • 4 x 6 in. / 101 x 152 mm • 4 x 7 in. ...
Extended user guide - Page 23
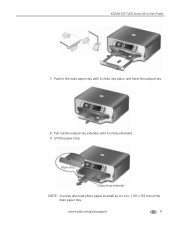
Pull out the output tray extender until it is fully extended. 9. Paper stop . www.kodak.com/go/aiosupport
17 KODAK ESP 7200 Series All-in the main paper tray until it clicks into place, and lower the output tray.
8.
Push in -One Printer
7. Lift the paper stop
Output tray extender
NOTE: You may also load photo paper as small as 4 x 6 in. / 101 x 152 mm in the main paper tray.
Extended user guide - Page 25
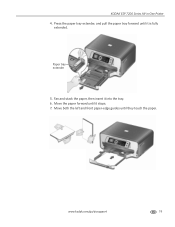
Move the paper forward until it into the tray. 6. Move both the left and front paper-edge guides until it is fully
extended. Fan and stack the paper, then insert it stops. 7. www.kodak.com/go/aiosupport
19 Paper tray extender
5. Press the paper tray extender, and pull the paper tray forward until they touch the paper.
KODAK ESP 7200 Series All-in-One Printer 4.
Extended user guide - Page 27

... photo paper:
1. Raise the output tray, and pull out the photo paper tray. Output tray Photo paper tray
2. Move the front paper-edge guide forward. KODAK ESP 7200 Series All-in-One Printer
Loading the photo paper tray
The photo (top) paper tray capacity is 40 sheets of photo paper.
Similar Questions

How To Change 7200 Printer From Print Offline To Print Online
(Posted by gtsgodbo 10 years ago)

Why Wont My Kodak Esp 7200 Printer Print
(Posted by LiSpa 10 years ago)
Kodak Esp 7200 Printer Won't Scan Wirelessly
(Posted by Aaroal 10 years ago)

Why Does My Computer Say My Hp 7200 Printer Is Offline
(Posted by itzyayy 10 years ago)

Says Close Printer Access Door
when i try to print something it says close printer access door but it is already closed. how do i f...
when i try to print something it says close printer access door but it is already closed. how do i f...
(Posted by davidzegarzewski 12 years ago)