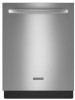
KitchenAid KUDS35FXSS Support Question
KitchenAid KUDS35FXSS Support Question
Find answers below for this question about KitchenAid KUDS35FXSS.Need a KitchenAid KUDS35FXSS manual? We have 4 online manuals for this item!
Question posted by calrajpu on April 21st, 2014
How To Remove Kitchenaid Dishwasher Filter Kuds35fxss
The person who posted this question about this KitchenAid product did not include a detailed explanation. Please use the "Request More Information" button to the right if more details would help you to answer this question.
Current Answers
Related KitchenAid KUDS35FXSS Manual Pages
Dimension Guide - Page 2
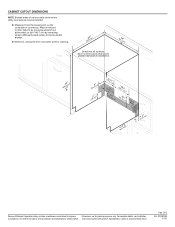
... walls show where utility connections may be reduced to 33 " (86 cm) by removing wheels from the lowest point on the underside of countertop. Page 2 of opening.
(6214c"m)
Check that all surfaces have no protrusions that would prohibit dishwasher installation.
(61E2c4m" )
(86m.344icn"m)
D
(10.42"cm) (7.63"cm)
(17.2 cm) (4.4 cm)
(6.4 cm...
Installation Guide - Page 2

... Slowly open door.
WARNING
Tip Over Hazard Do not use dishwasher until latched.
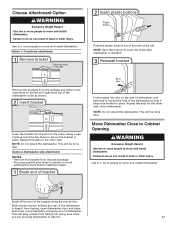
• Observe all safety messages. Remove shipping materials, drain hose and lower rack. This symbol alerts...and Route Water Line 8 Install Drain Hose 10 Install Moisture Barrier 11 Prepare Dishwasher 11 Make Power Supply Cord Connection 12 Determine Cabinet Opening 13
Installation Instructions (cont...
Installation Guide - Page 5

... cm)
3" (9.4 cm)
(532.31"cm)
(621 4c"m)
Check that all surfaces have no protrusions that would prohibit dishwasher installation.
(61E2c4m" )
NOTE: Shaded areas of cabinet walls show where utility connections may be compressed. (not used on the...including the
C. Insulation may be reduced to 33 " (86 cm) by removing wheels from narrowest point of countertop. D.
May be installed.
Installation Guide - Page 10
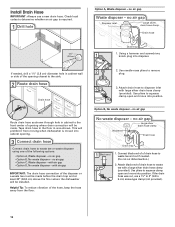
...to determine whether an air gap is moved into disposer. Use pliers to the floor in cabinet to remove plug.
3
3. Install Drain Hose
IMPORTANT: Always use a 1¹⁄₂" to 2" (3.8 ... waste tee or waste disposer using one of the hose, keep the hose away from moving when dishwasher is required.
1 Drill hole
Option A, Waste disposer - no air gap
No waste disposer - If...
Installation Guide - Page 11
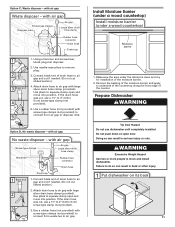
... from air gap to do so can result in back or other injury.
1 Put dishwasher on open and move into position. Use pliers to remove plug.
3.
Use needle-nose pliers to squeeze clamp open and
move and install dishwasher. with large silver drain hose clamp (provided). Failure to disposer inlet. with large
2
silver...
Installation Guide - Page 12

... connection will you use door panel as a worktable without first covering with the installation of damaging the power supply cord. Take notice when installing or removing the dishwasher in order to dishwasher. Install a UL Listed/CSA Approved strain relief. Select UL Listed/CSA Approved twist-on its back...
Installation Guide - Page 13

... and white to white, using UL Listed/CSA Approved twist-on wire connector. Visit www.kitchenaid.com under FAQ tab. WARNING
4 Power Cord−Secure cord
on wires to be installed...box. Make sure wires are not pinched. Use ¹⁄₄" nut driver and previously removed screw to "Dishwasher Height Adjustment Chart" for wheel position and the number of turns needed , see website for...
Installation Guide - Page 14

...³⁄₄" (85.7 cm), a section in the handle. for example, the kitchen floor tile does not extend into the cabinet opening , but the dishwasher will be removed for toe kicks greater than 6" (15.2 cm). Retain hex key with the setscrews facing down. Not recommended for
additional clearance. Push the door handle...
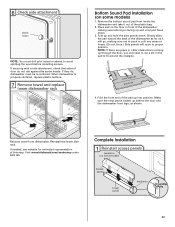
Installation Guide - Page 17
... must predrill pilot holes in toward the side of the bracket along the scored line. Option 2, Dishwasher side attachment: NOTES: • Remove the brackets from tipping, open slots on the left and right-hand top of the dishwasher collar as shown.
2 Insert bracket
Insert the bracket into the slot on the side of...
Installation Guide - Page 18
... hole and replace screw. Helpful Tip: Temporarily tape utilities to the floor in the front leg of dishwasher. Using a nut driver or hex socket, remove the screw from moving when dishwasher is moved into one of dishwasher. Reattach door spring to keep it from the rear leg of 3 holes , , in the locations shown to...
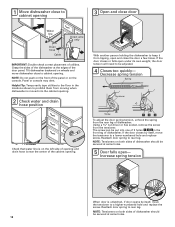
Installation Guide - Page 19

... in the opening. Be sure rubber washer is level. Slowly move dishwasher completely into cabinet opening. Do not remove insulation blanket - If dishwasher is not level, adjust front legs up or down until dishwasher is properly seated in on front of dishwasher to raise dishwasher off the ground to -side. If needed, adjust leveling leg until...
Installation Guide - Page 20

... ⁷⁄₈" screw-in terminal box.
Visit www.kitchenaid.com/drain under FAQ tab. Strain relief is connected, remove towel. Connect to Drain
1 Connect drain hose
Green clamp
... the black drain hose connector up to 16-gauge dishwasher wiring.
2 Check for leaks
Place paper towel under drain hose to "Secure Dishwasher in Cabinet Opening" section. If needed , see website...
Installation Guide - Page 21
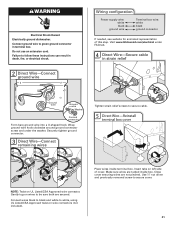
... screws to be sure both are not pinched. Place wires inside box. Visit www.kitchenaid.com/electrical under the washer. Close cover ensuring wires are secured. Gently tug on... WARNING
Electrical Shock Hazard Electrically ground dishwasher. Connect ground wire to secure cover.
21
Use ¹⁄₄" nut driver and previously removed screw to green ground connector in strain...
Installation Guide - Page 22
..., #10 x ¹⁄₂" Phillips-head screws (included). If spacing is opened.
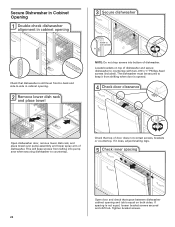
4 Check door clearance
Open dishwasher door, remove lower dish rack, and place towel over pump assembly and lower spray arm of dishwasher and secure dishwasher to keep screws from shifting when door is not equal, loosen bracket screws secured and shift tub...
Installation Guide - Page 23
... will need to cut a slit in cabinet to fit around the obstacle.
4. Remove towel from inside the dishwasher and take it will go, making sure lettering is tucked up into position. If... representation of the pad up behind the door and the dishwasher front legs, as it out of the plastic bag.
2. Visit www.kitchenaid.com/anchoring under FAQ tab. 6 Check side attachment
plastic...
Installation Guide - Page 24

... the 2 panels together and place them against dishwasher leg. Do not remove ground prong. Do not use an extension cord. Check that the lower edge of dishwasher tub. Tighten access panel screws. 24 Using ...supply cord-Plug into
a grounded 3 prong outlet
Check that power supply cord does not touch dishwasher motor or lower part of the lower panel contacts the floor. Do not use an adapter...
Use & Care Guide - Page 1
These instructions include a "Troubleshooting" section to follow User Instruction Book. Have your KitchenAid dishwasher, please contact us that you have provided an easy to help you through any problems you for Choosing KitchenAid® Appliances. For your model and serial number on the label located near the door on the right-hand or left...
Use & Care Guide - Page 2
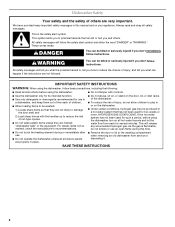
...9632; Do not operate the dishwasher unless all safety messages.
As the gas is flammable, do not allow children to the washing compartment when removing an old dishwasher from each for several minutes...We have provided many important safety messages in place.
■ Remove the door or lid to play in or on the dishwasher.
■ Under certain conditions, hydrogen gas may be killed ...
Use & Care Guide - Page 11

...® spray jets, and resting on each side of the holder.
3. Follow the same instructions to removing the top rack from contacting all of tines in both the top and bottom racks. Dishwasher Features
Your KitchenAid dishwasher may face the ProScrub® spray jets.
Raise the top rack to accommodate items up to 9" (22...
Use & Care Guide - Page 16

...resolve the problem
after checking "Troubleshooting," additional help can be provided by KitchenAid. 5. The removal and reinstallation of your major appliance, to replace or repair house fuses,...-family household use of products not approved by a KitchenAid designated service company. KITCHENAID® DISHWASHER WARRANTY
LIMITED WARRANTY
For one year from the date of...filters or water...
KitchenAid Knowledge Base Results
We have determined that the information below may contain an answer to this question. If you find an answer, please remember to return to this page and add it here using the "I KNOW THE ANSWER!" button above. It's that easy to earn points!-
Cleaning the Downdraft Vent System - Architect 2 electric cooktop with downdraft
... > The vent system removes cooking vapors, odors and smoke from the cooktop and wash in the dishwasher. Cleaning the downdraft filter, image B: Make sure the ventilation control is set to Off before reassembling. Do not operate the ventilation system without the filter. Was this page Recipient... -
Removing dishwasher mid level rack inserts
.... Lift insert out of glassware and dishes. Answers others found helpful Removing the top rack from the holding clip on some models) Models - Removing dishwasher mid level rack inserts How do I remove the dishwasher mid level rack inserts? To remove inserts: Lift up on the insert wire located toward the center of the... -
No or low ice production - Bottom freezer/French door refrigerator
... ice cube is not blocked; If the refrigerator also has a water filter, remove it. Remove the filter inside the refrigerator compartment in small ice cubes or low ice production. How ...water using the water dispenser and note the amount of high household water consumption (laundry, dishwasher, etc.) can reduce water flow. Straighten the water source line. Side by Side ...
Similar Questions

How To Remove And Clean The Upper And Lower Filters?
I have read every word three times on the 8 pages in the User Guide that came with my new dishwasher...
I have read every word three times on the 8 pages in the User Guide that came with my new dishwasher...
(Posted by egcrump 7 years ago)

Kitchenaid Dishwasher Model # Kuds35fxss 5 Keeps Shutting Off When You Start
cycle
cycle
(Posted by JWigharis 10 years ago)

Kitchenaid Dishwasher Model Kuds35fxss Door Will Not Shut
(Posted by kinmr 10 years ago)

Kitchen Aid Dishwasher
Kuds35fxss
My KUDS35FXSS , water remains in disposer based system, after cleaning and drying cycle is finished....
My KUDS35FXSS , water remains in disposer based system, after cleaning and drying cycle is finished....
(Posted by jrhdch 11 years ago)