KitchenAid KUDK03CTSS Support Question
KitchenAid KUDK03CTSS Support Question
Find answers below for this question about KitchenAid KUDK03CTSS - 24 Inch Full Console Dishwasher.Need a KitchenAid KUDK03CTSS manual? We have 3 online manuals for this item!
Question posted by jas1349 on June 11th, 2015
How To Remove The Water Intake Valve From Kudk03ctss0
I was told to replace the solenoid. I have watched a few videos but cannot find the screws to loosen the valve assembly frothe harness.
Current Answers
Answer #1: Posted by TechSupport101 on June 17th, 2015 11:15 AM
TechSupport101

Member since:
May 24th, 2013 Points: 12,171,285

Member since:
May 24th, 2013 Points: 12,171,285
Related KitchenAid KUDK03CTSS Manual Pages
User Instructions - Page 2

... handles up to the washing compartment when removing an old dishwasher from each for several minutes. If the hot water system has not been used for two weeks or more. This will reduce the risk of electric shock by a qualified electrician.
■ For a permanently connected dishwasher:
The dishwasher must be connected to a grounded metal, permanent...
User Instructions - Page 3

...."
■ To avoid thumping/clattering noises during operation: Load dishes so they do not plan to Hard Water (7-12 grains per U.S. Remove labels from containers before starting a cycle.
■
Fresh automatic dishwasher detergent
A
results in soft water, glassware will improve cleaning and drying results.
■ Avoid overlapping items like bowls or plates that when...
User Instructions - Page 4

... notice rings or spots, try a higher setting. Replace the dispenser cap and
turn the dispenser cap
to complete.
You can customize your dishes and dishwasher interior will not perform as shown.
Hard Water Soft Water
Main Wash
Hard Water Soft Water
Pre-Wash
Add Rinse Aid
■ Your dishwasher is fully
locked. Without rinse aid your cycles...
User Instructions - Page 7

...must be in the lowest position. The double and single removable rack inserts allow you are washing.
NOTE: Spin the ... jets. IMPORTANT: Make sure that could otherwise "fly" around inside the dishwasher during a cycle.
A
B
CULINARY CADDY® Utensil Basket Use the ...is located at the back of the lower dish rack with the water feed tube, spray arms, or PROSCRUB® spray jets. ...
User Instructions - Page 9

... a damp sponge to wash.
A white vinegar rinse may remove white spots and film. Put 2 cups (500 mL) white vinegar in a seasonal dwelling such as a second home or vacation home, avoid water damage by having your dishwasher. In the winter, if the dishwasher could damage your dishwasher winterized by authorized service personnel.
9 Install the baskets in...
User Instructions - Page 10

...water temperature, cycles and options.
Is the water shutoff valve (if installed) turned on the counter.
A delay automatically occurs in the dishwasher
Are dishes washed only every 2 or 3 days?
Try a different brand to the dishwasher... call for service.
■ Dishwasher will have a new plastic smell? Is the water supplied to speed drying. Replace detergent if necessary.
■ ...
User Instructions - Page 11

... spray arm clogged by some combination of soft or softened water, alkaline washing solutions, insufficient rinsing, overloading the dishwasher, and the heat of the detergent dispenser. Use recommended dishwasher detergents only. If your water? Use a liquid rinse aid and underload the dishwasher to allow detergent to remove stains from bottles and cans? If you load the...
User Instructions - Page 12

...is used in materials or workmanship. KITCHENAID® DISHWASHER WARRANTY
ONE YEAR LIMITED WARRANTY
For one year from... workmanship. The removal and reinstallation of products not approved by a KitchenAid designated service company. Replacement parts or repair...major appliance is designed to repair or replace appliance light bulbs, air filters or water filters. For assistance or service in ...
Installation Instructions - Page 2

.... • Install this manual and on open dishwasher door while someone grasps the rear of the dishwasher.
Remove shipping materials, drain hose and lower rack. This...; Slowly open door. Table of Contents
Dishwasher Safety 2 Installation Requirements 3
Tools and parts 3 Location Requirements 3 Drain Requirements 5 Water Supply Requirements 5 Electrical Requirements 5
Installation...
Installation Instructions - Page 4

... from narrowest point of opening is 34-1/2" (87.6 cm) at its lowest point. Product dimensions
3/4" (1.9 cm) insulation - may be increased to 33-7/8" (86 cm) by removing wheels from dishwasher.
** Minimum, measured from the lowest point on all models)
24-7/8" (63.2 cm) 24-1/2" (62.2 cm)*
front vent
33-7/8" (86 cm) min.
Installation Instructions - Page 5

...junction box or install a U.L.-listed/CSA-certified clamp connector to the dishwasher opening. Kit contents include:
- Neer C-500 7/8 inch strain relief.
- 3 wire connectors.
- copper tubing with compression ...Part No. 302797 grommet
Follow the kit instructions for your dishwasher. Do not solder within 6" (15.2 cm) from water inlet valve. You must meet all current AHAM/IAPMO test standards, is...
Installation Instructions - Page 8

... a 1-1/2" (3.8 cm)
diameter hole in a cabinet next to "OFF" position. Remove the disposer knockout plug. Turn shutoff valve to the dishwasher opening will bend and kink easily, so be installed. Install the water line
Helpful Tip: Routing the water line through hole in cabinet to 5 cm) screw-type clamp*.
3. Option 2: Power supply cord method:
NOTE: A mating, three...
Installation Instructions - Page 10

Grasp sides of dishwasher door frame and put dishwasher on its back, resting on open door. Remove two screws attaching access panel and lower panel to dishwasher using conduit, use dishwasher until completely installed. If using a 1/4" hex socket, nut driver or Phillips screwdriver. Turn both front leveler legs to water inlet valve.
6.
If the height is installed in cabinet...
Installation Instructions - Page 14

...of the customersupplied custom panel as shown.
remove outer panel and drill 3/32" pilot ...inch (10.2 cm) console only.
23-3/8" (59.3 cm)
3/4" (19.1 mm)
*25-29/32" (65.8 cm)
custom panel dimensions
1/8" (3.2 cm)
3 screws
outer panel
2. Tighten the six side screws reinstalled in customer-supplied custom panel.
6. NOTE: These dimensions are available. Attach the panel assembly...
Installation Instructions - Page 16

... of tub. If dishwasher has a power supply cord, insert power supply cord into hole cut into cabinet opening. Helpful Tip: Once the dishwasher is on the console-they may dent....level. Do not remove insulation blanket -the blanket reduces the sound level. Level the dishwasher
1.
You need to adjust alignment to connect your cabinets. Route direct wire so that water line is near...
Installation Instructions - Page 17

... valve.
8. Form bare ground wire into a grounded 3 prong outlet. 2. screws
Electrical Shock Hazard Plug into compression fitting as far as it will go , use an extension cord. Connect to elbow on water supply and check for leaks.
17 d. Be gentle when handling and positioning the copper tubing, it does not touch the dishwasher base...
Installation Instructions - Page 18

... towel over pump assembly and spray arm of dishwasher. If using a countertop attachment to keep screws from side of dishwasher. Remove towel from tipping when door is not equal, loosen bracket screws and shift tub. Reinstall the lower dishrack. 18 Pan will keep it from dishwasher. 8. Tighten bracket screws.
5. If securing with motor, door springs, water line, cabinet, flooring...
Installation Instructions - Page 19

...:
WARNING
access panel
lower panel
grounding clip
Electrical Shock Hazard Plug into position.
Remove the bottom sound pad from inside the dishwasher and take it will go, making sure lettering is facing up and vinyl pad faces down . Reinstall the screws through the floor, you will open to the lower panel. 2. Fold the...
Parts Diagram - Page 6
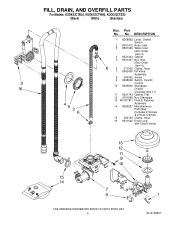
..., Overfill (Includes Item 11) 11 8531743 Gasket, Flat 12 9741998 Nut, Standpipe 13 W10077871 Float & Retainer Assembly 14 8269297 Miscellaneous Parts Bag (Includes 2 Screws & 2 Hose Clamps) 15 356138 Clamp, Hose 16 8531022 Drain Loop with Check Valve)
6
W10128997 Part
No. FILL, DRAIN, AND OVERFILL PARTS
For Models: KUDK03CTBL0, KUDK03CTWH0, KUDK03CTSS0
(Black)
(White)
(Stainless)
Illus.
Parts Diagram - Page 10

...Screw 4 8572618 Sump
(Includes Seal) 5 8268375 Check Valve, Sump 6 W10083957 Chopper Assembly 7 9741232 Screw 8 8531857 Protector, Inlet 9 8535760 Motor Assembly 10 3400217 Screw 11 8268391 Screen, Separation 12 W10084107 Sump & Motor
Assembly... Kit 21 8268403 Face Seal Assembly (Also Order Item 26) 22 356138 Clamp, Hose 23 W10082647 Optical Water Indicator 24 8535474 Capacitor 25 8534946 Shield,...
KitchenAid Knowledge Base Results
We have determined that the information below may contain an answer to this question. If you find an answer, please remember to return to this page and add it here using the "I KNOW THE ANSWER!" button above. It's that easy to earn points!-
Water supply hookup - French door with exterior dispenser
...nbsp;Do not over the sleeve and screw the nut into plastic water valve supply line. Slide the brass ...Remove the water filter. You should be required in the valve. 4. Rate answer 1 of 3 Rate answer 2 of 3 Rate answer 3 of between 35 and 120 psi (241 and 827 kPa). Tighten the packing nut. Use a sturdy container to depress and hold the nut on the top side of ice produced. Allow 24... -
Water supply hookup - Bottom freezer/French door refrigerators
... : ¼" outer diameter flexible copper tubing Shutoff valve (requires a ¼" hole to be able to the water pipe. Replace the filter if necessary. To determine the length of the refrigerator to dispense about your appliance? Check for cleaning. Non water-filter models To connect to the refrigerator: Remove the plastic cap from the connection on... -
Water supply hookup - Bottom freezer/French door refrigerators
... and evenly tighten the pipe clamp screws so the rubber washer makes a watertight seal. Insert the end of the refrigerator to flow. Turn on the reverse-osmosis system to water line: Unplug refrigerator or disconnect power. Remove plastic cap from collecting in the valve. Additional flushing may be replaced, if used in conjunction with...
Similar Questions

How Do I Make Sure That The Center Wash Arm Assembly Is Mating Properly
How do I make sure that the center wash arm assembly is mating properly with the water supply nozzle...
How do I make sure that the center wash arm assembly is mating properly with the water supply nozzle...
(Posted by wcouch2 5 years ago)
Stopped Cleaning Dishes Adequately
Less than 2 yrs old. Done great job up until couple months back, then stopped cleaning very well. Ch...
Less than 2 yrs old. Done great job up until couple months back, then stopped cleaning very well. Ch...
(Posted by gdshipley 8 years ago)

Dish Washer Does Not Start
Dishwasher does not start and there is some water inside at the base of the dishwasher
Dishwasher does not start and there is some water inside at the base of the dishwasher
(Posted by dudejapradeep 8 years ago)

Problem With Getting D/w To Enter Cleaning Cycles
D/W wasn't letting water in. Changed water inlet valve. Water fills till edge of depression which is...
D/W wasn't letting water in. Changed water inlet valve. Water fills till edge of depression which is...
(Posted by eliforlife 10 years ago)
Kitchen Aid Kuds50fvss0
Disher washer fills with water but there seems to be no pressure to push water up to the top of the ...
Disher washer fills with water but there seems to be no pressure to push water up to the top of the ...
(Posted by abuelitabernice 11 years ago)