Get support for KitchenAid KHMS2040WSS

KitchenAid KHMS2040WSS Support Question

KitchenAid KHMS2040WSS Support Question

Find answers below for this question about KitchenAid KHMS2040WSS.
Need a KitchenAid KHMS2040WSS manual? We have 3 online manuals for this item!
Question posted by ctagar on December 26th, 2012

Filter Installation

How do I fit the filter in the bottom of the micro for the wall mounted venting?

Current Answers

There are currently no answers that have been posted for this question.
Be the first to post an answer!

Remember that you can earn up to 1,100 points for every answer you submit. The better the quality of your answer, the better chance it has to be accepted.

Related KitchenAid KHMS2040WSS Manual Pages

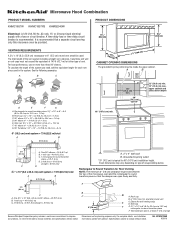
Dimension Guide - Page 1

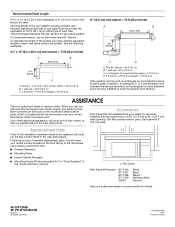
...+ 6 ft (1.8 m) straight = 8 ft (2.4 m) A. 2" x 4" wall stud B. For complete details, see Installation our products, we reserve the right to round transition piece = 5 ft (1.5 m) D. 2 ft (0.6 m) + 6 ft (1.8 m) straight = 8 ft (2.4 m) D 3 " x 10" (8.3 x 25.4 cm) vent system = 73 ft (22.2 m) total A B 6 ft (1.8 m) 2 ft (0.6 m) C A. Microwave Hood Combination PRODUCT MODEL NUMBERS...
Installation Guide - Page 1

...you to Wall 8 Prepare Upper Cabinet 8 Install Damper Assembly 9 Install the Microwave Oven 9 Complete Installation 10 VENTING DESIGN SPECIFICATIONS 11 ASSISTANCE 12 Replacement Parts 12 Accessories 12 MICROWAVE HOOD COMBINATION ... your particular model may differ slightly from the illustration in Rear Wall 7 Attach Mounting Plate to potential hazards that can kill or hurt you what ...
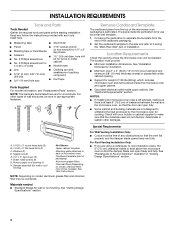
Installation Guide - Page 2

...20 x 3" flat-head bolts (2) C. Materials needed ■ Standard fittings for use appropriate fasteners. Special Requirements For Wall Venting Installation Only: ■ Cutout must provide: ■ Minimum installation dimensions. Sheet metal screws (2) G. The location must be free of clearance between the wall and the microwave oven, so that the door can open fully. ■ Some...
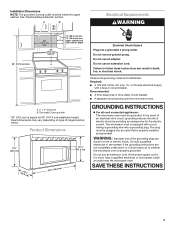
Installation Guide - Page 3

A. 2" x 4" wall stud B. Product Dimensions 17¹⁄₄" (43.8 cm) 16¹⁄₄" (41.3 ... these instructions can result in death, fire, or electrical shock. Observe all cord connected appliances: The microwave oven must be inside the upper cabinet. Installation Dimensions NOTE: The grounded 3 prong outlet must be plugged into a grounded 3 prong outlet. Do ...
Installation Guide - Page 4

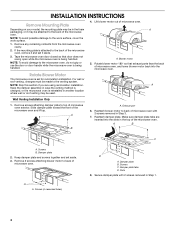
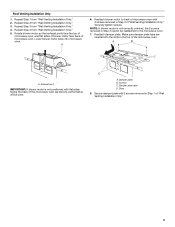
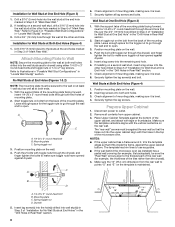
...: To avoid possible damage to the back of microwave oven, and lower blower motor back into the slots in recessed holes) D A. If the mounting plate is attached to the venting system. For wall or roof venting, changes must be attached to the work surface, cover the work surface. 1. Wall Venting Installation Only 1. Keep damper plate and screws together and...
Installation Guide - Page 5

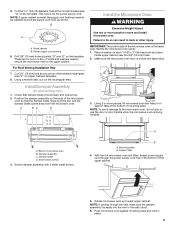
... 2 screws removed in Step 1 of "Wall Venting Installation Only." 5 Repeat Step 3 from "Wall Venting Installation Only." 5. Reattach blower motor to the microwave oven. 7. Make sure damper plate tabs are inserted into microwave oven. Screws C. Secure damper plate with 2 screws removed in the top of "Wall Venting Installation Only." A 6. Damper plate tabs D. Damper...
Installation Guide - Page 6

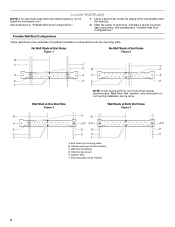
...." 2. Cabinet opening , do not install the microwave oven. 1. Wall stud centerlines D. Holes for lag screws E. Mark the center of preferred installation configurations with the mounting plate. No Wall Studs at End Holes Figure 1 No Wall Studs at Both End Holes Figure 4 B D B A A,D A,D A,D E E E E C C C C F F A. Possible Wall Stud Configurations These depictions show...
Installation Guide - Page 7

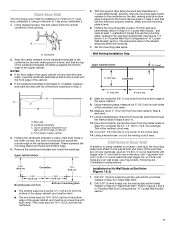
... nuts; Mark Rear Wall The microwave oven must be installed on a minimum of 1 wall stud, preferably 2, using a minimum of the upper cabinet, and must be on a level line with each be 15³⁄₄" (40.0 cm) from the bottom edge of "Locate Wall Stud(s)," and mark at both end holes. These represent the mounting plate's end...
Installation Guide - Page 8

.... 7. Position mounting plate on the wall. 4. The "rear wall" arrows must be secured to Figure 3 in "Possible Wall Stud Configurations" in Step 2 of the microwave oven. Refer to open . Position mounting plate on the wall. 2. Securely tighten all contents from the rear wall to the wall at End Holes" in the "Drill Holes in "Locate Wall Stud(s)" section. If installing on the...
Installation Guide - Page 9

...with 2 sheet metal screws. Mounting plate B. These are for wall venting only) 1. A B C D Install the Microwave Oven WARNING Excessive Weight Hazard Use two or more people, lift microwave oven and hang it on support tabs at one corner of the upper cabinet. 5. Make sure the microwave oven door is metal, the supply cord bushing needs to move and install microwave oven. Using 2 or more...
Installation Guide - Page 10

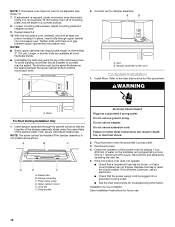
.... Adjust mounting plate and retighten screws. 9. The blocks must be installed if the damper assembly is plugged into a grounded 3 prong outlet. A 2. Long tab F. Do not use an extension cord. Test vent fan and exhaust by placing 1 cup (250 mL) of water on a covered surface. 8. NOTE: If microwave oven does not need to be added. Install filters. Insert...
Installation Guide - Page 11

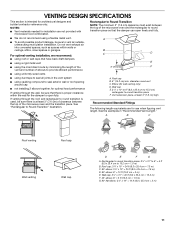
...;₄" x 10" = 10 ft (8.3 x 25.4 cm = 3 m) 11 For optimal venting installation, we recommend: ■ using roof or wall caps that have back draft dampers ■ using a rigid metal vent ■ using the most direct route by minimizing the length of the vent and number of the microwave oven and the transition piece. Rectangular to Round Transition NOTE...
Installation Guide - Page 12

... come in China If you need , add the equivalent lengths of each vent piece used . Replacement Parts If any of the installation hardware needs to be installed to keep the damper from your model number located on the front frame of the microwave oven. When you call, you need additional assistance, call us at our...
Use & Care Guide - Page 1

... eggs in this section and in the microwave oven. ■ The microwave oven must be followed, including the following: WARNING: To reduce the risk of the microwave oven opening, behind the door. We have provided an easy to excessive microwave energy: ■ Install or locate the microwave oven only in accordance with the provided Installation Instructions. ■ Read all safety...
Use & Care Guide - Page 2

...oven door closed, turn the fan on. ■ Use care when cleaning the vent-hood filter. THIS COULD RESULT IN VERY HOT LIQUIDS SUDDENLY BOILING OVER WHEN THE CONTAINER IS DISTURBED OR A SPOON OR OTHER UTENSIL IS INSERTED INTO THE LIQUID. After heating, allow soil or cleaner residue to microwave... mount over a sink. ■ Do not cover racks or any appliance, close properly and that the oven ...
Use & Care Guide - Page 3

...Clock The Clock is too short, have a qualified electrician or serviceman install an outlet near the microwave oven. Light Timer Set the cooktop light to turn tones off or on... control to reach the "Vent Fan" submenu, and select the setting. Filter Reset Reset the filter status after 30 minutes). Observe all cord connected appliances: The microwave oven must be turned off ....
Use & Care Guide - Page 4

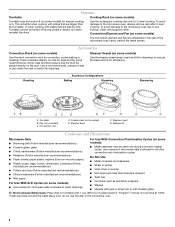
...for some roast functions. Some roast functions require that are embedded in the microwave oven. 4 To avoid damage to the microwave oven due to catch drippings. Features Turntable Cooking Rack (on some models) Turntable ..., or use the dish in the wall of the microwave oven cavity, behind the metal screen. Use the rectangular cooking rack only for simmering. Convection rack ...
Use & Care Guide - Page 5

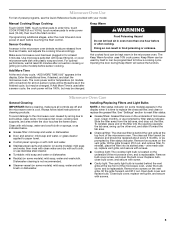
... by arcing due to reset filter status. ■ Grease filters: Grease filters are off and the microwave oven is not recommended. ■ Steamer vessel (on the vent grille, tilt the grille forward, lift it out, and remove filter. Remove two screws on some models) appears in the display. Installing/Replacing Filters and Light Bulbs NOTE: A filter status indicator (on the...
Use & Care Guide - Page 6

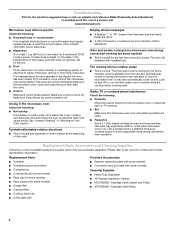
... and supplies which is separate from the vent fan, automatically comes on during convection cooking (on some models) ■ This is normal for 5 minutes or more without the microwave oven being used. If microwave oven still does not operate, call . Call for some models) ■ Grease filter ■ Charcoal filter ■ Cooktop light bulb ■ Cavity light...
Use & Care Guide - Page 7

...Service calls to repair or replace appliance light bulbs, air filters or water filters. KITCHENAID® BUILT-IN OVEN & MICROWAVE WARRANTY LIMITED WARRANTY For one year from the date of...microwave ovens only, in the second through due to defects in materials or workmanship. Damage resulting from accident, alteration, misuse, abuse, fire, flood, acts of God, improper installation, installation...

KitchenAid Knowledge Base Results

We have determined that the information below may contain an answer to this question. If you find an answer, please remember to return to this page and add it here using the "I KNOW THE ANSWER!" button above. It's that easy to earn points!

  • My microwave oven will not run
    ... bulb - Extended warranty information - See "Assistance or service" section below . Firmly close door. On some models, is locked, only the Vent Fan and Light pads will not run Why won't my microwave oven run? Is a spacer (on some models) or Start (on some models) attached to unlock and remove the lock icon from...
  • Cleaning the Downdraft Vent System - Architect 2 electric cooktop with downdraft
    ...;Removing the filter will expose the ventilation chamber. Clean the walls of a vent cover, filter and a vent fan. Cleaning the downdraft vent cover, image A: Remove the vent cover from ... the vent cover and filter and clean them with downdraft Product Literature (Use & Care, Parts Lists, etc) << Email Your Feedback How old is set to Off before installing the filter and ...
  • Microwavable immersion blender beaker
    Care Guides, Installation Instructions and Warranty Information. Download available Owners Manuals/Use & Model Number | Help me locate my model number Please enter at 1-800-541-6390. All times are Eastern Time.  The beaker and the chopper bowl should not be used in the microwave oven. Microwavable immersion blender beaker...

Similar Questions

Charcoal Filter
What is the part number for the charcoal filter my KitchenAid Microwave Model KHMS2040WSS-0?  needs?
(Posted by retfel 12 years ago)
Change Light Bulb In Microwave Oven.
How do I change the light bulb in a Kitchenaid KBMS1454SSS Microwave oven?
(Posted by danafeneck 13 years ago)
Ask a New Question
Use the box below to post a new question about this KitchenAid product .
Points & Prizes
  • You can earn points for nearly everything you do on HelpOwl.com
  • You can trade in those points for gift cards at leading retailers such as Amazon.com and Walmart
  • It's that simple!
See How it Works
Create a Free Account

KitchenAid Manuals

Find free KitchenAid KHMS2040WSS manuals and user guides available at ManualOwl.com. Try out our unique manual viewer allowing you to interact with manuals from directly within your browser!

KitchenAid Reviews

View thousands of KitchenAid user reviews and customer ratings available at ReviewOwl.com.

Contact Information

Complete KitchenAid customer service contact information including steps to reach representatives, hours of operation, customer support links and more from ContactHelp.com.

Scoreboard Ratings

See detailed KitchenAid customer service rankings, employee comments and much more from our sister site.

KitchenAid Recalls

Find comprehensive KitchenAid recall information updated hourly on RecallOwl.com.