Get support for KitchenAid KHHC2090SSS - Architect II 2.0 cu. ft. 1200 W

KitchenAid KHHC2090SSS Support Question

KitchenAid KHHC2090SSS Support Question

Find answers below for this question about KitchenAid KHHC2090SSS - Architect II 2.0 cu. ft. 1200 W.
Need a KitchenAid KHHC2090SSS manual? We have 3 online manuals for this item!
Question posted by patty2821 on January 26th, 2013

My Microwave Just Beeps All The Time . Do Not No How To Stop Different Thing Com

The person who posted this question about this KitchenAid product did not include a detailed explanation. Please use the "Request More Information" button to the right if more details would help you to answer this question.

Current Answers

There are currently no answers that have been posted for this question.
Be the first to post an answer!

Remember that you can earn up to 1,100 points for every answer you submit. The better the quality of your answer, the better chance it has to be accepted.

Related KitchenAid KHHC2090SSS Manual Pages

Use & Care Guide - Page 1

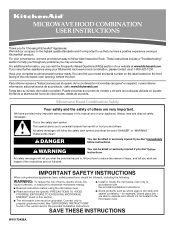
...o para obtener información adicional acerca de su producto, visite: www.kitchenaid.com Tenga listo su número de modelo completo. IMPORTANT SAFETY INSTRUCTIONS When using ...number ready. WARNING You can visit the Frequently Asked Questions (FAQs) section of the microwave oven opening, behind the door. These instructions include a "Troubleshooting" section to explode and ...
Use & Care Guide - Page 2

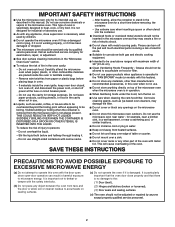
... or block any materials, other combustible materials are able to be overheated beyond the boiling point without appearing to stand in the microwave oven for a short time before placing bags in the oven cavity: - Do not overcook food. Do not leave paper products, cooking utensils, or food in the cavity when not in this...
Use & Care Guide - Page 3

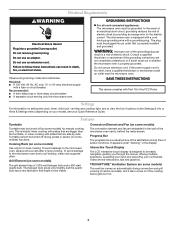
... shock. The plug must be plugged into a grounded 3 prong outlet. Recommended: ■ A time-delay fuse or time-delay circuit breaker. ■ A separate circuit serving only this microwave oven. The microwave oven is equipped with a cord having a grounding wire with Part 18 of the microwave oven cavity, behind the metal screen. SAVE THESE INSTRUCTIONS This device complies with...
Use & Care Guide - Page 4

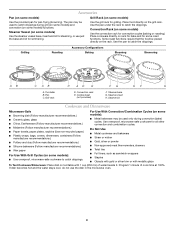
...rack E. If dish becomes hot and the water stays cool, do not use just the base and lid for some models) and convection (on rack for bake ... insert and lid for steaming, or use the dish in the microwave oven. 4 Pan C. Program 1 minute of water beside it. Steamer...Place food directly on turntable with 1 cup (250 mL) of cook time at 100%. Do Not Use ■ Metal cookware and bakeware &#...
Use & Care Guide - Page 5

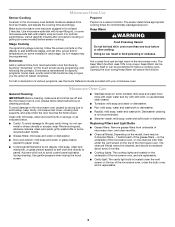
... - 1 behind each stage. Activate child lock to follow label instructions on some models) for each of the microwave oven, and are off and the microwave oven is remembered for commercially packaged popcorn. The sensor determines appropriate cooking times for specific programs. Some meat, poultry and/or fish functions may be prorammed to avoid control panel...
Use & Care Guide - Page 6

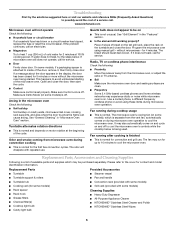
... grill use . The bread should toast dark brown. Use a corded phone, a different frequency cordless phone or avoid using manual grill - Replacement Parts, Accesssories and Cleaning Supplies...the cover for up to 10 minutes to inside of the microwave oven. Make sure Control Lock is off . www.kitchenaid.com Microwave oven will dissipate with some models), which may run for contact ...
Use & Care Guide - Page 8

... ■ Solid state touch control system parts SECOND THROUGH TENTH YEAR LIMITED WARRANTY On microwave ovens only, in accordance with the product, KitchenAid will pay for Factory Specified Parts for ...For additional product information or to view FAQs (Frequently Asked Questions), visit www.kitchenaid.com If you do not have been removed, altered or cannot be provided by this limited...
Dimension Guide - Page 1

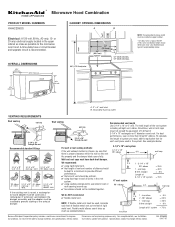
...° flat elbow= 10 ft. NOTE: The grounded 3 prong outlet must be installed to provide efficient performance. ✔ that there is round, a rectangularto-round adapter must be used and a rectangular 3" extension vent between the damper assembly and the adapter must have back-draft damper. 3-1/4" x 10" to the microwave oven hood. Grounded 3 prong outlet...
Installation Guide - Page 1

...Requirements 2 Product Dimensions 3 Electrical Requirements 3 INSTALLATION INSTRUCTIONS 4 Remove Mounting Plate 4 Convert Microwave Oven to External Venting 4 Locate Wall Stud(s 6 Mark Rear Wall 7 Drill Holes in...provided many important safety messages in this manual and on your particular model may differ slightly from the illustration in Rear Wall 7 Attach Mounting Plate to reduce the ...
Installation Guide - Page 2

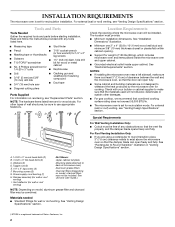
...wall or roof venting) Not Shown: Upper cabinet template Mounting plate (attached to back of microwave oven) Aluminum grease filters Charcoal filters (Depending on model, charcoal filters may be free of ... a registered trademark of 150 lbs (68 kg), which includes microwave oven and items placed inside the microwave oven and upper cabinet. ■ Grounded electrical outlet inside upper cabinet...
Installation Guide - Page 3

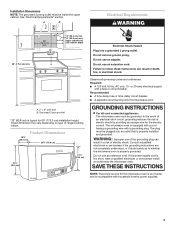
...* 12" (30.5 cm) min. 13" (33.0 cm) max. Do not remove ground prong. Recommended: ■ A time-delay fuse or time-delay circuit breaker. ■ A separate circuit serving only this microwave oven is an inverter, and is typical for this microwave oven. GROUNDING INSTRUCTIONS ■ For all governing codes and ordinances. Installation Dimensions NOTE: The grounded 3 prong...
Installation Guide - Page 4

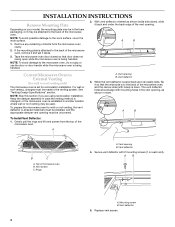
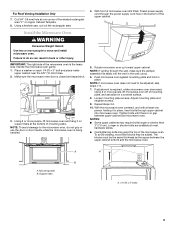
.... With vent deflector oriented as shown in inset. See "Venting Design Specifications" section. Top of the microwave oven. Vent deflector 4. NOTE: To avoid damage to the back of the microwave oven. A B Convert Microwave Oven to the back of the microwave oven, remove it and set for wall or roof venting, the vent deflector (L-shaped metal bar) must be...
Installation Guide - Page 5

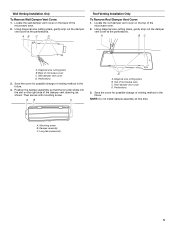
...the damper vent cover at this time. Position the damper assembly so that the long tab slides into the slot on the top of the microwave oven. 2. Diagonal wire cutting pliers ...vent cover at the perforations. Diagonal wire cutting pliers B. Top of microwave oven C. Wall damper vent cover D. Back of microwave oven C. Locate the wall damper vent cover on the back of venting ...
Installation Guide - Page 6

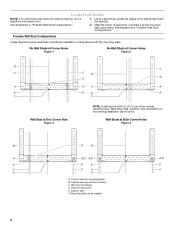
... is within 6" (15.2 cm) of the wall stud(s) within the cabinet opening vertical centerline C. Corner holes (on mounting plate) B. Cabinet opening , do not install the microwave oven. 1. Support tabs F. Locate Wall Stud(s) NOTE: If no wall studs exist within the opening. Possible Wall Stud Configurations These depictions show examples of each stud...
Installation Guide - Page 7

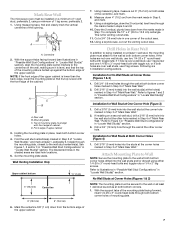
... at both bottom corner holes drilled into the studs at least 1, preferably 2, hole(s) through both bottom corner holes of mounting plate. 7 Mark Rear Wall The microwave oven must be secured to the wall on both sides of the centerline, and mark. 8. Using measuring tape, find and clearly mark the vertical centerline of...
Installation Guide - Page 8

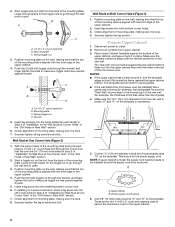
... 1¹⁄₂" (3.8 cm) diameter hole at the circular shaded area "G" on the template. Mounting plate C. Push the 2 bolts with the front edge of the microwave oven. Securely tighten all contents from the back of the mounting plate. Leave enough space for Wall Stud at Corner Holes" in the "Drill Holes in...
Installation Guide - Page 9

... to do not grip or use the door or door handle while the microwave oven is no gap between the upper cabinet bottom and the microwave oven. Loosen mounting plate screws. Handle the microwave oven gently. 1. Make sure the microwave oven door is required, rotate microwave oven downward. Adjust mounting plate and retighten screws. 9. Longer or shorter bolts are available...
Installation Guide - Page 10

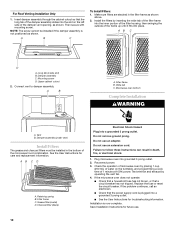
...1. Damper assembly C. Retaining spring B. Filter frame C. Failure to damper assembly. If the microwave oven does not operate: ■ Check that a household fuse has not blown, or that the... tab of the damper assembly slides into the slot on the turntable, and programming a cook time of the frame up until it fits into grounded 3 prong outlet. 2. Save Installation Instructions for...
Installation Guide - Page 11

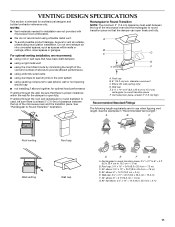
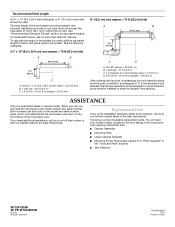
...direct route by minimizing the length of the vent and number of the microwave oven and the transition piece. Wall cap E. 3¹⁄₄" x 10...ft (8.3 x 25.4 cm = 7.3 m) C. 90° elbow: 3¹ ₄" x 10" = 25 ft (8.3 x 25.4 cm = 7.6 m) D. 90° elbow: 6" = 10 ft (15.2 cm = 3 m) E. Vent extension piece, at least 3" (7.6 cm) of clearance between the top of the microwave oven...
Installation Guide - Page 12

...9/10 Printed in the User Instructions. If you need additional assistance, call , you need the microwave oven model number and serial number. See the following examples: 3¹⁄₄" x 10" (8.3 x 25.4 cm) vent system = 73 ft (22.2 m) total A B 6 ft (1.8 m) 2 ft (0.6 m) C A. In addition, a rectangular 3" (7.6 cm) extension vent between the damper assembly and rectangular to...

KitchenAid Knowledge Base Results

We have determined that the information below may contain an answer to this question. If you find an answer, please remember to return to this page and add it here using the "I KNOW THE ANSWER!" button above. It's that easy to earn points!

  • The cycle time is not correct - Front-load washer
    ... correct on : detergent type, size and type of detergent to remove the excess suds. Does the displayed Estimated Time Remaining differ from the actual cycle time. Front-load washer Why is detected, the washer will not open - The display indicates too much suds, and the washer is required . Consider adding ...
  • Glass bowl and microwaves
    ...800-541-6399 Moday-Friday, 8am-8pm, or Saturday, 10am-5pm, Eastern Standard Time. Silicone coated flat beaters Follow these steps to remove the thread ring from the Glass..., cooktop or in the microwave oven. However, before placing the bowl in the microwave oven? Glass bowl and microwaves Can I put my glass mixer bowl in the microwave you require additional information, please...
  • KSB354 origin
    ... additional questions please contact KitchenAid Customer eXperience Center at 1-800-541-6390 Monday-Friday, 8am-8pm and Saturday 10am-5pm. Eastern Standard Time or visit shopkitchenaid.com .

Similar Questions

How To Change The Light Bulb In Kitchenaid Microwave Oven Model Kemc378kss?
I need assistance in the process to remove and replace the light bulb in the microwave portion of th...
(Posted by chipnchatter 11 years ago)
Microwave Will Not Heat
i have a kitchenaid convection/microwave oven, the oven works but the microwave does not heat
(Posted by bootif 12 years ago)
This Microwave Series Should Be Recalled Do To The Malfunction Of The Wave Guid
This microwave/convection oven should be recalled do to the malfunction of the wave guide? How long ...
(Posted by e1024 13 years ago)
Change Light Bulb In Microwave Oven.
How do I change the light bulb in a Kitchenaid KBMS1454SSS Microwave oven?
(Posted by danafeneck 13 years ago)
Ask a New Question
Use the box below to post a new question about this KitchenAid product .
Points & Prizes
  • You can earn points for nearly everything you do on HelpOwl.com
  • You can trade in those points for gift cards at leading retailers such as Amazon.com and Walmart
  • It's that simple!
See How it Works
Create a Free Account

KitchenAid Manuals

Find free KitchenAid KHHC2090SSS - Architect II 2.0 cu. ft. 1200 W manuals and user guides available at ManualOwl.com. Try out our unique manual viewer allowing you to interact with manuals from directly within your browser!

KitchenAid Reviews

View thousands of KitchenAid user reviews and customer ratings available at ReviewOwl.com.

Contact Information

Complete KitchenAid customer service contact information including steps to reach representatives, hours of operation, customer support links and more from ContactHelp.com.

Scoreboard Ratings

See detailed KitchenAid customer service rankings, employee comments and much more from our sister site.

KitchenAid Recalls

Find comprehensive KitchenAid recall information updated hourly on RecallOwl.com.