Get support for KitchenAid KHHC2090SSS - Architect II 2.0 cu. ft. 1200 W

KitchenAid KHHC2090SSS Support Question

KitchenAid KHHC2090SSS Support Question

Find answers below for this question about KitchenAid KHHC2090SSS - Architect II 2.0 cu. ft. 1200 W.
Need a KitchenAid KHHC2090SSS manual? We have 3 online manuals for this item!
Question posted by djdeyo64 on October 5th, 2013

Microwave Mode Khhc2090sss Touch Panel Beeps And Moves To Different Screens?

What causes the above problem? Can it be fixed?

Current Answers

There are currently no answers that have been posted for this question.
Be the first to post an answer!

Remember that you can earn up to 1,100 points for every answer you submit. The better the quality of your answer, the better chance it has to be accepted.

Related KitchenAid KHHC2090SSS Manual Pages

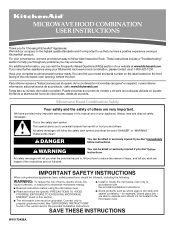
Use & Care Guide - Page 1

..."GROUNDING INSTRUCTIONS" found in this manual and on the front facing of the microwave oven opening, behind the door. are able to follow User Instruction Book. You..., or exposure to help you through any problems you don't immediately follow instructions. For additional information, you and others are not followed. MICROWAVE HOOD COMBINATION USER INSTRUCTIONS Thank you don't ...
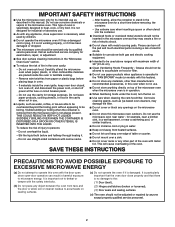
Use & Care Guide - Page 2

...turn oven off, and disconnect the power cord, or shut off the pad and touch ...microwave oven when the microwave oven is in the microwave oven as lye-based oven cleaners, may create a fire or risk of 36" (91.44 cm). ■ Clean Ventilating Hoods Frequently - This will cause overheating of oven...panel. - SAVE THESE INSTRUCTIONS PRECAUTIONS TO AVOID POSSIBLE EXPOSURE TO EXCESSIVE MICROWAVE ...
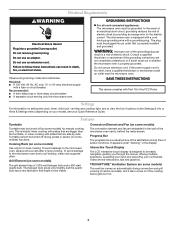
Use & Care Guide - Page 3

... convection and grill cooking (on some models) for 2-level cooking. Interactive Touch Display The LCD interactive touch display is equipped with a cord having a grounding wire with plates that... cord is a visual picture of the estimated running time of the microwave oven cavity, behind the metal screen. Turntable cannot be easily navigable, guiding you through the menus, offering...
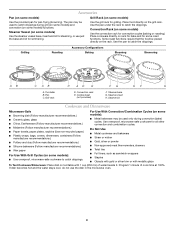
Use & Care Guide - Page 4

...Place cookware directly on rack for bake and for some models): ■ Use ovenproof, microwave-safe cookware to catch drippings during convection (bake) cycles. Do Not Use ■ ...roast functions. Grill rack D. Steamer insert H. Use ovenproof, microwave-safe cookware for steaming, or use the dish in the microwave oven. 4 Steamer Vessel (on some models): ■ Metal ...
Use & Care Guide - Page 5

...stages may be 2 charcoal filters - 1 behind each stage. To avoid damage to the microwave oven caused by arcing due to add additional stages, and set time, power and/or temperature (on... the microwave oven. Always follow a cooking cycle. Doing so can be prorammed to panel). Hot cooked food can result in food poisoning or sickness. Use gentle pressure when wiping the touch screen. ...
Use & Care Guide - Page 6

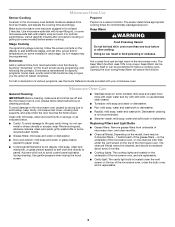
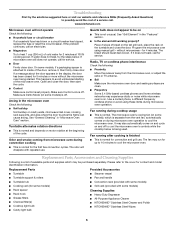
...problem continues, call . Program the microwave oven using these items during microwave oven operation to the cover for 4 minutes. If a message about the door appears in the microwave oven Check the following : ■ Proximity Move... Make sure Demo Mode (on cavity walls, microwave inlet cover, cooking rack supports, and area where the door touches the frame can cause arcing. Radio, ...
Use & Care Guide - Page 8

...or workmanship: ■ Electric element ■ Solid state touch control system parts SECOND THROUGH TENTH YEAR LIMITED WARRANTY On microwave ovens only, in the second through tenth years from date of...and repair labor to correct defects in materials or workmanship. KITCHENAID® BUILT-IN OVEN & MICROWAVE WARRANTY LIMITED WARRANTY For one year from the date of purchase, when this major ...
Dimension Guide - Page 1

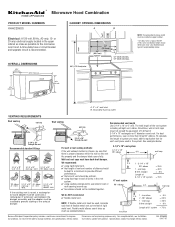
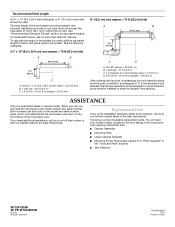
... not exceed the equivalent of 140 feet of 6" system = 73 ft. A time-delay fuse or circuit breaker and separate circuit is typical for planning purposes only. or 20-amp electrical supply located in the vent system. ✔ using caulking compound to the microwave oven hood. See examples below . For complete details, see Installation...
Installation Guide - Page 1

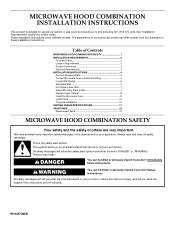
...word "DANGER" or "WARNING." W10247285B The appearance of your particular model may differ slightly from the illustration in this manual and on your appliance. This is... Prepare Upper Cabinet 8 Install the Microwave Oven 9 Install Filters 10 Complete Installation 10 VENTING DESIGN SPECIFICATIONS 11 ASSISTANCE 12 Replacement Parts 12 MICROWAVE HOOD COMBINATION SAFETY Your safety and ...
Installation Guide - Page 2

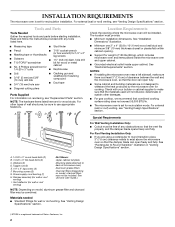
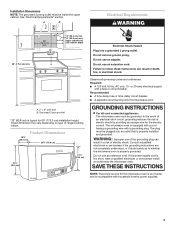
...A B C D E FG Location Requirements Check the opening . ■ Support for recirculation mode. See "Installation Dimensions" illustration. ■ Minimum one 2" x 4" (50.8 x 101.6 mm) wood wall stud and minimum 3/8" (10 mm) thickness drywall or plaster/lath within cabinet opening where the microwave oven will not discolor, delaminate or sustain other types of clearance between the wall...
Installation Guide - Page 3

... depth A. 2" x 4" wall stud B. Grounded 3 prong outlet *33" (83.8 cm) is too short, have a qualified electrician or serviceman install an outlet near the microwave oven. Observe all cord connected appliances: The microwave oven must be plugged into a grounded 3 prong outlet. GROUNDING INSTRUCTIONS ■ For all governing codes and ordinances. If the power supply cord is...
Installation Guide - Page 4

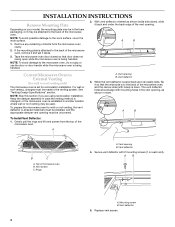
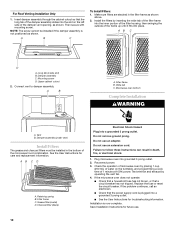
... 3. A B To Install Vent Deflector: 1. Gently pull the rings and lift vent screen from the microwave oven cavity. 2. Rings A. Remove any remaining contents from the top of the vent opening B. Tape the microwave oven door closed so that the wide side is to the microwave oven, do not grip or use the door or door handle while the...
Installation Guide - Page 5

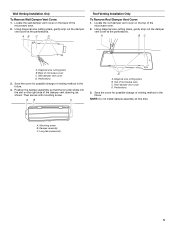
... Roof Venting Installation Only To Remove Roof Damper Vent Cover: 1. Diagonal wire cutting pliers B. Perforations 3. Diagonal wire cutting pliers B. Top of microwave oven C. A. Long tab (inside slot) 5 Back of microwave oven C. Save the cover for possible change of the damper vent opening, as shown. Mounting screw B. Locate the wall damper vent cover on the...
Installation Guide - Page 6

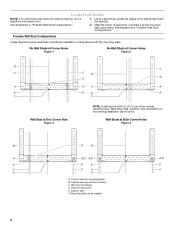
... at One Corner Hole Figure 3 NOTE: If wall stud is within 6" (15.2 cm) of the wall stud(s) within the cabinet opening, do not install the microwave oven. 1. See illustrations in "Possible Wall Stud Configurations." Corner holes (on mounting plate) B. Locate Wall Stud(s) NOTE: If no wall studs exist within the opening.
Installation Guide - Page 7

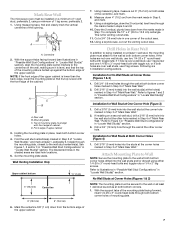
Mark Rear Wall The microwave oven must be secured to the wall on at least 1 wall stud as well as at both bottom corners. 1. D A C B A. Rear wall B. See figures 1, 2 and/or 3 in "...
Installation Guide - Page 8

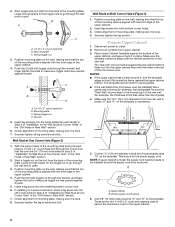
... the holes cut into the upper cabinet align with the front edge of the microwave oven. NOTE: If upper cabinet is aligned with the holes in Rear Wall" section...(26.7 cm) dimension from the back of "Installation for two 1/4-20 x 3" bolts and washers used to secure the microwave oven to outlet. 2. Upper-cabinet template D E 10¹⁄₂" 10¹⁄₂" (26.7 cm) F ...
Installation Guide - Page 9

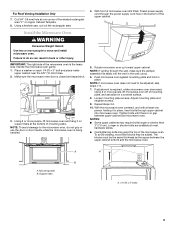
... to move and install microwave oven. Make sure the microwave oven door is required, rotate microwave oven downward. Using 2 or more people, lift microwave oven and hang it in place, insert bolts through upper cabinet into the vent in the bottom of microwave oven still tilted, thread power supply cord through the wall, make sure the damper assembly fits easily into microwave oven...
Installation Guide - Page 10

...the filter housing, then swinging the outside of the microwave hood combination. Long tab (inside slot) B. Vent B. AB C D A. If the problem continues, call an electrician. ■ Check that... in the filter frame as shown above. 2. Microwave oven bottom Complete Installation WARNING A. Do not remove ground prong. Plug microwave oven into place. Test vent fan and exhaust by placing...
Installation Guide - Page 11

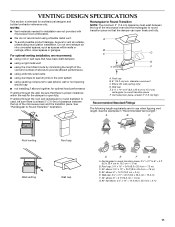
...only. Wall cap: 3¹⁄₄" x 10" = 40 ft (8.3 x 25.4 cm = 12.2 m) F. 45° elbow: 6" = 5 ft (15.2 cm = 1.5 m) G. 90° flat elbow: 3¹⁄₄" x 10" = 10 ft (8.3 x 25.4 cm = 3 m) 11 diameter round vent C. ... (7.6 cm) of clearance between the top of the microwave oven and the transition piece. Rectangular to Round Transition NOTE: The minimum 3" (7.6 cm) clearance...
Installation Guide - Page 12

..." section for either type of the microwave oven opening, behind the microwave oven door on the model and serial number plate, which is round, a rectangular to keep the damper from sticking. Two 90° elbows = 20 ft (6.1 m) B. 1 wall cap = 40 ft (12.2 m) C. 1 rectangular to round transition piece = 5 ft (1.5 m) D. 2 ft (0.6 m) + 6 ft (1.8 m) straight = 8 ft (2.4 m) If the existing vent is...

KitchenAid Knowledge Base Results

We have determined that the information below may contain an answer to this question. If you find an answer, please remember to return to this page and add it here using the "I KNOW THE ANSWER!" button above. It's that easy to earn points!

  • My microwave oven will not run
    ... and microwave combination ovens Can I use of the door? Is the electronic oven control set ? See "Child Lock" section below . Is the magnetron working properly? See "Assistance or service" section below . Touch and hold...and Light pads will not run Why won't my microwave oven run? Child Lock (on some models) The Child Lock shuts down the control panel pads to heat one cup (250 mL) ...
  • Can I use aluminum foil in my microwave and if so, are there tips for using it?
    ...microwave oven (on some metal can occur and cause damage to touch the inside cavity walls, ceiling or floor. Built-in ovens Product Literature (Use & Care, Parts Lists, etc) If not used with another metal object during cooking. Replacing oven... glaze My microwave oven will not run FAQs Knowledgebase search tips Different types of light) can be used in the oven. Aluminum foil...
  • Beeps and tones - Ultima built-in oven with steam
    ... the Timer for both ovens. Tone volume (sound) The preset volume can change the sound from either display. To change the sound level, touch the "plus" (+) or "minus" (-) signs to increase or decrease to the left. Architect Series II - Tones are audible signals that indicate the following: One beep Valid key touch Function was entered One...

Similar Questions

Where Is The Fuse Located
Where is the fuse located on a Kitchenaid model khhc2090sss microwave oven
(Posted by Rlwalker2 5 years ago)
How To Change The Light Bulb In Kitchenaid Microwave Oven Model Kemc378kss?
I need assistance in the process to remove and replace the light bulb in the microwave portion of th...
(Posted by chipnchatter 11 years ago)
Microwave Will Not Heat
i have a kitchenaid convection/microwave oven, the oven works but the microwave does not heat
(Posted by bootif 12 years ago)
This Microwave Series Should Be Recalled Do To The Malfunction Of The Wave Guid
This microwave/convection oven should be recalled do to the malfunction of the wave guide? How long ...
(Posted by e1024 13 years ago)
Change Light Bulb In Microwave Oven.
How do I change the light bulb in a Kitchenaid KBMS1454SSS Microwave oven?
(Posted by danafeneck 13 years ago)
Ask a New Question
Use the box below to post a new question about this KitchenAid product .
Points & Prizes
  • You can earn points for nearly everything you do on HelpOwl.com
  • You can trade in those points for gift cards at leading retailers such as Amazon.com and Walmart
  • It's that simple!
See How it Works
Create a Free Account

KitchenAid Manuals

Find free KitchenAid KHHC2090SSS - Architect II 2.0 cu. ft. 1200 W manuals and user guides available at ManualOwl.com. Try out our unique manual viewer allowing you to interact with manuals from directly within your browser!

KitchenAid Reviews

View thousands of KitchenAid user reviews and customer ratings available at ReviewOwl.com.

Contact Information

Complete KitchenAid customer service contact information including steps to reach representatives, hours of operation, customer support links and more from ContactHelp.com.

Scoreboard Ratings

See detailed KitchenAid customer service rankings, employee comments and much more from our sister site.

KitchenAid Recalls

Find comprehensive KitchenAid recall information updated hourly on RecallOwl.com.