KitchenAid KCM111OB Support Question
KitchenAid KCM111OB Support Question
Find answers below for this question about KitchenAid KCM111OB.Need a KitchenAid KCM111OB manual? We have 1 online manual for this item!
Question posted by Anjaesteba on November 26th, 2013
Kitchenaid 14 Cup Coffee Maker Clean Indicator Display Will Not Disappear
The person who posted this question about this KitchenAid product did not include a detailed explanation. Please use the "Request More Information" button to the right if more details would help you to answer this question.
Current Answers
Related KitchenAid KCM111OB Manual Pages
Use & Care Guide - Page 3
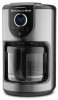
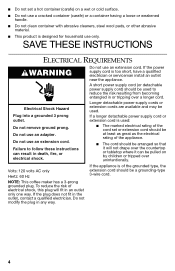
... you don't follow instructions.
Use handles or knobs.
■ To protect against electrical shock, do not immerse cord, plugs, or coffee maker in water or other than intended use.
■ Do not use and before putting on container (carafe).
■ The container (... after the appliance malfunctions or has been damaged in this appliance.
Return appliance to cool before cleaning.
Use & Care Guide - Page 4
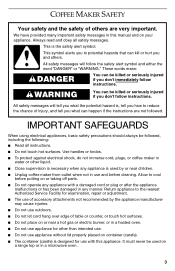
... the risk resulting from becoming entangled in or tripping over a longer cord. NOTE: This coffee maker has a 3-prong grounded plug. ■ Do not set or extension cord should be at... a cracked container (carafe) or a container having a loose or weakened handle.
■ Do not clean container with abrasive cleaners, steel wool pads, or other abrasive material.
■ This product is designed ...
Use & Care Guide - Page 5
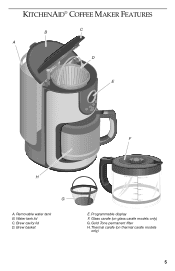
Water tank lid C. Programmable display F. Thermal carafe (on glass carafe models only) G. Brew cavity lid D. Gold Tone permanent filter H. Brew basket
E. Removable water tank B. Glass carafe (on thermal carafe models
only)
5 KITCHENAID® COFFEE MAKER FEATURES
B
C
A
D
E
F
H
G
A.
Use & Care Guide - Page 6
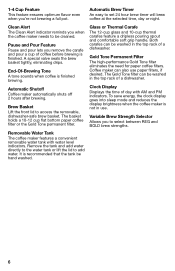
... Tone permanent filter. Clock Display Displays the time of a dishwasher. Remove the tank and add water directly to the water tank or lift the lid to be washed in the top rack of day with water level indicators. 1-4 Cup Feature
This feature ensures optimum flavor even when you when the coffee maker needs to add water...
Use & Care Guide - Page 7
... brew time.
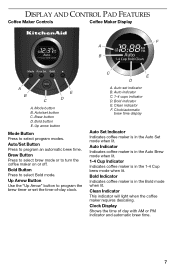
7 Clock/automatic
brew time display
Auto Set Indicator Indicates coffee maker is in the 1-4 Cup brew mode when lit. Auto Indicator Indicates coffee maker is in the Auto Brew mode when lit. 1-4 Cup Indicator Indicates coffee maker is in the Bold mode when lit. Clean Indicator This indicator will light when the coffee maker requires descaling. C E
D
A. Mode button B.
Brew...
Use & Care Guide - Page 8
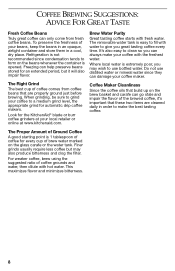
... Right Grind
The best cup of your coffee maker. Finer grinds usually require less coffee but it 's important that are cleaned daily in a cool, dry place. To preserve the freshness of coffee comes from fresh coffee beans. This maximizes flavor and minimizes bitterness.
8
COFFEE BREWING SUGGESTIONS: ADVICE FOR GREAT TASTE
Fresh Coffee Beans
Truly great coffee can only come from...
Use & Care Guide - Page 9
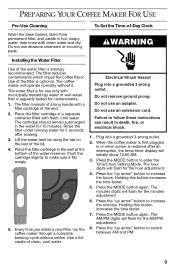
...for 5 seconds after an interruption, the brew timer display will operate normally without coffee. The filter reduces contaminants which impair the coffee flavor. Use of the water reservoir. Place the ... The minutes digits will flash for the minutes adjustment. 6. PREPARING YOUR COFFEE MAKER FOR USE
Pre-Use Cleaning
Wash the brew basket, Gold Tone permanent filter, and carafe in hot,...
Use & Care Guide - Page 10
... the reservoir at the same time. After filling the reservoir, place the carafe in the coffee maker.
KITCHENAID® COFFEE MAKER USE
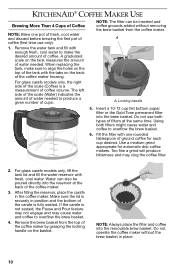
Brewing More Than 4 Cups of Coffee
NOTE: Brew one rounded tablespoon of ground coffee for automatic drip coffee makers. Insert a 10-12 cup flat bottom paper filter or the Gold Tone permanent filter into the removable brew basket. Remove...
Use & Care Guide - Page 11
... before starting the next brew cycle.
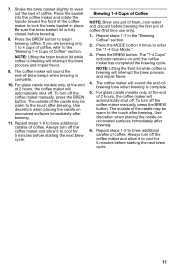
11 Repeat steps 1-7 in place. The "1-4 Cups" indicator remains on uncovered surfaces immediately after brewing. To turn off the coffee maker and allow it to cool for 5 minutes before brewing the first pot of the coffee maker to the touch after brewing.
6. Use discretion when placing the carafe on until...
Use & Care Guide - Page 12

... and Pour" feature enables you to remove the carafe from the coffee maker and pour a cup of coffee from the brew basket. To program and activate the "Bold" mode setting:
1.
Press the "up to increase the hours. The "AM/ PM" indicator will flash. The "Auto Set" indicator will beep.
Press the AUTO SET button.
The "Minutes...
Use & Care Guide - Page 13
... remove the water filter (see the "Installing the Water Filter" section) and make sure the brew basket contains no coffee or coffee filters.
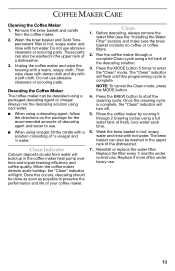
2. Reinstall or replace the water filter. Do not use abrasive cleansers or scouring pads. Wash the brew basket in the upper rack of your coffee maker.
Clean Indicator
Calcium deposits (scale) from the...
Use & Care Guide - Page 14
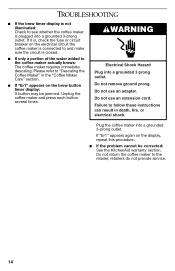
... be jammed. Do not remove ground prong.
Please refer to follow these instructions can result in the "Coffee Maker Care" section.
■ If "Er1" appears on the brew button timer display: A button may be corrected: See the KitchenAid warranty section.
Unplug the coffee maker and press each button several times. Do not use an extension cord.
Use & Care Guide - Page 15
... United States, the District of Columbia and Canada: Hassle-free replacement of your personal records:
Model Number
Serial Number
Date Purchased
Store Name and Location
KITCHENAID® COFFEE MAKER WARRANTY
Length of Warranty:
50 United States, the District of Columbia, Canada, and Puerto Rico: One-year limited warranty from accident, alteration, misuse or...
Use & Care Guide - Page 16
... OF THIS LIMITED WARRANTY. to 8 p.m. (Eastern Time), or Saturday,
identical or comparable replacement to us. Box
your original coffee maker returned to your 10 a.m. When you are
defects in Puerto Rico
Your KitchenAid® coffee maker is covered by our one year limited warranty. In the carton, include your name and address on a
sheet of...
Use & Care Guide - Page 17
... to Order Accessories and Replacement Parts
To order accessories or replacement
To order accessories or replacement
parts for your coffee maker in the 50
parts for your local KitchenAid dealer or the For service information in Mexico, call the KitchenAid® line 01-800-002-2767. to :
Mississauga, ON L5N 0B7
Customer Satisfaction Center...
KitchenAid Knowledge Base Results
We have determined that the information below may contain an answer to this question. If you find an answer, please remember to return to this page and add it here using the "I KNOW THE ANSWER!" button above. It's that easy to earn points!-
Descaling the espresso machine
...; press the Espresso Button again to the next step. Descaling the Espresso Machine Coffee maker is not necessary for 15 seconds; local hard-water conditions may impair espresso quality. See,&... cleaning solution, place a large cup under the brew head (Do not attach the portafilter), and another under the frothing nozzle. Press the Espresso Button and dispense the cleaning... -
How often to descale a KitchenAid JavaStudio Coffeemaker.
... will build up of descaling KitchenAid coffeemaker. How often do I clean my coffee maker? When the coffeee maker detects a build-up in the Pro Line Series coffee maker Frequency of scale, the "Cleaning Needed" indicator will illuminate after brewing process is complete The "Cleaning Needed" indicator light is illuminated on a JavaStudio coffee maker If an "E1" or "E2" appears in the coffeee... -
Scale and the cleaning needed indicator light on the Java Studio coffeemaker.
... shopkitchenaid.com or call the KitchenAid Customer eXperience Center toll-free at When the Coffee Maker detects a build-up in the Coffee Maker heat pump over time and impair brewing efficiency and coffee quality. If the cleaning needed indicator lights after a brewing cycle is complete, repeat Step 2 using fresh descaling solution. NOTE: Replace the filter...
Similar Questions

Replacement Carafe For Kcm511who White 10 Cup Coffee Maker
where can I get a replacement carafe
where can I get a replacement carafe
(Posted by 195terra 7 years ago)

The Clean Indicator Light Won't Go Out Kitchenaid Coffee Maker
(Posted by mlanjol 9 years ago)

How To Set Auto Brew On My Kitchenaid 12 Cup Coffee Maker Kcm111ob
(Posted by swtrnasee 10 years ago)
How To Set The Automatic Brew For Kitchenaid Red 14 Cup Coffee Pot
(Posted by Markgsann 10 years ago)

Problem With Clean Indicator On The Kcm111ob 12cup Coffee Maker
The clean indicator light won't go out. Manual says to press Mode button, I do that, but it immediat...
The clean indicator light won't go out. Manual says to press Mode button, I do that, but it immediat...
(Posted by thedeerins 13 years ago)