Kenwood KDC-152 Support Question
Kenwood KDC-152 Support Question
Find answers below for this question about Kenwood KDC-152.Need a Kenwood KDC-152 manual? We have 2 online manuals for this item!
Question posted by hoops222699 on August 9th, 2022
Kdc-152 Faceplate
KDC-152 Faceplate is stuck on KDC-BT310U stereo
Current Answers
Answer #1: Posted by SonuKumar on August 10th, 2022 8:43 AM
SonuKumar

Member since:
May 9th, 2021 Points: 16,597,990

Member since:
May 9th, 2021 Points: 16,597,990
https://www.youtube.com/watch?v=9DFrkpTTSk4
https://www.youtube.com/watch?v=j0FNWp39Oz8
https://www.manualslib.com/manual/724348/Kenwood-Kdc-153.html?page=3
Please respond to my effort to provide you with the best possible solution by using the "Acceptable Solution" and/or the "Helpful" buttons when the answer has proven to be helpful.
Regards,
Sonu
Your search handyman for all e-support needs!!
Answer #2: Posted by RecLumagbas on August 9th, 2022 11:33 PM
RecLumagbas

Member since:
August 6th, 2022 Points: 280
Member since:
August 6th, 2022 Points: 280
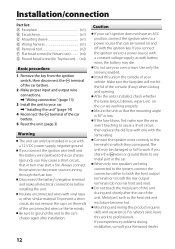
Basic procedure 1 Remove the key from the ignition switch, then disconnect the · terminal of the car battery. 2 Make proper input and output wire connections. \ "Wiring connection" (page 13) 3 Install the unit to your car. \ "Installing the unit" (page 14) 4 Reconnect the · terminal of the car battery. 5 Reset the unit. (page 3) Warning The unit can only be installed in a car with a 12 V DC power supply, negative ground. If you connect the ignition wire (red) and the battery wire (yellow) to the car chassis (ground), you may cause a short circuit, that in turn may start a fire. Always connect those wires to the power source running through the fuse box. Disconnect the battery's negative terminal and make all electrical connections before installing the unit. Insulate unconnected wires with vinyl tape or other similar material. To prevent a short circuit, do not remove the caps on the ends of the unconnected wires or the terminals. Be sure to ground this unit to the car's chassis again after installation. Caution If your car's ignition does not have an ACC position, connect the ignition wires to a power source that can be turned on and off with the ignition key. If you connect the ignition wire to a power source with a constant voltage supply, as with battery wires, the battery may die. Do not use your own screws. Use only the screws provided. Install this unit in the console of your vehicle. Make sure the faceplate will not hit the lid of the console (if any) when closing and opening. After the unit is installed, check whether the brake lamps, blinkers, wipers, etc. on the car are working properly. Mount the unit so that the mounting angle is 30° or less. If the fuse blows, first make sure the wires aren't touching to cause a short circuit, then replace the old fuse with one with the same rating. Connect the speaker wires correctly to the terminals to which they correspond. The unit may be damaged or fail to work if you share the · wires or ground them to any metal part in the car. When only two speakers are being connected to the system, connect the connectors either to both the front output terminals or to both the rear output terminals (do not mix front and rear). Do not touch the metal part of this unit during and shortly after the use of the unit. Metal part such as the heat sink and enclosure become hot. Mounting and wiring this product requires skills and experience. For safety's sake, leave this work to professionals. If you experience problems during installation, consult your Kenwood dealer. 13 ENGLISH Wiring connection Fuse (10 A) Antenna terminal Car fuse box Car fuse box Battery Ignition key switch Blue/White (Power control wire) Red (Ignition wire) Yellow (Battery wire) Black (Ground wire) To the metallic body or chassis of the car To the power control terminal when using the optional power amplifier, or to the antenna control terminal in the vehicle. (Not used) Rear/subwoofer output terminals Brown (Mute control wire) Blue (Antenna control wire) White Gray Green Purple White/Black Gray/Black Green/Black Purple/Black To the terminal that is grounded when either the telephone rings or during conversation. (To connect the Kenwood navigation system, consult your navigation manual.) To front speaker (left) To rear speaker (left) To front speaker (right) To rear speaker (right) 14 Installing the unit Installing without using the mounting sleeve (Japanese car) 1 Remove the mounting sleeve and escutcheon from the unit. 2 Align the holes in the unit (on both sides) with the vehicle mounting bracket and secure the unit with the supplied screws. 2 1 Connect the wiring harness to the unit. Other wiring connection has been completed earlier. (page 13) Before attaching, make sure the direction of the escutcheon is correct. (Wider hooks on the top side.) Dashboard of your car T: Toyota cars ; N: Nissan cars Removing the unit 1 Detach the faceplate. 2 Engage the catch pin on the removal tools into the holes on both sides of the escutcheon, then pull it out. 3 Insert the removal tools deeply into the slots on each side, then follow the arrows i
Related Kenwood KDC-152 Manual Pages
Instruction Manual - Page 1
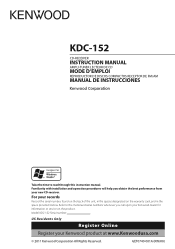
Model KDC-152 Serial number
US Residents Only
Register Online
Register your new CD-receiver. Familiarity with installation and...(KW/K0) For your Kenwood dealer for information or service on the warranty card, and in the space provided below.
KDC-152
CD-RECEIVER
INSTRUCTION MANUAL
AMPLI-TUNER LECTEUR DE CD
MODE D'EMPLOI
REPRODUCTOR DE DISCOS COMPACTOS RECEPTOR DE FM/AM
MANUAL DE ...
Instruction Manual - Page 2
... the unit
Specifications
15
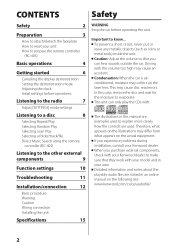
WARNING Stop the car before operating the unit. Detailed information and notes about the playable audio files are used to explain more clearly how the controls are stated in your model and in an online manual...can hear sounds outside the car. CONTENTS
Safety
Safety
2
Preparation
3
How to attach/detach the faceplate How to reset your Kenwood dealer.
Instruction Manual - Page 3

...are not round. To prevent deterioration, do not touch the terminals of the unit and faceplate with too much dust or the possibility of explosion if the battery is pressed.
Danger of... Replace only with coloring on the dashboard.
Lithium battery. Insulation sheet
Do not expose the faceplate to your disc writing software, and your unit If this unit fails to prepare the remote...
Instruction Manual - Page 4

... knob
Detaches the faceplate
The following indicator lights up when... ST: A stereo broadcast is in ...damage to bright sunlight.
Do not use a disc with a dry silicon or soft cloth. on the panel with a cotton swab gently, being careful not to observe this unit, pull them out horizontally. Clean the disc with tape stuck on the reverse side of the faceplate...
Instruction Manual - Page 5

... FM2/ FM3) or AM. Selects track/file. SCRL DISP
- AUD Enters [AUDIO CTRL] settings directly.
- The audio system pauses.
EXIT • Press and hold the following button(s)... Main unit
Remote...a commercial telephone accessory. (page 13)
When a call ends, "CALL" disappear.
The audio system resumes.
5
Enters clock adjustment mode directly (page 6) if pressed and
held . ...
Instruction Manual - Page 6
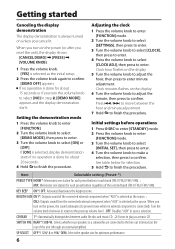
... display shows:
[CANCEL DEMO] \ [PRESS] \ [VOLUME KNOB]
1 Press the volume knob. [YES] is always turned on unless you cancel it. Press 4 / ¢ to move between audio file disc and music CD. ; 2: Forces to finish the procedure.
ON2: Outputs sound from the connected external component when "AUX" is connected). OFF: Disables "AUX...
Instruction Manual - Page 8
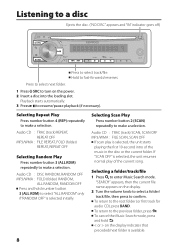
...number button 4 (REP) repeatedly to select "ALL RANDOM" only if "RANDOM OFF" is selected initially. Audio CD : DISC RANDOM, RANDOM OFF MP3/WMA : FOLD (folder) RANDOM,
ALL RANDOM, RANDOM OFF Press...SCAN OFF" is selected, the unit resumes normal play is available.
8 To return to make a selection.
Audio CD : TRAC (track) REPEAT, REPEAT OFF
MP3/WMA : FILE REPEAT, FOLD (folder) REPEAT, REPEAT ...
Instruction Manual - Page 9
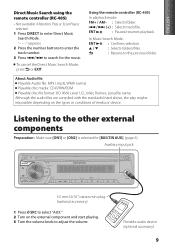
...Preparation : Make sure [ON1] or [ON2] is selected.
1 Press DIRECT to the previous folder.
Portable audio device (optional accessory)
9
"- - -" appears.
2 Press the number buttons to enter the track number...
3.5 mm (3/16") stereo mini plug (optional accessory)
1 Press SRC to select "AUX." 2 Turn on the types or conditions of media or device. About Audio file Playable Audio file: MP3 (.mp3...
Instruction Manual - Page 10

...ON].
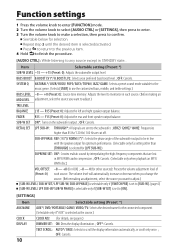
[SETTINGS]
Item
Selectable setting (Preset: *)
AUX NAME AUX*/ DVD/ PORTABLE/ GAME/ VIDEO/ TV: Selects the desired name for the connected component. (Selectable only if "AUX" is ... - 0 (for selection. Press to return to the previous item. 4 Hold to finish the procedure.
[AUDIO CTRL] : While listening to the subwoofer. ; 85HZ/ 120HZ/ 160HZ: Frequencies higher than [THROUGH] is selected...
Instruction Manual - Page 12

... during installation, consult your own screws. Mount the unit so that in the console of the unconnected wires or the terminals. Installation/connection
Part list: A Faceplate 1) B Escutcheon 1) C Mounting sleeve 1) D Wiring harness 1) E Removal tool 2) F Flat head screw (for Nissan cars 4) G Round head screw (for Toyota cars).... (×4)
Basic procedure
1 Remove the key...
Instruction Manual - Page 14

... mounting sleeve (Japanese car)
1 Remove the mounting sleeve and escutcheon from the unit. 2 Align the holes in place. N: Nissan cars
Removing the unit 1 Detach the faceplate. 2 Engage the catch pin on the
removal tools into the holes on both sides) with the vehicle mounting bracket and secure
the unit with the...
Owners Manual - Page 1

... and operation procedures will help you call upon your new CD-receiver.
KDC-152
CD-RECEIVER
INSTRUCTION MANUAL
AMPLI-TUNER LECTEUR DE CD
MODE D'EMPLOI
REPRODUCTOR ... Kenwood dealer for information or service on the warranty card, and in the space provided below. Model KDC-152 Serial number Refer to read through this instruction manual. For your records
Record the serial number, found on...
Owners Manual - Page 2

...metal tools) inside the unit. CONTENTS
Safety
Safety
2
Preparation
3
How to attach/detach the faceplate How to reset your Kenwood dealer. Condensation: When the car is airconditioned, moisture may differ from...remote
controller (RC-405)
Listening to know... Detailed information and notes about the playable audio files are used to make sure that you can only play the CDs with the ...
Owners Manual - Page 3
... deterioration, do not touch the terminals of the unit and faceplate with coloring on the dashboard. Discs with your disc recorder ... reset button. ENGLISH
Preparation
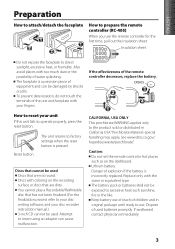
How to attach/detach the faceplate
1 1
2 2
How to excessive heat such sunshine, fire or the like. Insulation sheet
Do not expose the faceplate to direct sunlight, excessive heat, or humidity.
Dispose ...
Owners Manual - Page 4

...function properly if the connectors between the unit and faceplate are dirty. Display window
Ejects the disc
Volume knob
Detaches the faceplate
The following indicator lights up when... Failure to damage... not expose to the monitor or unit.
Detach the faceplate and clean the connector with tape stuck on the reverse side of the faceplate)
Handling discs Do not touch the recording surface of...
Owners Manual - Page 5
... jack.
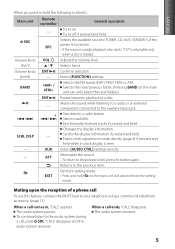
4 / ¢
+ 4 / ¢
Searches for a radio station.
The audio system pauses.
Confirms selection. Mutes the sound while listening to a radio or an external component ...8734; Selects items.
Volume knob ENT
(press)
-
To continue listen to the previous item. The audio system resumes.
5 Main unit
Remote controller
General operation
- Exit from the setting
mode. Turns on...
Owners Manual - Page 6

... the unit), the display shows:
[CANCEL DEMO] \ [PRESS] \ [VOLUME KNOB]
1 Press the volume knob. [YES] is selected as the source. ;
Press 4 / ¢ to move between audio file disc and music CD. ; 2: Forces to the previous volume level. ;
MIX: Memorizes one station for about 20 seconds. 4 Hold to confirm. [DEMO OFF] appears...
Owners Manual - Page 10
...[ON].
[SETTINGS]
Item
Selectable setting (Preset: *)
AUX NAME AUX*/ DVD/ PORTABLE/ GAME/ VIDEO/ TV: Selects the desired name for optimum performance. (Selectable only if a setting other sources): Presets... the volume adjustment level of the subwoofer output to any source except in MP3/WMA audio compression. ; See table below for [LPF SUB-W].)
SUPREME SET: ON*: Creates realistic ...
Owners Manual - Page 12
...turn may start a fire. Metal part such as with vinyl tape or other similar material. Installation/connection
Part list: A Faceplate 1) B Escutcheon 1) C Mounting sleeve 1) D Wiring harness 1) E Removal tool 2) F Flat head screw (for ... voltage supply, as the heat sink and enclosure become hot.
Make sure the faceplate will not hit the lid of this unit in the car. When only two...
Owners Manual - Page 14
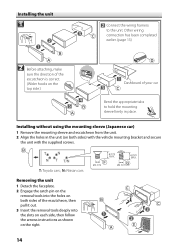
... correct. (Wider hooks on the top side.)
Dashboard of your car
Bend the appropriate tabs to the unit.
N: Nissan cars
Removing the unit 1 Detach the faceplate. 2 Engage the catch pin on the
removal tools into the slots on each side, then follow the arrows instructions as shown on both sides) with...
Similar Questions

Code To Unlock Kenwood Kdc-x491 Stereo
bought a truck with stereo in it have no paperwork is it possible or should i put another stereo in ...
bought a truck with stereo in it have no paperwork is it possible or should i put another stereo in ...
(Posted by kpwaiting42 10 years ago)

My Kenwood Kdc-x595 Stereo Doesn't Work Help!
my Kenwood KDC-X595 stereo does not work, do not turn on and the only thing that does is remove the ...
my Kenwood KDC-X595 stereo does not work, do not turn on and the only thing that does is remove the ...
(Posted by murriaandres 11 years ago)
Where Do I Connect Remote Wire From Amp To The Kenwood Kdc-152 Stereo? What Colo
(Posted by Wwwwendyrojas5 11 years ago)
Kenwood Kdc 152
how do you stop your kenwood kdc 152 deck from saying call in the middle of a song?
how do you stop your kenwood kdc 152 deck from saying call in the middle of a song?
(Posted by Anonymous-90937 11 years ago)

Kenwood Kdc -152
installed brand new and the face plate doesnt turn on , you can hear the cd player cut on and spin r...
installed brand new and the face plate doesnt turn on , you can hear the cd player cut on and spin r...
(Posted by mycadisondubs 11 years ago)