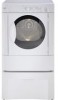
Kenmore 8804 Support Question
Kenmore 8804 Support Question
Find answers below for this question about Kenmore 8804 - 5.8 cu. Ft. Electric Dryer.Need a Kenmore 8804 manual? We have 2 online manuals for this item!
Question posted by mike200083006 on January 7th, 2014
Control Panel
came with no directions to replace control panel. where can I find how to replace this part in my dryer model88042
Current Answers
Related Kenmore 8804 Manual Pages
Use and Care Guide - Page 2
... not touch any phone _nyour building. Follow the gas supplier's instructions.
Your dryer may be preceded by a qualified installer, service agency or the gas supplier. 2
Always read and obey all occupants.
Do not store or use any electrical switch; If you what can happen if the instructions are found on your safety...
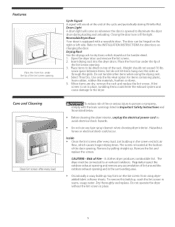
Use and Care Guide - Page 3
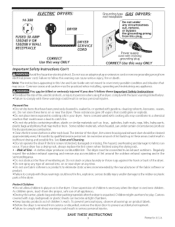
... way ONL Y
Important Safety Instructions Con't
_Avoid
fire hazard or electrical shock. C hildren might usethem for play on or near dryer at any appliance.
Prevent Fire
Do not dry items that could result in this dryer, complywith the basicwarnings listed below. Keep laundry products out of Fire -
Do not spray any type of lint...
Use and Care Guide - Page 4
...To prevent personal injury or damage tothe dryer, the electrical power cord of fire, electrical shock, or injury to persons, read and follow fabric care labels and laundry product labels.
To reduce the risk ...
• To prevent shock hazard and assure stability du ring operation, the dryer must replace the thermal limiter switch after correcting the fault, • Failure to comply with...
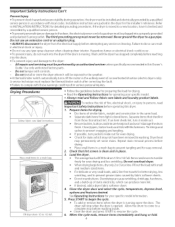
Use and Care Guide - Page 5
..., feathers or down. 5. Hazardous fumes or electrical shock could enter the exhaust system and cause damage to illuminate the dryer drum during Wrinkle-Rid. The screen is not...injury to be connected to the INSTALLATION INSTRUCTIONSfor directions on the right or left side. Remove the lint and replace the screen. A clothes dryer produces combustible lint. Place items to persons ...
Use and Care Guide - Page 6
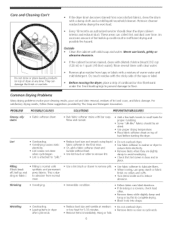
...laundry products on top of load before drying the next load. Never use spray starch or fabric finish on top of dryer at medium or low heat for
proper tumbling. Place fabric softener sheet on collars and cuffs.
reduce static electricity...
electricity. o Use proper drying temperature. o When ironing, use harsh, gritty or abrasive cleansers.
o Follow fabric care label directions...
Use and Care Guide - Page 7

... lint screen before laundering.
Drying temperature too high.
Call authorized service person for service, review this dryer. Replace fuse.
Electric dryer is open (gas models). SeeDrying Procedures. Foreign objects such as cycle ends.
Dryer does not have anough air supply to a 208 volt circuit,
Drying procedures have not been met. Avoid Service Checklist
OCCURRENCE...
Use and Care Guide - Page 8
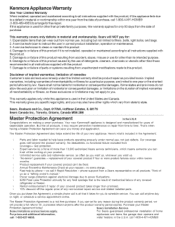
... this appliance fails due to a defect in material or workmanship within twelve
Product replacement if your covered product can't be product repair as provided herein. If this...or limitations may require preventive maintenance or repair from
coverage--
replacement
of your request - Power surge protection against electrical damage due to state.
failure of any food spoilage that...
Installation Instructions - Page 2
...System Requirements ...Gas Supply Requirements ...Location of Your Dryer...Rough-In Dimensions ...Mobile Home Installation ...Unpacking ...Reversing Door Swing ...Electrical Installation ...Grounding Requirements ...Electrical Connections--3-wire ...Electrical Connections--4-wire ...Gas Connection ...General Installation ...Replacement Parts ...Espahol ...
2 3 3-4 4-5 5 6 7
7 8-9 I0
I0 11 11 12
12...
Installation Instructions - Page 3
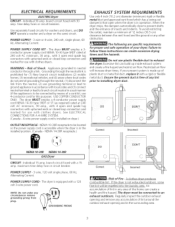
...ONLY. See ELECTRICAL CONNECTIONS FOR A 4-WIRE SYSTEM.
(Canada - 4-wire power supply cord is installed on the same circuit. When the dryer stops, ...can build up of plastic duct or metal foil duct, replace it with local codes and (3) connect neutral terminal or ...of insects and rodents. Risk of Shock. The dryer must be expelled into the laundry area. To avoid restricting the outlet, maintain ...
Installation Instructions - Page 4
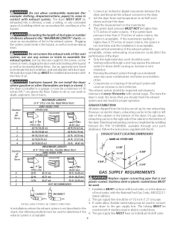
...dryers, exhausting can result in vent restriction.
SAME AS OTHER SIDE
./" 5 718"
/_,31=j
(10.2 cm)
0
3Oft. (9.14 m)
(6.35 cm) 18 ft. (5.49 m)
GAS SUPPLY REQUIREMENTS
1
22 ft. (6.71 m}
14 ft. (4.27 m)
Replace...
I . Read the measurement on electric dryers, exhausting can accumulate lint, resulting in the exhaust system.
Directional exhausting can cause an accumulation of ...
Installation Instructions - Page 5
... during any pressure testing of the gas supply connection to be exhausted outdoors.
5. The dryer MUST be installed in excess of combustion and
ventilation air. 3. 5. A 1/8 inch ... for proper operation in a bedroom, bathroom, recessor closet, MUSTbe exhausted outdoors. 2. The dryer MUST be installed immediately upstream of the gas supply piping system at test pressures equal to ...
Installation Instructions - Page 6
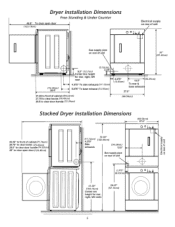
...) (182.88cm) 4.375"
Side
exhausts
13.5"
(34.29cm)
!
Dryer Installation Dimensions
Free=Standing & Under Counter
48.5" To clear open door (123.19cm)
Electrical supply
on rear of unit
/
0 o ,'_,_ #
l
Gas supply pipe... (70.49cm) 28.5 to clear door handle (72.39cm)
q
(68.58cm)
(34.29cm)
Stacked Dryer Installation Dimensions
T
9
(68.58cm) 27.0"
1
28.25" to front of unit
l
36"
"91...
Installation Instructions - Page 7
...secu rely fastened to be not less than twice the area of the dryer exhaust outlet.
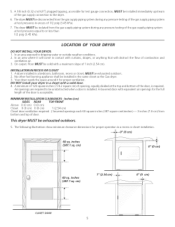
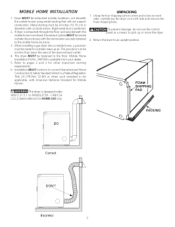
4. Installation MUSTconform to current Manufactured Home Construction & Safety ...Dryer MUST be 4 inches (10.16 cm) in diameter with American National Standard for other important venting requirements.
6. This provision is not applicable, with no obstructions. To prevent damage, do not use the control panel...
Installation Instructions - Page 8
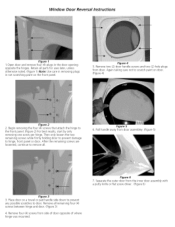
... or pad handle side down to prevent any possible scratches to scratch paint on the front panel. Separate the outer door from door. Figure 5 6. Again taking care not to door.... hinge and door. (Figure 3)
4.
Begin removing the four (4) screws that attach the hinge to the front panel. (Figure 2) For best results, start by only removing one screw per hinge.
Pull handle away from side ...
Installation Instructions - Page 9

... into holes that had secured the hinge.
15. Install four (4) screws into the front panel door opening .
Install four (4) screws securing hinge to door assembly in the new location, take note to ...place hinge in the front panel door opening where hinges were originally installed. Reinstall door handle by placing the handle...
Installation Instructions - Page 10
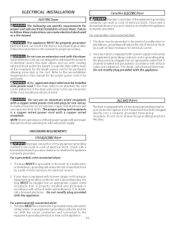
... the circuit conductors and connected to the pre-installation requirements in this dryer. Since your protection against shock hazard and should be plugged directly into a properly grounded three-prong receptacle. Do not cut by any movement of the cord, resulting in electrical shock.
1. Tile dryerMUSTbe grounded. In the event of a malfunction or breakdown...
Installation Instructions - Page 11
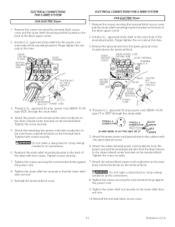
WIRE SYSTEM
USA ELECTR/CDryer
l
1.
GREEN SCREW
GREEN POWER CORD
SILVERTERMINAL TERMINAL BLOC K
tUTTIGHTEN NUT TO THESE _READS
BRACKET...
. Remove the screws securing the terminal block access cover and the strain relief mounting bracket located on the back of the dryer upper corner.
2. power cord, NEMA 10-30 type SRDT,through the strain relief.
4. Attach the remaining two power cord...
Installation Instructions - Page 12
... is turned on top of the dryer.
7. VALVE OPEN I GAS FLOW POSITION
REPLACEMENT PARTS
Pedestal A pedestal accessory,ModelNo. 48062 (white), 48066(black), specifically designed for this dryer are needed for proper operation. Children might use . Use a 1/2 inch to 3/8 inch (1.27 cm to disconnection when servicing controls.
Remove the shipping cap from combustible materials, gasoline...
Installation Instructions - Page 24

For the replacement parts, accessories and owner's manuals that you need to do-it ! of all major brand appliances, lawn and garden equipment, or heating and cooling systems,
...
Similar Questions

How To Open Front Panel
How do you open the front panel of Kenmore gas dryer 98042
How do you open the front panel of Kenmore gas dryer 98042
(Posted by 2rnzrus 1 year ago)

Dryer Vent Positioning
Where is the vent positioned on the back of an 8787 HE3 7.0Cu Ft Electric Dryer?
Where is the vent positioned on the back of an 8787 HE3 7.0Cu Ft Electric Dryer?
(Posted by monte20536 1 year ago)


New Dryer Has No Heat. Runs Cold Then I Can Smell Gas Coming Out Of Vent
(Posted by piepergeorge 12 years ago)

Kenmore 80272 Dryer Question
We are looking at this dryer, but I am concerned because I use "air dry" alot, so I am wondering......
We are looking at this dryer, but I am concerned because I use "air dry" alot, so I am wondering......
(Posted by jwhall15 12 years ago)