Hunter 20174 Support Question
Hunter 20174 Support Question
Find answers below for this question about Hunter 20174.Need a Hunter 20174 manual? We have 3 online manuals for this item!
Question posted by Blaschkemb on September 13th, 2014
G0253-80
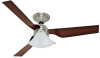
Where can I find this fan blade near zip code 90232. Thanks
Current Answers
Related Hunter 20174 Manual Pages
Owner's Manual - Page 1
Model Name
Model No.
For Your Records and Warranty Assistance For reference, also attach your receipt or a copy of your receipt to the manual. Date Purchased
Where Purchased
Type 3 Models
Owner's Guide and Installation Manual
English
Español
Form# 45007-01 20090611 ©2009 Hunter Fan Co.
Owner's Manual - Page 2
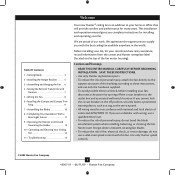
... local electrical codes and ANSI/NFPA 70. Cautions and Warnings
• READ THIS ENTIRE MANUAL CAREFULLY BEFORE BEGINNING INSTALLATION.
SAVE THESE INSTRUCTIONS.
• Use only Hunter replacement parts. • To reduce the risk of personal injury, attach the fan directly to the
support structure of personal injury, do not bend the blade attachment...
Owner's Manual - Page 3
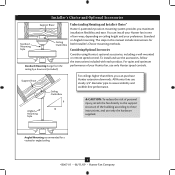
Considering Optional Accessories
Consider using Hunter's optional accessories, including a wall-mounted or remote speed control.
CAUTION: To reduce the risk of personal injury, attach the fan directly to the support structure of the building according to assure stability and wobble-free performance. For quiet and optimum performance of two ways, depending ...
Owner's Manual - Page 4
... building structure are essential for safety, reliable operation, maximum efficiency, and energy savings. Installing Multiple Fans? Proper ceiling fan location and attachment to the motor or fan blades. Gathering the Tools
You will need help installing the fan, your Hunter fan dealer can do the following tools for and install wood screws. • Identify and connect...
Owner's Manual - Page 5
...
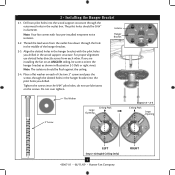
2-2. Tighten the screws into the pilot holes you drilled in the outlet box. Note: Your fan comes with the pilot holes you drilled. Do not over tighten.
3" Screw
Flat Washer
Ceiling Peak...Opening
Left
Step 2-3 (Angled Ceiling Only)
5 45007-01 • 06/11/09 • Hunter Fan Company
RIGHT
Place a flat washer on an ANGLED ceiling, be 9/64" in the hanger bracket into the...
Owner's Manual - Page 6
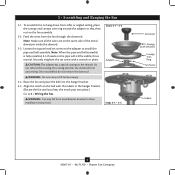
... Steps 3-4 - 3-5
Downrod Canopy
(with the indent in these installation instructions.
Once assembled, do not remove the downrod. To assemble fan to install the
pipe and ball assembly. Feed the wires from the fan through the downrod. Securely retighten the set screw on the ball with Washer) Canopy Trim Ring Set Screw
Indent...
Owner's Manual - Page 7
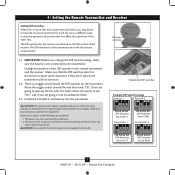
...Setting the Remote Transmitter and Receiver
Setting DIP switches When two or more fans are located near each fan set to a different code, so that may cause undesired operation. The DIP switches for the receiver ... change the DIP switch settings, make sure the battery is not connected to operate the fan with part 15 of the DIP switches in the the battery compartment.
The DIP switches...
Owner's Manual - Page 8
... Fan
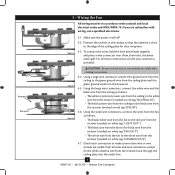
... wire from the fan to the red wire from the receiver (marked on white...fan to the black wire from the receiver (marked on white tag "FAN OUT")
• The white wire from the fan...Using the small wire connectors, connect the wires from the fan as follows: • The white (common) power wire ...8
45007-01 • 06/11/09 • Hunter Fan Company Step 5-5
CAUTION: Be sure no bare wire or wire...
Owner's Manual - Page 9
... the canopy trim ring, follow these steps:
1. Hanger Bracket
Canopy Trim Ring
Step 6-4
Step 6-3
Step 6-5
Canopy Screw
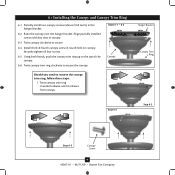
9 45007-01 • 06/11/09 • Hunter Fan Company 6 • Installing the Canopy and Canopy Trim Ring
6-1. Raise the canopy over the hanger bracket. Securely tighten all four screws.
6-5.
Steps 6-1 - 6-2 Canopy
Should you...
Owner's Manual - Page 10
Step 7-1
Step 7-2
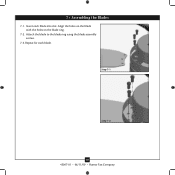
10 45007-01 • 06/11/09 • Hunter Fan Company Insert each blade. Attach the blade to the blade ring using the blade assembly screws.
7-3. Align the holes on the blade with the holes on the blade ring.
7-2. Repeat for each blade into slot.
7 • Assembling the Blades
7-1.
Owner's Manual - Page 11
....
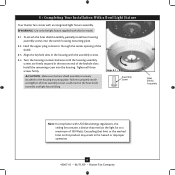
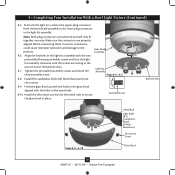
8-2. CAUTION: Make sure the heat shield assembly is securely attached to a maximum of 190 Watts. 8 • Completing Your Installation With a Bowl Light Fixture
Your Hunter fan comes with the assembly screws.
8-4. Tighten all three assembly screws could result in the housing with an integrated light fixture assembly. Failure to properly attach...
Owner's Manual - Page 12
... Slots
Steps 8-8 - 8-10
Metal Rod Light Bulbs (B10 CandelabraBased, 60 Watt Maximum)
Decorative Screw
Glass Bowl
12 45007-01 • 06/11/09 • Hunter Fan Company 8 • Completing Your Installation With a Bowl Light Fixture (Continued)
8-5. Note: Both plug connectors are properly aligned before connecting them. Make sure the connectors are...
Owner's Manual - Page 13
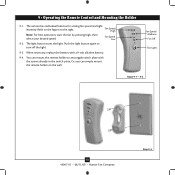
.... The light button turns the light.
The remote has individual buttons for setting fan speed and light
intensity. Fan Speed Low
9-2. You can simply mount the remote holder on the right. Fan Speed High
Note: For best operation, start the fan by pressing high, then select your desired speed. Push the light button again...
Owner's Manual - Page 14
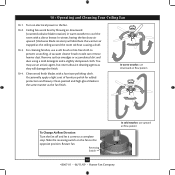
... accumulated dirt and dust using a mild detergent and a slightly dampened cloth.
Slide the reversing switch on electrical power to the fan.
10-2. Ceiling fans work best by blowing air downward (counterclockwise blade rotation) in the same manner as they will distribute the warmer air trapped at the ceiling around the room without causing...
Owner's Manual - Page 15
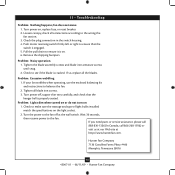
If so, replace all blade iron screws.
3. Tighten all the blades. Problem: Lights dim when turned on or do not turn on , replace fuse, or reset breaker. 2. Check to the wiring the
fan section. 3. If you need parts or service assistance, please call 888‑830‑1326 (In Canada, call 866-268-1936...
Parts Guide - Page 1
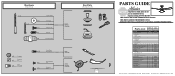
...Kit
Wire
x 4
Connector
x 10
Screw, Blade Iron Armature
Screw, Machine,
x 6
6-32
Decorative
x 3
Screw
Hanger Bracket Assembly
Blade Assembly
Switch Housing Assembly
Fan Parts
(Not Drawn to Scale)
PARTS GUIDE
... Globe/Shade Light bulb / Bulb
Model #
20174
Asm. Dwg. #
99082-01
Finish
Brushed Nickel
Qnty
Part #
1
96761-09
1
G0253-80
1
74229-03
10
63755-05
1
88137-01...
Similar Questions

Fan Blade Brackets
I need the fan blade brackets for my hunter 28672 I broke one. Where could I find the one for this f...
I need the fan blade brackets for my hunter 28672 I broke one. Where could I find the one for this f...
(Posted by mamagryz 2 years ago)

Fan Blades Dimensions
what are the dimensions for the fan blades for the hunter fan model 28839?
what are the dimensions for the fan blades for the hunter fan model 28839?
(Posted by srrnjs2018 5 years ago)


Buy Fan Blade Brackets
Where can I buy replacement white fan blade brackets for a Hunter model 23856 fan?
Where can I buy replacement white fan blade brackets for a Hunter model 23856 fan?
(Posted by sspaduzzi 9 years ago)

Hello , Could You Please Tell Me What Extention Rods Are Avalibel For A 20174
(Posted by corvanlakewood 11 years ago)