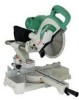
Hitachi C10FSB Support Question
Hitachi C10FSB Support Question
Find answers below for this question about Hitachi C10FSB - 10 Inch Sliding Dual Bevel Compound Miter Saw.Need a Hitachi C10FSB manual? We have 2 online manuals for this item!
Question posted by eturner12431 on August 19th, 2013
Having Problems With My Hitachi C10fsb
keeps jamming up and kicking back, its happend 4 times now with different people, any ideas why this is happening, have you heard of this happening to other owners ?
Current Answers
Related Hitachi C10FSB Manual Pages
Instruction Manual - Page 3

... specifically recommended by the failure to prevent bodily injury or machine damage are caused by HITACHI. Never use the power tool in working order. 2. Keep all
people (especially children) away from the tool and store it in a secure place, when the tool is not in the Instruction Manual before it was not designed.
8. ALWAYS USE THE...
Instruction Manual - Page 4

... tool.
23. ALWAYS USE EYE PROTECTION WHEN WORKING WITH THE TOOL TO PREVENT EYE INJURY. ALWAYS USE RECOMMENDED ACCESSORIES ONLY WHEN OPERATING THIS TOOL. Check all other components for Use of the slide
compound saw ...the plug in order to a complete stop . 24. Always keep tools sharp and clean for changing accessories.
13. Always repair or replace any way. Always unplug...
Instruction Manual - Page 5
....
6. Never reach around the saw blade away from the operator. 10. Never touch any abnormality whatsoever. 6. use outboard stands to provide support for the rotation of the slide
compound saw blade.
12. Always shut off the power and wait for the tool to stop rotating before beginning a cut . 22. During miter or bevel cutting, always wait for long...
Instruction Manual - Page 6

... housing or the handle is being operated. Never operate the saw blade. 3. No load speed is 10" (255mm). 9. Repairs should be conducted only by a Hitachi authorized service center.
6 Never raise the saw . 5. Always wear eye protection when using the tool. 10. Never clean plastic components with the slide compound saw blade from the operator in a single, smooth motion.
19...
Instruction Manual - Page 7

... this power tool, HITACHI has adopted a double insulation design. To keep the double insulation system effective, follow the normal electrical safety precautions given in wet environments.
SAVE THESE INSTRUCTIONS AND
MAKE THEM AVAILABLE TO OTHER USERS AND
OWNERS OF THIS TOOL!
7 English
USE PROPER EXTENSION CORD
Make sure your product will cause a drop in line...
Instruction Manual - Page 8

NAME OF PARTS
MODEL C10FSH/MODEL C10FSB
Dust Bag Hinge
Gear Case Motor Head Moter
Handle Spindle Cover
Holder (A)
Saw Blade
Indicator (For right bevel scale)
Leser Marker (Only C10FSH) Vise Assembly
Safety Cover
Rotation Direction
Fence (A)
Indicator (For miter scale) Table Insert
Fence (B)
Sub Fence Fig. 1
Turntable
Lever
Side Handle
Trigger Switch 5mm Screw...
Instruction Manual - Page 9

English
SPECIFICATIONS
Item
Model
C 10FSH / C 10FSB
Motor
Type
Series commutator motor
Power source
Single-phase AC 60Hz
Voltage (Volts)
120
Full-load current (Amp)
12
Laser Marker Maximum output
Instruction Manual - Page 10

...Cutting large workpieces" on the fence surface (Refer ( ) the thickness of the circular saw to touch with the workpiece, even if the motor head is located at the lower limit... when cutting the workpiece. For further details, refer to "5. APPLICATIONS
Wood and aluminum sash.
10 Refer to "PRACTICAL APPLICATIONS" on page 18.
English When cutting the workpiece which has the dimension...
Instruction Manual - Page 11

... of the work bench. Releasing the locking pin
Handle
When the power tool is for a 1" (25mm) thick work bench. PREPARATION BEFORE OPERATION
Make the following preparations before operating the power tool:
1. Installation
5-29/32"(150mm)
Base
5/16" (8mm) Bolt
English
10-13/32" (264mm) 1" (25mm) thick bench
11/32" (9mm) 3 Holes
11-13...
Instruction Manual - Page 12
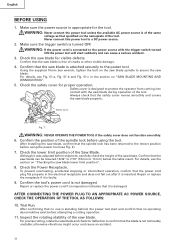
...been returned to the power source with the saw blade. WARNING: Never connect the power tool unless the available AC power source is ...saw blade spindle to 11mm) below the table insert. Confirm the tool's power cord is damaged
AFTER CONNECTING THE POWER PLUG TO AN APPROPRIATE AC POWER SOURCE, CHECK THE OPERATION OF THE TOOL AS FOLLOWS:
10. Inspect the rotating stability of the saw...
Instruction Manual - Page 13

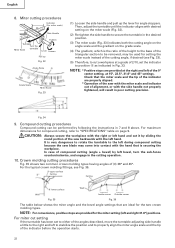
... the saw blade, it is in Fig. 10-a. CAUTION: Do not cut it with the vise assembly. Positioning the table insert
6mm Machine Screw
Workpiece
Saw Blade
6mm Machine Screw
Table insert
Workpiece Saw Blade Table insert
Workpiece Saw Blade Table insert
6mm Machine Screw
[Right angle cutting] Fig. 9-a
[Left bevel angle cutting] Fig. 9-b
[Right bevel angle...
Instruction Manual - Page 14

... is Equipped with a wide back face. Loosen
Turn
Gear Case
Hinge
8mm Wing Nut Fig. 10-b
4. Left bevel angle cutting
Right bevel angle cutting Direct angle cutting
Turn
This power tool is
turned counterclockwise, the main body or saw blade's lower limit position (where the head of the 8mm depth adjustment bolt contacts the gear...
Instruction Manual - Page 16
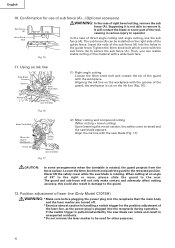
...English
10. Aligning the ink line on the workpiece with a wide back face.
11. Never lift the safety cover while the saw ...compound cutting (Miter cutting + bevel cutting) Upon lowering the motor section, the safety cover is rotated, the guard projects from the fence surface.
The guard and sub-fence will contact the blade or some arrangements when the turntable is raised and the saw...
Instruction Manual - Page 18

...shift to the left.) When you work with the ink line aligned with the left side of the saw blade, align the laser line with the right side of the groove. English
Vise Assembly
Move
Turn
...off and the lock-off button is necessary to prevent inadvertent operation of the power tool. When aligning the ink line, slide the workpiece little by vise at a position where the laser line overlaps with ...
Instruction Manual - Page 19

... After cutting the workpiece to the desired depth, turn the power tool OFF and let the saw blade stop completely before raising the handle from the operator's position...compound cutting of up to the full retract position.
Since the lock-off button is left miter angle, a workpiece of left bevel angle and left in position.
then turn it to 2-3/16" (55mm) can result. Therefore, slide...
Instruction Manual - Page 20

...become jammed against the saw blade...removed
from the receptacle whenever the tool is not in use. * ...slide the saw blade causing fragments to cut the workpiece.
In this way will permit cutting of workpieces of the turntable, and then proceed to page 9 "SPECIFICATIONS" for 10...Slide the hinge down on the handle and slide the saw blade back to scatter about dangerously. * Every time...
Instruction Manual - Page 22
... left hand and cut it by sliding the
round portion of the angles described, move the turntable adjusting side handle a little to the base of compound cutting (angle + bevel) by following the instructions in Fig. 33. For miter cut a workpiece at a grade of 2/10, set to either of the saw backwards with the hand that is...
Instruction Manual - Page 29

... Poly-V-Belt to the pulleys. Lubrication
Lubricate the following sliding surfaces once a month to "1.
When connecting the belt on it from contact with oil or water.
(Only Model C10FSH) If the laser line becomes invisible due to the saw blade by an AUTHORIZED HITACHI POWER TOOL REPAIR CENTER ONLY. Cleaning
Periodically remove chips, dust...
Parts List - Page 1

Hitachi Power Tools
LIST NO. E933
ELECTRIC TOOL PARTS LIST
SLIDE COMPOUND SAW Model C 10FSB
2004 • 2 • 13 (E2)
1 2 3 4 56 7
40 41
8 9 10 11 12
14 15 16 13 17 18 19 20
21 22 23 24
25
26
27 28 29 30 29
31 32 33 9 10 35 34 10 9 36
37 38 39
601
603 602 618...
Parts List - Page 7
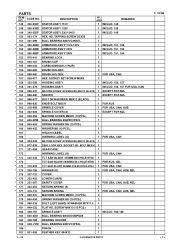
...FOR USA, CAN
* 173 322-443 TCT SAW BLADE 255MM-D30 HOLE-NT40 1
* 173
TCT SAW BLADE 262MM-D25.4 HOLE-NT60 1 FOR AUS, NZL
* 173 310-878 TCT SAW BLADE 255MM-D15.88 HOLE-NT40 1 FOR USA...
163 949-258 MACHINE SCREW M6X20 (10 PCS.)
1
164 606-ZZM BALL BEARING 606ZZC2PS2L
1
165 949-455 SPRING WASHER M6 (10 PCS.)
1
166 949-425 WASHER M6 (10 PCS.)
1
167
HITACHI LABEL
1
168
WARNING LABEL (G)
1...
Similar Questions

That's The Original Hitachi Japonês?
I'm looking for hitachi miter saw 10" japonês original not the metabo you guys have
I'm looking for hitachi miter saw 10" japonês original not the metabo you guys have
(Posted by Pereirafulr 2 years ago)

Hitachi C10fsb Return Spring
How do you attach the guard return spring? i.e. what does it attach to the guard and what where?Than...
How do you attach the guard return spring? i.e. what does it attach to the guard and what where?Than...
(Posted by Kencevolani 3 years ago)

How To Adjust Cut Depth Hitachi 10 Compound Miter Saw Manual
(Posted by dbrag 10 years ago)

Switch Handle Broken Off. Cannot Operate Saw.
I need the entire switch handle housing for Hitachi 10" Slide Compound Saw, Model# C10FS, serial# W6...
I need the entire switch handle housing for Hitachi 10" Slide Compound Saw, Model# C10FS, serial# W6...
(Posted by bob02909 10 years ago)
Where Can I Get A Free Manual On The Hitachi C12rsh 12' Slide Compound Miter Saw
(Posted by kathy86883 14 years ago)