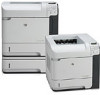
HP LaserJet P4015 Support Question
HP LaserJet P4015 Support Question
Find answers below for this question about HP LaserJet P4015.Need a HP LaserJet P4015 manual? We have 25 online manuals for this item!
Question posted by umaibigx on April 26th, 2014
How To Configure A Ip Address For A Hp Laserjet P4015n
Current Answers
Answer #1: Posted by waelsaidani1 on April 26th, 2014 7:51 AM

Member since:
May 12th, 2013 Points: 19,501,797

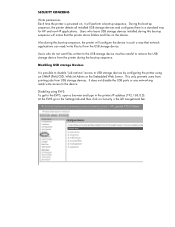
You can use the embedded Web server to view or change IP configuration settings.
-
Print a configuration page. On the embedded Jetdirect page, locate the IP address.
-
If you are using IPv4, the IP address contains only digits. It has this format:
xx.xx.xx.xx
-
If you are using IPv6, the IP address is a hexadecimal combination of characters and digits. It has this format:
xxxx::xxx:xxxx:xxxx:xxxx
-
-
Type the IP address into the address line of a Web browser to open the embedded Web server.
-
Click the Networking tab to obtain network information. You can change settings as needed.
Use the embedded Web server to set a network password or change an existing password.
-
Open the embedded Web server and click the Settings tab.
-
In the left-side pane, click Security .
-
In the area for Device Password , type the new password in the New Password box and in the Verify Password box.
-
At the bottom of the window, click Apply to save the password.
Manually configure IPv4 TCP/IP parameters from the control panel
In addition to using the embedded Web server, you can also use the control-panel menus to set an IPv4 address, subnet mask, and default gateway.
-
Press Menu .
-
Press the down arrow to highlight CONFIGURE DEVICE , and then press OK .
-
Press the down arrow to highlight I/O , and then press OK .
-
Press the down arrow to highlight EMBEDDED JETDIRECT MENU , and then press OK .
-
Press the down arrow to highlight TCP/IP , and then press OK .
-
Press the down arrow to highlight IPV4 SETTINGS , and then press OK .
-
Press the down arrow to highlight MANUAL SETTINGS , and then press OK .
-
Press the down arrow to highlight IP ADDRESS , and then press OK .
-or-
Press the down arrow to highlight SUBNET MASK , and then press OK .
-or-
Press the down arrow to highlight DEFAULT GATEWAY , and then press OK .
-
Use the numeric keypad, or press the up arrow or the down arrow to increase or decrease the number for the first byte of the IP address, subnet mask, or default gateway.
-
Press OK to move to the next set of numbers. To move to the previous set of numbers, press the back arrow .
-
Repeat steps 9 and 10 until the IP address, subnet mask, or default gateway is complete, and then press OK to save the setting.
-
Press Menu to return to the Ready state.
More information here: http://h20565.www2.hp.com/hpsc/doc/public/display?calledBy=&ac.admitted=1398523662967.876444892.492883150&docId=emr_na-c01449158-5&docLocale=
Related HP LaserJet P4015 Manual Pages


Similar Questions


