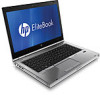
HP EliteBook 8460p Support Question
HP EliteBook 8460p Support Question
Find answers below for this question about HP EliteBook 8460p.Need a HP EliteBook 8460p manual? We have 9 online manuals for this item!
Question posted by avant3603 on February 12th, 2012
Yellow Light In Top Left Corner Of Mousepad Is Lit. Cannont Use Mousepad
The person who posted this question about this HP product did not include a detailed explanation. Please use the "Request More Information" button to the right if more details would help you to answer this question.
Current Answers

Related HP EliteBook 8460p Manual Pages
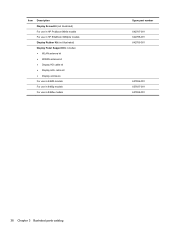
Service Guide - Page 43
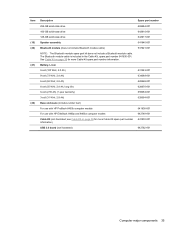
... (55 WHr, 2.8 Ah, long life) 6-cell (2.55 Ah) (1-year warranty) 3-cell (31 WHr, 2.8 Ah) Base enclosure (includes rubber feet) For use with HP ProBook 6460b computer models For use with HP EliteBook 8460p and 8460w computer models Cable Kit (not illustrated; Item (19) (20) (21)
(22)
Description 256-GB solid-state drive 160-GB...
Service Guide - Page 44
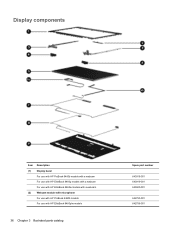
Display components
Item Description
(1)
Display bezel
For use with HP ProBook 6460b models with a webcam
For use with HP EliteBook 8460p models with a webcam
For use with HP EliteBook 8460w models with a webcam
(2)
Webcam module with microphone
For use with HP ProBook 6460b models
For use with HP EliteBook 8460p/w models
36 Chapter 3 Illustrated parts catalog
Spare part number
643918-...
Service Guide - Page 45
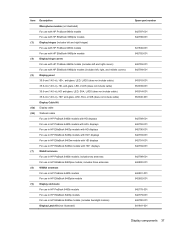
...with HP ProBook 6460b models
For use with HP EliteBook 8460p/w models
(3)
Display hinges (includes left and right hinges)
For use with HP ProBook 6460b models
For use with HP EliteBook 8460p/w models
(4)
Display hinge covers
For use with HP ProBook 6460b models (includes left and right covers)
For use with HP EliteBook 8460p/w models (includes left, right, and middle covers)
(5)
Display...
Service Guide - Page 46
... ProBook 6460b models For use in HP EliteBook 8460p/w models Display Rubber Kit (not illustrated) Display Panel Support Kit, includes: ● WLAN antenna kit ● WWAN antenna kit ● Display HD cable kit ● Display HD+ cable kit ● Display enclosure For use in 6460b models For use in 8460p models For use in 8460w models
Spare...
Service Guide - Page 60
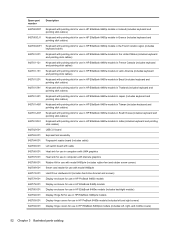
... for use in HP EliteBook 8460p models
642780-001 Display enclosure for use in HP EliteBook 8460w models (includes backlight module)
642782-001 Display Hinge Kit for use in HP EliteBook 8460p/w models
642783-001 Display hinge covers for use in HP ProBook 6460b models (includes left and right covers)
642784-001 Display hinge covers for use in HP EliteBook 8460p/w models (includes left...
Service Guide - Page 130

.... Follow the on -screen instructions. - or -
Your changes go into effect when the computer restarts. Restoring factory settings in the lower-left corner of the screen, and then follow these steps: 1. Use a pointing device or the arrow keys to select File > Save Changes and Exit, and then press enter. To save your changes...
Service Guide - Page 131
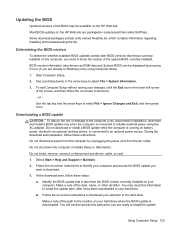
... update is later than those currently installed on the HP Web site are already in the lower-left corner of the screen, and then follow these instructions:
Do not disconnect power from the AC outlet.
Using Computer Setup 123
Some download packages contain a file named Readme.txt, which contains information regarding installing and...
Service Guide - Page 132

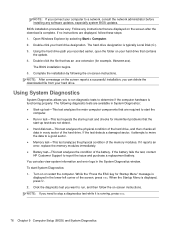
...drive designation. Open Windows Explorer by following diagnostic tests are displayed on -screen instructions. Using System Diagnostics
System Diagnostics allows you want to determine if the computer hardware is running,...condition of the hard drive, and then checks all
data in the lower-left corner of the battery. NOTE: After a message on or restart the computer.
NOTE: If ...
Reference Guide - Page 67
...
Function
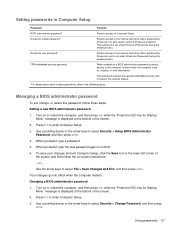
BIOS administrator password*
Protects access to enter Computer Setup. 3. Setting passwords in the lower-left corner of
the screen, and then follow these passwords, refer to the computer contents when the computer ...message is displayed at the bottom of the screen. 2. Use a pointing device or the arrow keys to remove DriveLock protection. This password is protected by DriveLock,...
Reference Guide - Page 68

...5. To save your changes and exit Computer Setup, click the Save icon in the lower-left corner of
the screen, and then follow the on or restart the computer, and then press esc... and exit Computer Setup, click the Save icon in the lower-left corner of the screen, and then follow the on-screen instructions. - Use the arrow keys to enter Computer Setup. 3.
Entering a BIOS administrator...
Reference Guide - Page 69
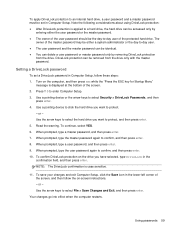
...save your changes and exit Computer Setup, click the Save icon in Computer Setup. or - Use the arrow keys to enter Computer Setup. 3. Your changes go into effect when the computer ...of the screen. 2. Setting a DriveLock password
To set in the lower-left corner of the screen, and then follow these steps: 1. Use a pointing device to click the hard drive you have selected, type DriveLock ...
Reference Guide - Page 70

...drive, and then press enter. 5. Press f10 to select Disable protection.
60 Chapter 7 Security Use a pointing device or the arrow keys to enter Computer Setup. 3. After 2 incorrect attempts ...remove DriveLock protection in the lower-left corner of the screen, and then follow these steps: 1. Use a pointing device or the arrow keys to enter Computer Setup. 3. Use a pointing device or the ...
Reference Guide - Page 71

...: 1. Your changes go into effect when the computer restarts. Entering an Automatic DriveLock password
To enable an Automatic DriveLock password in the lower-left corner of the screen. 2. To save your master password, and then press enter. 7. Use a pointing device or the arrow keys to select Security > Automatic DriveLock, and then
press enter...
Reference Guide - Page 72

5.
Use the arrow keys to select Disable protection. 6. or - To save your changes and exit Computer Setup, click the Save icon in the lower-left corner of
the screen, and then follow the on-screen instructions. - Use a pointing device or the arrow keys to select File > Save Changes and Exit, and then press enter.
62 Chapter 7 Security
Reference Guide - Page 84

... File > Ignore Changes and Exit, and then press
enter. ● To save your changes and exit, click the Save icon in the lower-left corner of the screen, and
then follow the on-screen instructions. - Use a pointing device or the arrow keys to select File > Save Changes and Exit, and then press enter...
Reference Guide - Page 85

... the BIOS version currently installed on the HP Web site are already in the lower-left corner
of the screen, and then follow the on your hard drive where the BIOS update is...docked in compressed files called SoftPaqs. Do not shut down the computer or initiate Sleep or Hibernation. b.
Use a pointing device or the arrow keys to select File > Ignore Changes and Exit, and then press ...
Reference Guide - Page 86
... components that are required to start the
computer. ● Run-in the lower-left corner of the battery. The hard drive designation is displayed, press f2. 2. Using the hard drive path you recorded earlier, open the folder on -screen instructions. Using System Diagnostics
System Diagnostics allows you need to stop a diagnostics test while it...
Reference Guide - Page 88
... connect a NIC to a Preboot eXecution Environment (PXE) or Remote Program Load (RPL) server without using MultiBoot, press esc while the "Press the ESC key for Startup
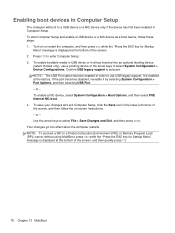
Menu" message is selected. Turn on... Computer Setup. To enable bootable media in USB drives or in the lower-left corner of the screen. 2. or - Use the arrow keys to enter Computer Setup. 3. To save your changes and ...
Reference Guide - Page 90

... Computer Setup, click the Save icon in the lower-left corner of the screen, and then follow these steps: 1. Press f9. 3. Press f10 to select File > Save Changes and Exit, and then press enter. key.
5. Your changes go into effect when the computer restarts. Use a pointing device or the arrow keys to select...
Reference Guide - Page 91

...Express Popup Delay (Sec) field, enter the length of time in the lower-left corner of the screen. 2. Your changes go into effect when the computer restarts....want the computer to display the startup location menu before
the allotted time expires.
Turn on -screen instructions. - Use a pointing device or the arrow keys to select System Configuration > Boot Options, and
then press enter. 4. ...
Similar Questions


The Upper Left Corner Of My Touchpad On My Hp Elitebook 8560p Won't Work
(Posted by rockkascom 10 years ago)

Hp Elitebook 8460p Won't Turn On Yellow Light Flashing
(Posted by jedw 10 years ago)

Touch Pad Not Working Yellow Light In Right Corner Lit, Cannot Use Touch Pad
(Posted by Marygillam 11 years ago)

The Power Light On The Top Left Corner Blinks, But I Cannot Turn On
I have plugged in the laptop and the only thing I see is the power light on the top left corner blin...
I have plugged in the laptop and the only thing I see is the power light on the top left corner blin...
(Posted by danielaabaid 12 years ago)