HP Deskjet 3050 Support Question
HP Deskjet 3050 Support Question
Find answers below for this question about HP Deskjet 3050 - All-in-One Printer - J610.Need a HP Deskjet 3050 manual? We have 3 online manuals for this item!
Question posted by rhBWick on June 7th, 2014
How To Clean Print Heads For Hp Deskjet 3050a
Current Answers
Answer #1: Posted by TechSupport101 on June 7th, 2014 6:07 AM

Member since:
May 24th, 2013 Points: 12,171,305

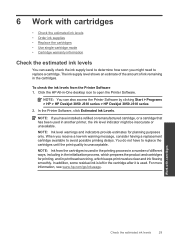
If you found defects on the alignment page, the printhead could be clogged. Follow these steps to run an automated tool to clean the printhead.
NOTE: To avoid issues that require cleaning the printhead, always turn the printer off with the Power button.
-
Open the HP printer software:
-
Windows XP: Click Start ( ), click All Programs , click HP , click the folder for your HP printer, and then click the icon for your HP printer ( ).
-
Windows Vista or Windows 7: Click the Windows icon ( ), click All Programs , click HP , click the folder for your HP printer, and then click the icon for your HP printer ( ).
-
Windows 8:
If you are not using the latest version of Windows 8, the information in these steps might not match. You can get the latest version from the Microsoft Store.
Right-click the Start button ( ) in the lower left corner of the screen, click Search , type HP , and then click your printer.
The printer software opens in a new window.
-
-
In the printer software, double-click Printer Actions ( ).
-
Double-click Maintenance Tasks ( ). The HP Toolbox opens.
-
Click the Device Services tab.
-
Click Clean Ink Cartridges , and then follow the on-screen instructions to clean the cartridges.
-
After running the tool, click Print to print a test page. If the print quality is still unacceptable, follow the on-screen instructions to run a Second-level clean .
-
If these steps resolved the issue , you can stop troubleshooting.
-
If the test page that you printed earlier shows track marks or smears , continue to the next step to clean the area around the ink nozzles.
Complete these steps only if you see track marks or smears in the text on the Printer Status Report or on your printout, skip to the next solution to replace the problem cartridge and align the cartridges .
Figure 15: Example of smeared text
Figure 16: Example of text with track marks
-
Gather the following materials:
-
Dry foam-rubber swabs, lint-free cloth, or any soft material that will not come apart or leave fibers (coffee filters work well)
-
Clean sheets of paper
-
Distilled, filtered, or bottled water (tap water might contain contaminants that can damage the print cartridges)
CAUTION: Do not use platen cleaners or alcohol to clean the area. These can damage the cartridge or the printer.
-
-
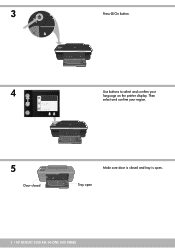
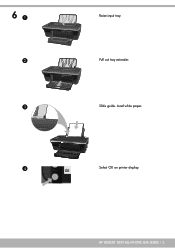
Press the Power button to turn on the printer, if it is not already on.
-
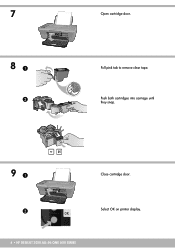
Open the cartridge access door. The carriage moves to the center of the printer. Wait until the carriage is idle and silent to continue.
Figure 17: Open the cartridge access door
-
Lightly press down on the cartridge to release it, and then pull the cartridge out to remove it from its slot.
Figure 18: Remove the cartridge
CAUTION: Do not touch the copper-colored contacts or the ink nozzles. Touching these parts can result in clogs, ink failure, and bad electrical connections.Figure 19: Do not touch the contacts or nozzles
-
Place the cartridge on a piece of paper with the ink nozzles up.
-
Lightly moisten a clean, foam-rubber swab with distilled water.
-
Clean the face and edges around the ink nozzle with the swab.
CAUTION: Do not clean the ink nozzle plate.Figure 20: Clean the area around the ink nozzle
1 - Nozzle plate - DO NOT CLEAN
2 - Area surrounding ink nozzle - Do clean
3 - Cartridge contacts - Do not clean -
Let the cartridge sit for 10 minutes to allow the cleaned area to dry, or use a new swab to dry it.
-
Hold the cartridge by its sides with the nozzles toward the printer, and then insert the cartridge into its slot. Make sure that the icon on the cartridge matches the icon on the slot.
-
The tri-color cartridge ( ) goes in the slot on the left
-
The black cartridge ( ) goes in the slot on the right
Figure 21: Insert the cartridge into its slot
-
-
Push the cartridge forward into its slot until it snaps into place.
Figure 22: Snap the cartridge into place
-
Repeat these steps to clean the area surrounding the ink nozzle on the other cartridge.
-
Close the cartridge access door.
Figure 23: Close the cartridge access door
-
Try to print again.
Related HP Deskjet 3050 Manual Pages


Similar Questions


