GE P2S975SEPSS Support Question
GE P2S975SEPSS Support Question
Find answers below for this question about GE P2S975SEPSS - 30" Slide-In Dual-Fuel Range.Need a GE P2S975SEPSS manual? We have 3 online manuals for this item!
Question posted by Ewassel on January 22nd, 2014
Ge Range Control Panel Not Responding
GE P2S975SEM1ss control panel beeps and says "error turn surface burners off". Problem: I had turned oven to self-clean and after 5 minutes this error message appeared. Control panel would not allow any changes. Turned stove off at breaker, over half an hour on again eith no change! Help?
Current Answers
Related GE P2S975SEPSS Manual Pages
Quick Specs - Page 1
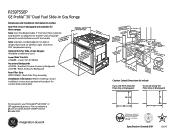
Optional Kits for Slide-In Gas Ranges: (Available at least 1/4". (Self-clean combustible surface. Range 3″
f3csocMcr&3wirn0ouaef....30″ Min.
Black Filler Strip Assembly 30" Slide-In Range Installation Information: Before installing,Dciomnseunltsions (in inches) installation instructions packed with the handle. P2S975SEP
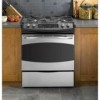
GE Profile™ 30" Dual Fuel Slide-In Gas Range...
Quick Specs - Page 2
6 2 4
8 9 9
7 8 4 6 8
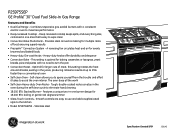
P2S975SEP
GE Profile™ 30" Dual Fuel Slide-In Gas Range
Features and Benefits • Dual-fuel Range - This setting is optimal for baking casseroles or lasagnas, yeast breads, pies and pizzas with a consistent
electric oven to maximize performance
• Deep-recessed Cooktop - A reversing fan circulates heat and air for larger cuts of food, ensuring ...
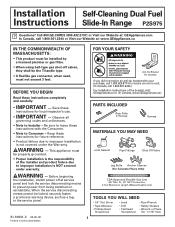
Installation Instructions - Page 1
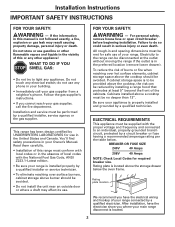
... In Canada, call 1.800.626.8774 to receive one at service panel and lock the service disconnecting means to prevent power from being switched on accidentally. BEFORE YOU BEGIN
Read these
instructions for local inspector's use.
• IMPORTANT - Installation Self-Cleaning Dual Fuel Instructions Slide-In Range P2S975
Questions? WARNING - Be sure to leave these
instructions for...
Installation Instructions - Page 2
...over hot surface elements, cabinet storage space above a cooktop must be supplied with the National Fuel Gas Code, ANSI Z223.1-Latest edition.
• Be sure your gas supplier, call your range connected by... Canada. To reduce the risk of burns or fire when reaching over surface burners, cabinet storage above burner should be disconnected at least 5" beyond the front of this manual is...
Installation Instructions - Page 3

... electrical codes which apply in your range according to governing codes could result in a hazardous condition. B Counter height greater than 36-3/4″: Lower Trim Slide-In (Kit JXS56XX). C One ...and range cooktop may cause excessive gaps.
In Canada your range must be wired and fused to fit may occur.
D Island Installation: To provide an optimum installation, the top surface of...
Installation Instructions - Page 4

...up and out until the hinge arms clear the slots.
This is removed.
NOTE: The oven door is an added convenience. Hinge slot
Hinge unlocked position
Hinge arm
B POSITION DOOR Place ... clears slot
6 REMOVE PACKING MATERIALS
Also remove labels on door, plastic on trim and panel and all tape around the range.
7 REMOVE STORAGE DRAWER
A Pull the drawer out until the
stops clear the guides...
Installation Instructions - Page 5

... a 1/4″ flat area at the back of the cooktop and the rear wall above the range, see Alternate Construction, Step 25D, on page 15.
Fpaloatcellkronawagteiendsawtpriuptclhitainocnes F9r-o1m/2″WMailnls.
30″ Min. csocouaf borofikvaniecneretghsteoadbottom
Drawer
13″ Mdeapxt.h
1dbo8iovs″etttraMohnmiencae.odvfferctorhatmbeicianathdel ejtascent
DepCthou2n5t1″...
Installation Instructions - Page 6
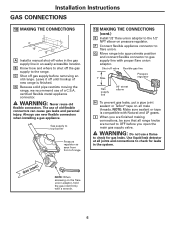
...open the main gas supply valve.
certified flexible metal appliance connector. Gas supply to top burner
Pressure regulator as seen from front of a C.S.A. Use liquid leak detector at all joints... to flare union. F Connect flexible appliance connector to the range. B Know how and where to shut off gas supply before you are turned to the 1/2″ NPT elbow on the flare union adaptor...
Installation Instructions - Page 7
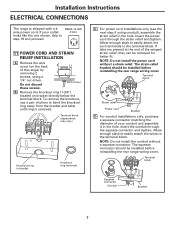
... end of the range) by removing 2 screws, using conduit), assemble the strain relief in the hole.
NOTE: Do not install the conduit without a strain relief. Terminal block (appearance may vary)
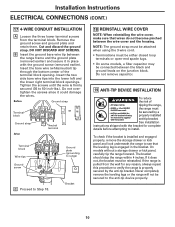
Knockout.... If your conduit and assemble it in the hole. Installation Instructions ELECTRICAL CONNECTIONS
The range is removed. NEMA 14-50R 4-wire
11 POWER CORD AND STRAIN RELIEF INSTALLATION
A ...
Installation Instructions - Page 8

... strap is connected to the ground plate. DO NOT remove the ground strap connection. A Remove the 3 lower terminal screws from the terminal block.
Terminal block (appearance may vary)
Neutral terminal
Ground plate
Ground strap
Power cord
B Skip to the neutral terminal located in the center of the terminal block.
Insert the...
Installation Instructions - Page 9
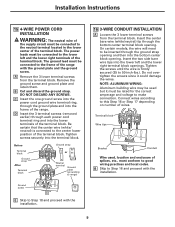
...of the terminal block.
Before
Terminal block
Ground strap After
Terminal block
Ground strap or
Neutral terminal
Ground plate (grounding to range)
Ground screw
E Skip to this Step 16 or Step 17 depending on number of wires. On certain models, the wire...
WARNING: The neutral wire of
the supply circuit must be connected to the frame of the range with the ground plate and the ground screw.
Installation Instructions - Page 10
...secured to the anti-tip device properly.
10 On models without a storage drawer or kick panel, carefully tip the range forward. Remove the ground screw and ground plate and retain them. Tighten the screws until...the bracket is installed and engaged properly, remove the storage drawer or kick panel and look underneath the range to see that wires do not become pinched between the black and ground ...
Installation Instructions - Page 11

...unit by the drawer.
G Carefully push the range into the Anti-Tip bracket and that the bracket is within 2″ of the front control panel
11 Locate the cord in the back of ... until the overhang comes to rest on the countertop.
20 SLIDE RANGE INTO OPENING (cont.)
H Plug the range cord into the opening until the range is securely installed. D Remove the protective trim from the ...
Installation Instructions - Page 12
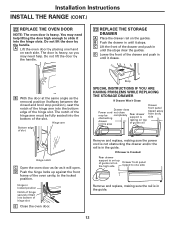
...
Drawer front panel tipped to one hand
on the guides. Hinge arm Bottom edge of the oven cavity, to slide it will ...rail on each side.
Stop
SPECIAL INSTRUCTIONS IF YOU ARE HAVING PROBLEMS WHILE REPLACING THE STORAGE DRAWER
If Drawer Won't Close:
Drawer
Power... the slot. Installation Instructions INSTALL THE RANGE (CONT.)
22 REPLACE THE OVEN DOOR
NOTE: The oven door is heavy, so you may...
Installation Instructions - Page 13

....
Medium head
Small head
Large head Front of any cooktop controls while the top of the burner is positioned over the burners.
13 Burner cap properly seated Burner cap not properly seated
c. Electrical shock might result.
d. Do not remove the top or touch the electrode of range Extra large head
b.
When placing the cap,
make sure...
Installation Instructions - Page 14
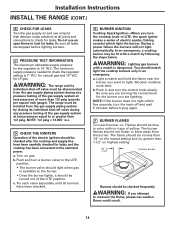
... If the burner does not light within five seconds, turn the control knob slowly. The flame should match light the cooktop burners only in and turn the knob ...range and its individual shut-off and wait 5 minutes before lighting burners. Light a match and hold the flame near the burner you attempt
to light.
Installation Instructions INSTALL THE RANGE (CONT.)
B CHECK FOR LEAKS Turn...
Installation Instructions - Page 15

... OVER THE RANGE LESS THAN 30″
If a 30″ clearance between cooking surface and overhead combustible...30″ smooth cut
Must be level 31-1/8″
Must be maintained, protect the underside of the range and through the slots in the proper position, tighten the 2 mounting screws. When the trim is less than 25″, a gap will occur between the countertop front and the control panel...
Installation Instructions - Page 16
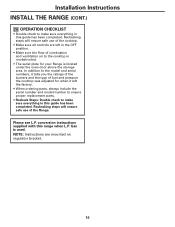
... serial numbers, it tells you the ratings of the burners and the type of fuel and pressure the cooktop was adjusted for your Range is used.
Rechecking steps will ensure safe use of combustion...the flow of the Range. Gas is located under the oven door above the storage area. Rechecking steps will ensure safe use of the cooktop.
• Make sure all controls are mounted on ...
Similar Questions

Self Cleaning Gas Range Jgb 900 Sep 25s
self cleaning gas range jgb900. Why can't I remove the large burner head. Others I can
self cleaning gas range jgb900. Why can't I remove the large burner head. Others I can
(Posted by Vadimgitman 9 years ago)

Self Clean Does Not Work When Gas/ Control Lockout Is Pushed - Model C2s980sem1s
(Posted by billwinn 10 years ago)


Stove Top Controls Don't Change Flame Height Between Position 2 And 8.
How do we change this? Note we have done the lp conversion to this range.
How do we change this? Note we have done the lp conversion to this range.
(Posted by sinjineer 11 years ago)

How. Much Is #js968sk 30' Slide In Electric Range ??
(Posted by Anonymous-63340 11 years ago)