GE G5WP Support Question
GE G5WP Support Question
Find answers below for this question about GE G5WP.Need a GE G5WP manual? We have 4 online manuals for this item!
Question posted by Anonymous-148201 on January 12th, 2015
When I Turn The Camera On It Says Lens Obstructed Restart Camera And It Turns Of
The person who posted this question about this GE product did not include a detailed explanation. Please use the "Request More Information" button to the right if more details would help you to answer this question.
Current Answers
Answer #1: Posted by zzed41 on January 13th, 2015 12:00 AM
zzed41

Member since:
December 12th, 2014 Points: 914,010

Member since:
December 12th, 2014 Points: 914,010
Hi! Please check the lens hole for any small rocks or dust buildup which may be causing it to jam. However, if there is none, this is likely to be a software error and you should bring your camera to a GE Authorized Repair center.
Hope this helps! If it does, please click on the Accept Answer button. I will greatly appreciate it! :)
Related GE G5WP Manual Pages
User Manual (English (5.17 MB)) - Page 4

... water falls into camera. Waterproof rubber with...camera is stored, do that ...the camera with...
4. When the camera is under strong ...camera not sink. Precautions When Using 1.
Don't use the camera below 5 meters underwater. 2. And, silicone grease can . Please make sure to introduce water into the camera...Proof • The camera has JIS/IEC waterproof...with the camera have no ...
User Manual (English (5.17 MB)) - Page 5

...camera and possibly pose a potential safety risk.
• Do not touch the camera lens.
• Do not expose the camera to service the camera yourself.
• Do not drop or knock the camera... purchasing a GE digital camera. Copyright © Copyright 2010 General Imaging Company All rights reserved. Improper handling may damage the product.
• Turn off the camera before using Li-ion...
User Manual (English (5.17 MB)) - Page 7
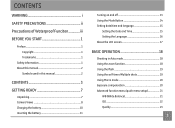
... BEFORE YOU START 1
Preface 1 Copyright 1 Trademarks 1
Safety information 1 About this manual 2
Symbols used in this manual 2
CONTENTS 3 GETTING READY 7
Unpacking 7 Camera Views 8 Charging the battery 10 Inserting the battery 11
Turning on and off 13 Using the Mode Button 14 Setting date/time and language 15
Setting the Date and Time 15...
User Manual (English (5.17 MB)) - Page 17
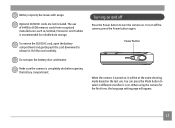
... press the Mode button to 16GB memory cards from recognized manufacturers such as SanDisk, Panasonic and Toshiba is turned on, it is completely dry before opening the battery compartment. Power Button
When the camera is recommended for the first-time, the language setting page will be at the same shooting mode based...
User Manual (English (5.17 MB)) - Page 19
...
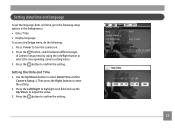
To set the language, date, and time, go to confirm the setting.
15 Use the Up/Down button to turn the camera on the
Camera Setup 1. Press the button, switch between different pages
of Camera Setup menu by using the Left/Right button to enter the setting. 2. Then press the Right button to select...
User Manual (English (5.17 MB)) - Page 20

Use the Up/Down button to go to enter the setting.
2.
The Date/Time and Language setup will automatically appear when the camera is turned on the
Camera Setup 2. Press the button to select the desired language.
3. Use the Left/Right buttons to confirm the setting. Setting the Language 1. Then press the Right button to the Language on the first time.
16
User Manual (English (5.17 MB)) - Page 21
...into your mouth thoroughly with the liquid crystal in any of water and induce vomiting. About the LCD screen
When you turn the camera on, various icons are normal in the manufacturing process and the recording is swallowed, flush your eye, flush the affected... care with water. LCD Screen notes: High-precision technology had been used to indicate the current camera settings and status.
User Manual (English (5.17 MB)) - Page 22
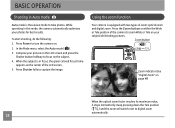
... is in this mode, the camera automatically optimizes your photos for best results. Press the Zoom button on either the Wide or Tele position of the camera to turn the camera on your picture on the subject... it stops momentarily. Press Shutter fully to take photos. Zoom button
Zoom indicator (See "Digital Zoom" on the center of the LCD screen. 5.
BASIC OPERATION
Shooting in Auto mode
...
User Manual (English (5.17 MB)) - Page 23

...the menu. (See "Continuous Shot"
on existing
light conditions.
•
Flash: Red-eye reduction
The camera fires a brief flash before the picture is
taken to reduce red-eye effects.
•
Flash: ...Forced flash
Flash always fires.
•
Flash: Forced off
Flash is turned off.
•
Flash: Slow Synchro
This allows you to take pictures of people at night
...
User Manual (English (5.17 MB)) - Page 27
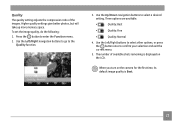
..., or press the button once to the Quality function.
3. The number of the images. To set the image quality, do the following:
1. When you turn on the camera for the first time, its default image quality is displayed on the LCD.
Use the Left/Right navigation buttons to go to confirm your...
User Manual (English (5.17 MB)) - Page 41
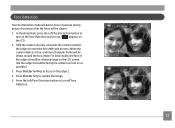
.../Face Detection button to capture the image. 5. Press Shutter fully to
turn off Face Detection.
37 Hold the camera securely, and point the camera towards the subject to focus on the subject. 4. Press Shutter halfway to... start the face detection process. When the camera detects a face, a white rectangular frame will be drawn around the face. (Note...
User Manual (English (5.17 MB)) - Page 42

... the shutter button all the way down and release the shutter button.
To turn on Smile Detection and an icon ( ) appears on the LCD. 2. Point the camera at the subject until the subject's face is detected and bracketed by the camera in order for the subject to function correctly. For optimal detection results...
User Manual (English (5.17 MB)) - Page 49

Select On to turn on the subject. • Multi-AF: The camera automatically focuses the subject in dark conditions. Two options are available: • Single-AF: The focus frame appears on the center of the LCD screen ...
User Manual (English (5.17 MB)) - Page 50
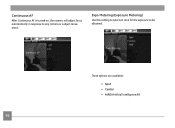
Continuous AF
After Continuous AF is turned on, the camera will adjust focus automatically in response to be obtained.
Three options are available: • Spot • Center • AiAE (Artificial Intelligence AE)
46 Expo Metering (Exposure Metering)
Use this setting to select an area for the exposure to any camera or subject movement.
User Manual (English (5.17 MB)) - Page 56
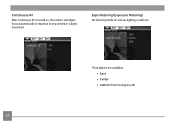
Expo Metering (Exposure Metering) Set metering mode for various lighting conditions.
Continuous AF
After Continuous AF is turned on, the camera will adjust focus automatically in response to any camera or subject movement. Three options are available: • Spot • Center • AiAE (Artificial Intelligence AE)
52
User Manual (English (5.17 MB)) - Page 65
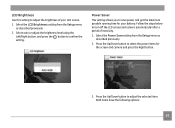
...the steps below to save power and get the maximum possible running time for the screen and camera and press the Right button.
3. Press the Up/Down button to confirm the setting. Both... menu as described previously.
2. Power Saver
This setting allows you to turn off the LCD screen and camera automatically after a period of your battery. Select the LCD Brightness setting from the Setup...
User Manual (English (5.17 MB)) - Page 66
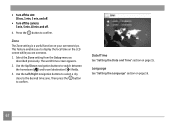
... Zone setting is a useful function on page 16.
62 Then press the button to the desired time zone. • Turn off the LCD: 30 sec, 1 min, 2 min, and off.
• Turn off the camera: 3 min, 5 min, 10 min, and off.
4. Date/Time See "Setting the Date and Time" section on the LCD screen...
User Manual (English (5.17 MB)) - Page 71

... is completed.
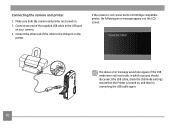
67 Connect the other end of the supplied USB cable to the USB/AV OUT port on your camera.
4.
Start a computer to a PC. Make sure both the camera and PC are turned on.
3.
By using the USB cable, you can transfer the captured photos and videos to which ArcSoft software has...
User Manual (English (5.17 MB)) - Page 74
If the camera is turned on, and then try connecting the USB cable again.
70 Connect the other end of the supplied USB... the USB cable, check the USB mode settings, ensure that the Printer is not connected to the USB port on your camera. 3. Connecting the camera and printer.
1.
Connect one end of the cable to a PictBridge compatible printer, the following error message appears on . 2. ...
User Manual (English (5.17 MB)) - Page 85
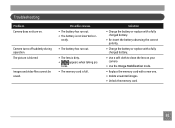
...the battery or replace with a fully charged battery.
• Use a soft cloth to clean the lens on . rectly.
Images and video files cannot be saved.
• The battery has run out.... • The battery is dirty.
•
appears when taking pic- Troubleshooting
Problem Camera does not turn on your camera
• Use the Image Stabilization mode.
• Replace the memory card with a new...
Similar Questions

The Camera Turns On But The Screen Is Black And I Cant Take A Pic
(Posted by Anonymous-121150 10 years ago)

Taking A Picture
DO I NEED TO ALWAYS ADJUST THE ZOOM FUNCTION BEFORE IT BECAME CLEAR? WHEN I'M OPENING THE CAMERA, IT...
DO I NEED TO ALWAYS ADJUST THE ZOOM FUNCTION BEFORE IT BECAME CLEAR? WHEN I'M OPENING THE CAMERA, IT...
(Posted by madmanflyhigh 11 years ago)

The Cam Say Restart Camera Lens Interrupt. How Can I Solve The Problem?
(Posted by iliamoreira 12 years ago)

Write Protect Keeps Appearing On Screen, When Camera Is Turned On.
(Posted by esand01 13 years ago)

When I Turn Camera On, It Sings Its Introduction Then Goes Back Off.
(Posted by paulataylor 13 years ago)