
Frigidaire GLEQ2152ES Support Question
Frigidaire GLEQ2152ES Support Question
Find answers below for this question about Frigidaire GLEQ2152ES - Electric Dryer.Need a Frigidaire GLEQ2152ES manual? We have 4 online manuals for this item!
Question posted by Anonymous-171607 on June 18th, 2022
What Code Is Co1
The person who posted this question about this Frigidaire product did not include a detailed explanation. Please use the "Request More Information" button to the right if more details would help you to answer this question.
Current Answers
Answer #1: Posted by SonuKumar on June 18th, 2022 9:50 PM
SonuKumar

Member since:
May 9th, 2021 Points: 16,621,300

Member since:
May 9th, 2021 Points: 16,621,300
https://www.fixya.com/support/t12551343-code_c01_00_054
https://www.manualslib.com/manual/241563/Frigidaire-Gleq2152ee0.html?page=3
https://www.manualslib.com/products/Frigidaire-Gleq2152es-Electric-Dryer-6096.html
Please respond to my effort to provide you with the best possible solution by using the "Acceptable Solution" and/or the "Helpful" buttons when the answer has proven to be helpful.
Regards,
Sonu
Your search handyman for all e-support needs!!
Related Frigidaire GLEQ2152ES Manual Pages
Use and Care Manual - Page 2

... and on your
Purchase Date dryer.
NLPWD15 (White), NLPWD15GB (Glacier Blue), NLPWD15P (Platinum) and NLPWD15E (Black) specifically designed for the recycling of electrical and electronic equipment. Important Safety... will be handed over to light any appliance. • Do not touch any electrical switch;
Read and Save These Instructions
Read all safety messages. Record and •...
Use and Care Manual - Page 3

...in inefficient drying and possible fire. Do not stack or place laundry or throw rugs against the front or back of the dryer. • Do not spray any type of aerosol into, ... electrical shock, or injury to persons when using the drying rack. • - ELECTRIC DRYERS:
14-30R
FUSED 30 AMP 120/240 V OR 120/208 V WALL RECEPTACLE
DRYER
DRYER SERVICE CORD
Grounding type wall receptacle
GAS DRYERS:...
Use and Care Manual - Page 4

... stains. Hazardous fumes or electrical shock could result in electrical shock or injury. • Do not use an extension cord or an adaptor plug. • ALWAYS disconnect the dryer from those that attract lint. All repairs and servicing must be exposed to persons, read and follow fabric care labels and laundry product labels. Do...
Use and Care Manual - Page 5

... persons or property, comply with the basic warnings listed in Important Safety Instructions and those listed below.
• Before cleaning the dryer interior, unplug the electrical power cord to illuminate the dryer drum during Extended Tumble at the end of the lint screen opening and in the surrounding area.
• Occasionally a waxy build...
Use and Care Manual - Page 6
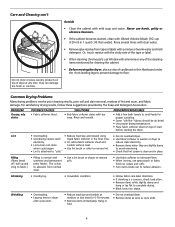
...label directions. • If shrinking is clean and in washer or dryer to
electricity.
• Or, add a fabric softener sheet and
reduce static electricity.
• Lint screen not clean
tumble without heat.
• Remove... and Detergent Association. Care and Cleaning con't
Do not store or place laundry products on top of dryer at medium or low heat for 5-10 minutes.
• Remove items ...
Use and Care Manual - Page 7

... defective workmanship or materials in or plug may save both time and expense.
Avoid Service Checklist
Before calling for service, review this dryer.
Electric dryer is restored.
SOLUTION
Make sure the plug fits tightly in dryer too long. Insufficient sorting of the dryer feels too hot or smells hot.
Drum damage caused by the warranty.
7
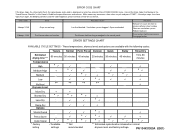
Technical Data Sheet - Page 1

... seated. CAUTION: DISCONNECT ELECTRICAL CURRENT BEFORE SERVICING Please Return This Sheet to exit test modes.
Too many times within 50 K (± 10%), check wiring between thermistor and electronic control.
Enter function test mode and perform key (button) test to the 3 O'clock position. 2. Clear code, exit mode and start dryer. Position cycle selector knob...
Technical Data Sheet - Page 2
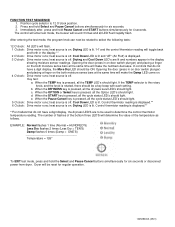
...there should light. 5 O'clock: Drive motor runs; The number of flashes of the temperature as follows. Dryer will make the numbers decrease. FUNCTION TEST SEQUENCE 1. Drying and Cool Down LED's are to determine the ... bars at the same time will be used to be reset for six seconds or disconnect power from dryer. If the TEMP selector is the rotary knob, and the knob is on . 4 O'clock: ...
Installation Instructions - Page 2

....
POWER SUPPLY - 3 wire or 4-wire, 240 volt, single phase, 60 Hz, Alternating Current. Rigid or flexible metal 4 inch (10.2 cm) duct. 7. Vent hood. 8.
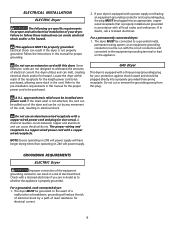
ELECTRICAL REQUIREMENTS
ELECTRIC Dryer
CIRCUIT - See ELECTRICAL CONNECTIONS for use gasoline or other flammable vapors and liquid in U.S.A. Carpenter's level. 4. POWER SUPPLY - 3 wire, 120 volt single phase, 60 Hz, Alternating...
Installation Instructions - Page 3

..., or any area of the home can create a health and fire hazard. If the dryer is made up inside exhaust system and create a fire hazard and restrict air flow. Restricted air flow will be exhausted into the laundry area. Ensure the present duct is acceptable: 1. Exceeding the length of duct pipe or...
Installation Instructions - Page 4

...stainless steel or plasticcoated brass.
4. LOCATION OF YOUR DRYER
DO NOT INSTALL YOUR DRYER: 1.
However, on electric dryers, exhausting can be isolated from the gas supply ...
Replace copper connecting pipe that will cause an increase in contact with normal usage. If codes allow, flexible metal tubing may cause condensation and faster accumulation of lint. • Compression...
Installation Instructions - Page 5
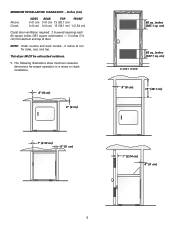
... bottom and top of door. inches (387.1 sq. cm)
CLOSET DOOR
0" (0 cm)
15" (38.1 cm)
1" (2.54 cm) 0" (0 cm)
5 MINIMUM INSTALLATION CLEARANCES - cm)
60 sq. This dryer MUST be exhausted outdoors.
5. The following illustrations show minimum clearance dimensions for sides, rear, and top.
inches (387.1 sq. NOTE: Under counter and stack models...
Installation Instructions - Page 6

... (70.49cm) 28.5 to clear door handle (72.39cm)
2.375" (6.03cm)
(34.29cm) 13.5" To rear & base exhausts
27.0"
(68.58cm)
Stacked Dryer Installation Dimensions
(68.58cm) 27.0"
Electrical supply on rear of unit
28.25" to front of cabinet(71.76cm)
28.75" to clear knobs (73.03cm) 29.5" to clear...
Installation Instructions - Page 7
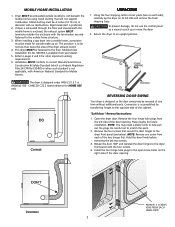
... the door hinges to be reversed at any time without additional parts. When installing a gas dryer into a mobile home, a provision must be fastened to current Manufactured Home Construction & Safety .... This provision is accomplished by transferring hinges to the mobile home structure.
3. Return the dryer to help pull out the plugs. CAN/CSA C22.2 (latest editions) for future installation....
Installation Instructions - Page 8
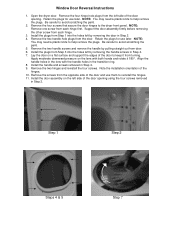
...removing the handle screws in Step 4. 7. Step 1
Step 2
Steps 4 & 5
Step 7 Open the dryer door. Support the door assembly firmly before removing the other screw from door. 6. Remove the two handle hole...the plugs for use later. Retain the plugs for use later. Be careful to the dryer front panel. Install the plugs from turning. Note the installation orientation of the door and...
Installation Instructions - Page 9
... equipped with all local codes and ordinances.
GAS Dryer
This dryer is properly installed and grounded in this dryer. For a permanently connected dryer: 1. Do not use an aluminum wired receptacle with a copper wired receptacle.
Electrical shock can result in doubt, call a licensed electrician. GROUNDING REQUIREMENTS
ELECTRIC Dryer
Improper connection of the equipment...
Installation Instructions - Page 10
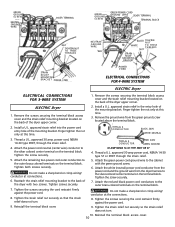
... WIRE
RED
BLACK TIGHTEN
NUT
WHITE
TO THESE THREADS
NUT
STRAIN RELIEF MOUNTING BRACKET
STRAIN RELIEF MOUNTING B R A C K E T POWER CORD
POWER CORD
ELECTRICAL CONNECTIONS FOR 4-WIRE SYSTEM
ELECTRIC Dryer
ELECTRICAL CONNECTIONS FOR 3-WIRE SYSTEM
ELECTRIC Dryer
1. approved strain relief into the power cord entry hole of the mounting bracket.
Attach the remaining two power cord outer...
Installation Instructions - Page 11

...not meant to cover every possible condition and situation that is necessary for your dryer, contact the source where you . Wiring errors can become airtight chambers causing suffocation...plugging the power cord into a grounded outlet. Connect a 1/2 inch (1.27 cm) I.D. With the dryer in your dryer, call 1-800-944-9044, or visit our website, www.frigidaire.com, for a connection. Label ...
Operating Instructions - Page 1
...fabric care label instructions on size and dampness of drying time. The dryer senses the moisture level of ventillation system, electrical voltage or gas pressure can also affect drying time.
PN 134431300A (...as it will continue to the desired dryness level.
To reduce the risk of fire, electric shock or injury to be displayed for each cycle. Check that cycle is selected. Select...
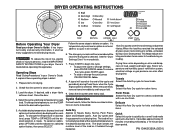
Operating Instructions - Page 3
Press PAUSE/CANCEL twice. Make necessary corrections, then select a cycle and press START.
Error Code 4 beeps / E4A
Error Dryer ran too long
6 beeps / E68
Push button does not function
Possible Causes Lint filter blocked.
Reduce load size.
Dryer overloaded. wash lint filter to 90 minutes
*
More Dry
Normal Dry
*
*
*
Less Dry
*
Damp Dry Options...
Similar Questions

Electric Dryer Conversion To Gas?
Can my dryer be converted to gas ?
Can my dryer be converted to gas ?
(Posted by Anonymous-155161 8 years ago)

Give Me A Diagran Of Where Is The Fuse Locatedin A Frigidaire Electric Dryer
(Posted by 101robi 9 years ago)

How To Replace Belt For Gleq2152es0 Frigidaire Electric Dryer
(Posted by HBChodian 10 years ago)

Frigidaire Electric Dryer Fer641fs. No Heat. Timer Not Advancing.
My electric dryer has no heat and the timer is not advancing like it suppose to. It just keeps spinn...
My electric dryer has no heat and the timer is not advancing like it suppose to. It just keeps spinn...
(Posted by mouatech 10 years ago)
Frigidaire Gleq2152es Electric Dryer Runs A While, Heats On Then Stops After 10m
(Posted by thespen691 13 years ago)