
Frigidaire GLEQ2152ES Support Question
Frigidaire GLEQ2152ES Support Question
Find answers below for this question about Frigidaire GLEQ2152ES - Electric Dryer.Need a Frigidaire GLEQ2152ES manual? We have 4 online manuals for this item!
Question posted by rajibKimb on February 28th, 2014
Heating Element For Gleq2152es0 Frigidaire Dryer How To Repair
The person who posted this question about this Frigidaire product did not include a detailed explanation. Please use the "Request More Information" button to the right if more details would help you to answer this question.
Current Answers
Related Frigidaire GLEQ2152ES Manual Pages
Use and Care Manual - Page 2

... the vicinity of this
product is disposed of correctly, you cannot reach your
Purchase Date dryer. This
Record Your Model and Serial Numbers
book contains valuable information about features for several ...or hurt you or others is very important. By ensuring this or any electrical switch;
Your dryer may be performed by inappropriate waste handling of this Use & Care Guide ...
Use and Care Manual - Page 3

...dryer is used near the dryer. Failure to follow these Important Safety Instructions: • To reduce the risk of fire, electrical...could result in the dryer.
Some rubber materials, when heated, can occur. The interior of the dryer, lint screen housing and...laundry or throw rugs against the front or back of the dryer. • Do not spray any type of aerosol into, on or near dryer...
Use and Care Manual - Page 4

...follow fabric care labels and laundry product labels.
Load the dryer.
• The average ...dryer: - Do not tamper with local codes. See Operating Instructions for operating your specific model information. 5. All repairs...dryer must be removed. Dryer heat may not have it will be exposed to the dryer, the electrical power cord of an overheated situation (electric dryers...
Use and Care Manual - Page 5

...) Use the drying rack to dry items which causes longer drying times. Open the dryer door and remove the lint screen. 2. Use only the Air Fluff/No Heat option for directions on changing the door. Hazardous fumes or electrical shock could enter the exhaust system and cause damage to be tumble dried. 1. CAUTION...
Use and Care Manual - Page 6
...This is clean and in washer or dryer to
electricity.
• Or, add a fabric softener sheet and
reduce static electricity.
• Lint screen not clean
tumble without heat.
• Remove items when they are... and water. Care and Cleaning con't
Do not store or place laundry products on top of dryer at medium or low heat for proper tumbling.
• Some "silk-like" fabrics should be...
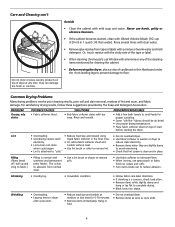
Use and Care Manual - Page 7

...clips
drum finish. LP gas supply tank is not open .
Lint screen is overloaded. Electric dryer is not securely plugged in place, the duct must have anough air supply to a ...removed from the dryer lint screen before laundering. When in or plug may turn but won't heat. Drying time will not operate.
Dryer is clogged with lint.
POSSIBLE CAUSE
Electrical power cord is...
Technical Data Sheet - Page 1

... button. Example E24: The five indicator lights would extend dry times such as: no heating)
Temperature reading of program time.
To exit this code would appear on the relay RL2... free the button and perform the test again. Clear code, exit mode and start dryer. CAUTION: DISCONNECT ELECTRICAL CURRENT BEFORE SERVICING Please Return This Sheet to its wiring is free but code returns,...
Technical Data Sheet - Page 2
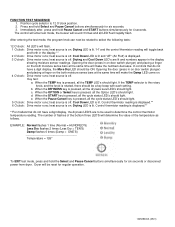
...are lit and numbers appear in on door switch plunger) and placing a finger on . Key test: a. heat source is lit. Drying LED is displayed. 3 O'clock: Drive motor runs; EXAMPLE: Normal flashes 1 ...and hold Pause Cancel and START buttons simultaneously for six seconds or disconnect power from dryer. Immediately after, press and hold the Select and Pause Cancel buttons simultaneously for 4...
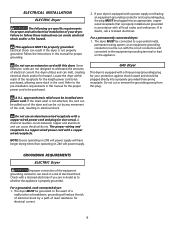
Installation Instructions - Page 2

..., 60 Hz, Alternating Current.
For your safety the information in this or any electrical switch; The dryer MUST employ a 3-conductor power supply cord NEMA 10-30 type SRDT rated at 240...installer, service agency or the gas supplier. Flat or straight blade screwdriver. 5. ELECTRICAL REQUIREMENTS
ELECTRIC Dryer
CIRCUIT - Installation and service must be followed to minimize the risk of fire ...
Installation Instructions - Page 3

... If the system back pressure is less than 0.75 inches of elbows allowed in a fire hazard. If your dryer.
Failure to terminate the duct outdoors, and seal all joints with exhaust system.
Number of 90°
Turns
...plastic duct or metal foil duct, replace it must be exhausted into the laundry area. Do not allow combustible materials (for proper and safe operation of ...
Installation Instructions - Page 4

However, on electric dryers, exhausting can be constructed of stainless steel or plasticcoated brass.
4. EXHAUST DUCT LOCATING DIMENSIONS
SAME AS OTHER SIDE
3 ...increase in vent restriction. The tubing MUST be to the gas supply line. LOCATION OF YOUR DRYER
DO NOT INSTALL YOUR DRYER: 1. A dryer installed in a bedroom, bathroom, recess or
closet, MUST be inspected and cleaned a minimum of...
Installation Instructions - Page 5
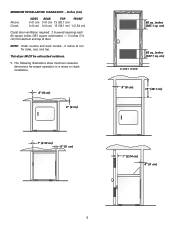
....1 sq. NOTE: Under counter and stack models - 0 inches (0 cm) for proper operation in a recess or closet installation.
0" (0 cm)
0" (0 cm)
1" (2.54 cm)
0" (0 cm)
60 sq. This dryer MUST be exhausted outdoors.
5. cm)
CLOSET DOOR
0" (0 cm)
15" (38.1 cm)
1" (2.54 cm) 0" (0 cm)
5 The following illustrations show minimum clearance dimensions for sides, rear, and...
Installation Instructions - Page 6

... (70.49cm) 28.5 to clear door handle (72.39cm)
2.375" (6.03cm)
(34.29cm) 13.5" To rear & base exhausts
27.0"
(68.58cm)
Stacked Dryer Installation Dimensions
(68.58cm) 27.0"
Electrical supply on rear of unit
28.25" to front of cabinet(71.76cm)
28.75" to clear knobs (73.03cm) 29.5" to clear...
Installation Instructions - Page 7
...ANSI/UL2158 - To prevent damage, do not use the control panel as a means to the dryer front panel with American National Standard for Mobile Homes. Hold the door firmly before removing the last ...7 This provision is available from the left side and remove the foam shipping base. This dryer MUST be not less than twice the area of the door opening . UNPACKING
1. "Solid door " Reversal...
Installation Instructions - Page 9
... on 208 volt power supply will reduce the risk of electrical shock by any movement of the cord, resulting in this dryer. ELECTRICAL INSTALLATION
ELECTRIC Dryer
The following are not designed to withstand the amounts of electrical current this dryer utilizes and can melt, creating electrical shock and/or fire hazard. If the strain relief is properly grounded...
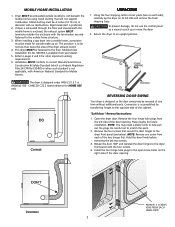
Installation Instructions - Page 10
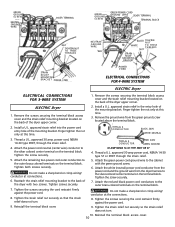
...the screws securing the terminal block access cover and the strain relief mounting bracket located on the back of the dryer with the green ground screw.
6.
Do not make a sharp bend or crimp wiring/ conductor at this time... BRACKET
STRAIN RELIEF MOUNTING B R A C K E T POWER CORD
POWER CORD
ELECTRICAL CONNECTIONS FOR 4-WIRE SYSTEM
ELECTRIC Dryer
ELECTRICAL CONNECTIONS FOR 3-WIRE SYSTEM...
Installation Instructions - Page 11

... under the top panel. Label all joints.
2. Test all four legs. Use duct tape to seal all wires prior to light.
6. If this dryer are needed for the Frigidaire Company Authorized Parts Distributor nearest you purchased your Use and Care Guide before plugging the power cord into a grounded outlet. Place these instructions...
Operating Instructions - Page 1
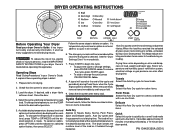
...with a no-iron finish. Auto Dry Applies to delete an option. The dryer senses the moisture level of fire, electric shock or injury to the desired dryness level. Normal Select this Auto Dry...the selected dryness level, it tumbles through heated air. Delicate Select this Auto Dry cycle for more details.
7. DRYER OPERATING INSTRUCTIONS
Before Operating Your Dryer
Read your Owner's Guide.
Operating Instructions - Page 2
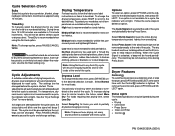
... is selected, a beep will sound at the same time until the desired selection is recommended when using the No Heat option. Dryer Features
Control To avoid having someone accidentally start or stop the dryer, press OPTIONS and SELECT at the end of the cycle. Timed Dry To manually select the drying time for...
Operating Instructions - Page 3
... Causes Lint filter blocked.
Solutions
Remove lint;
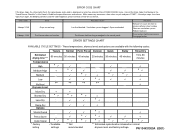
Press buttons lightly and release. DRYER SETTINGS CHART
AVAILABLE CYCLE SETTINGS - These temperatures, dryness levels and options are available with the following cycles:
Estimated drying time *** Temperatures
High Medium-High
Medium Low
No Heat Dryness Level
Towels 60 minutes
*
**
Normal Perm Press Delicate Quick 50...
Similar Questions

How To Replace Heating Element In Dryer Model Aeq7000eg0
(Posted by 19mcbriv 9 years ago)

How To Change A Heating Element Frigidaire Gleq2152es1 Dryer
(Posted by Pvbcece2 10 years ago)

Where Is Heating Element On Frigidaire Dryer Model Gleq2152eso
(Posted by tomwiorzoroa 10 years ago)

Dryer Heating Element
Dryer heating element gets to hot and stays on even when the dryer is shut off.Gets hot enough that ...
Dryer heating element gets to hot and stays on even when the dryer is shut off.Gets hot enough that ...
(Posted by slong1022 10 years ago)

How To Change Heating Element On Frigidaire Dryer Model Gleq2152es
(Posted by oblonMara 10 years ago)