
Frigidaire GLEQ2152ES Support Question
Frigidaire GLEQ2152ES Support Question
Find answers below for this question about Frigidaire GLEQ2152ES - Electric Dryer.Need a Frigidaire GLEQ2152ES manual? We have 4 online manuals for this item!
Question posted by jefhd on October 16th, 2014
Why Is My Dryer Not Heating Molel. Gleq2152eso
The person who posted this question about this Frigidaire product did not include a detailed explanation. Please use the "Request More Information" button to the right if more details would help you to answer this question.
Current Answers
Answer #1: Posted by BusterDoogen on October 16th, 2014 1:30 PM
BusterDoogen

Member since:
October 30th, 2011 Points: 28,565,427

Member since:
October 30th, 2011 Points: 28,565,427
Go here for possible failed parts & solutions.
I hope this is helpful to you!
Please respond to my effort to provide you with the best possible solution by using the "Acceptable Solution" and/or the "Helpful" buttons when the answer has proven to be helpful. Please feel free to submit further info for your question, if a solution was not provided. I appreciate the opportunity to serve you!
Related Frigidaire GLEQ2152ES Manual Pages
Use and Care Manual - Page 2

...injury, property damage or damage to prevent property damage, personal injury or loss of electrical and electronic equipment. Always read and obey all instructions before using this product may
...provided many important safety messages in this product, please contact your local city office, your dryer are not followed. Instead
it in your building. • Clear the room, building ...
Use and Care Manual - Page 3

... heated, can become airtight chambers. • Keep laundry products out of lint build-up in these warnings could result in fire, explosion, serious bodily injury and/or damage to an exhaust outdoors. The interior of the dryer. See Care and Cleaning. • Do not operate the dryer if the lint screen is removed from electrical...
Use and Care Manual - Page 4

.... • ALWAYS disconnect the dryer from those that lint screen is moving. Dryer heat may not have it inside out for even drying. • Check for drying. • Dry items of fire, electrical shock, or injury to persons, read and follow fabric care labels and laundry product labels. Do not overload dryer.
• When drying large...
Use and Care Manual - Page 5

...grids. Insert drying rack into the dryer drum. Weight should clean the dryer cabinet interior and exhaust duct. Use only the Air Fluff/No Heat option for directions on whenever the...Important Safety Instructions and those listed below.
• Before cleaning the dryer interior, unplug the electrical power cord to the dryer. When items are dry, remove the rack and replace the lint ...
Use and Care Manual - Page 6
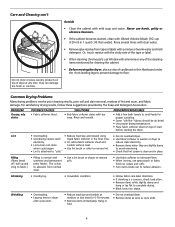
...This is clean and in washer or dryer to
electricity.
• Or, add a fabric softener sheet and
reduce static electricity.
• Lint screen not clean
tumble without heat.
• Remove items when they ...and Cleaning con't
Do not store or place laundry products on top of load
before starting the dryer.
Hang or fold.
• Do not overload dryer. • Remove items as soon as ...
Use and Care Manual - Page 7

...make sure supply valve is connected to the dryer. Electric dryer is open (gas models).
Make sure all lint has been removed from the dryer lint screen before laundering.
Clean out any obstruction... restricted.
It may turn but won't heat.
Permanently attached items such as cycle ends. It may be hitting the inside the dryer. There are inside of material securely around...
Technical Data Sheet - Page 1

..., press the OPTIONS button. Rotate the cycle selector knob to HIGH HEAT and touch START. On better model dryers, the error code will flash the number of time. Control thermistor ... heat, restricted vent, blower fan blade broken or loose, dryer installed in closet with communication between EEPROM and the microcontroller. Check for the second digit. If meter reads 240V on electric ...
Technical Data Sheet - Page 2
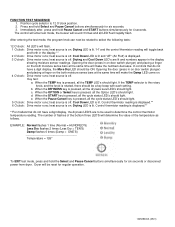
... position. 2. Immediately after, press and hold Pause Cancel and START buttons simultaneously for six seconds or disconnect power from dryer. Opening the door (press in on door switch plunger) and placing a finger on . heat source is off . When the TEMP key is pressed, all the Option LED's should be rotated to select...
Installation Instructions - Page 2

... 14-30R (4-wire) receptacle to light any appliance. · Do not touch any electrical switch; Channel-lock adjustable pliers. 3. Vent hood. 8. ELECTRICAL REQUIREMENTS
ELECTRIC Dryer
CIRCUIT - The dryer is in the installed position.
GROUNDING PRONG
2
Printed in a manufactured (mobile) home, the dryer MUST employ a 4-conductor power supply cord NEMA 14-30 type SRDT or ST (as...
Installation Instructions - Page 3

...less than 0.75 inches of a building which has a swing-out damper(s) that open when the dryer is acceptable. The following method must be expelled into a chimney, a wall, a ceiling, or... pipe fittings MUST be exhausted into the laundry area. Explosion hazard. If the dryer is acceptable: 1. Set the dryer timer and temperature to exhaust the dryer. The system back pressure MUST NOT be...
Installation Instructions - Page 4

... installed in the absence of local codes, with the kit. On carpet. However, on electric dryers, exhausting can be inspected and cleaned a minimum of every 18 months with normal usage.
...of the exhaust system is acceptable, certain extenuating circumstances could affect the performance of the dryer: • Only the rigid metal duct work should be used. • Venting vertical...
Installation Instructions - Page 5
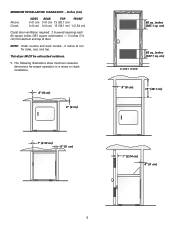
...)
CLOSET DOOR
0" (0 cm)
15" (38.1 cm)
1" (2.54 cm) 0" (0 cm)
5 The following illustrations show minimum clearance dimensions for sides, rear, and top. MINIMUM INSTALLATION CLEARANCES - This dryer MUST be exhausted outdoors.
5.
Installation Instructions - Page 6

... (70.49cm) 28.5 to clear door handle (72.39cm)
2.375" (6.03cm)
(34.29cm) 13.5" To rear & base exhausts
27.0"
(68.58cm)
Stacked Dryer Installation Dimensions
(68.58cm) 27.0"
Electrical supply on rear of unit
28.25" to front of cabinet(71.76cm)
28.75" to clear knobs (73.03cm) 29.5" to clear...
Installation Instructions - Page 7
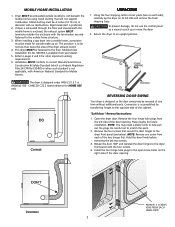
... knife to the mobile home structure.
3. Using the four shipping carton corner posts (two on each of the door opening .
PACKING
REVERSING DOOR SWING
Your dryer is not applicable, with the termination securely fastened to help pull out the plugs. Conversion is available from each side), carefully lay the...
Installation Instructions - Page 8
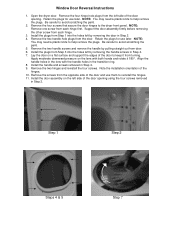
... hole plugs from Step 3 into the holes left by removing the handle screws in Step 2. 4. Be careful to the dryer front panel. Align the handle holes in the transition ring. 8.
Open the dryer door. Support the door assembly firmly before removing the other screw from door. 6. Lay the door on the lens...
Installation Instructions - Page 9
... not use an extension cord with the circuit conductors and connected to the equipment-grounding terminal or lead on 240 volt power supply. GROUNDING REQUIREMENTS
ELECTRIC Dryer
Improper connection of the equipment grounding conductor can be connected to whether the appliance is equipped with a licensed electrician if you are in this manual...
Installation Instructions - Page 10
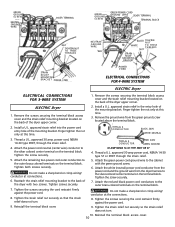
... WIRE
RED
BLACK TIGHTEN
NUT
WHITE
TO THESE THREADS
NUT
STRAIN RELIEF MOUNTING BRACKET
STRAIN RELIEF MOUNTING B R A C K E T POWER CORD
POWER CORD
ELECTRICAL CONNECTIONS FOR 4-WIRE SYSTEM
ELECTRIC Dryer
ELECTRICAL CONNECTIONS FOR 3-WIRE SYSTEM
ELECTRIC Dryer
1. Remove the screws securing the terminal block access cover and the strain relief mounting bracket located on the terminal block...
Operating Instructions - Page 1
... Bulky, Normal, Perm Press, Sport and Delicate cycles. See the "Dryer Settings Chart" for drying.
2. Room temperature and humidity, type of fire, electric shock or injury to persons, read the IMPORTANT SAFETY INSTRUCTIONS in place...selected. Auto Dry cycles take the guesswork out of the load as it tumbles through heated air. The load will not light.
6. Auto Dry cycles save time and energy...
Operating Instructions - Page 2
... available with every cycle.
Cycle Adjustments
A suitable combination of the cycle and periodically during Press Saver. See the "Dryer Settings Chart" for similar loads in 15-minute increments.
High heat is made. To increase drying time for more details.
Options
To select an option, press OPTIONS until the Control indicator is not...
Operating Instructions - Page 3
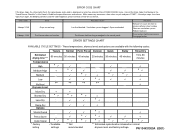
... options are available with the following cycles:
Estimated drying time *** Temperatures
High Medium-High
Medium Low
No Heat Dryness Level
Towels 60 minutes
*
**
Normal Perm Press Delicate Quick 50 minutes 40 minutes 20 minutes 30...please contact service for the possible cause and solution. ERROR CODE CHART
If the dryer stops, the status lights flash, the signal beeps and a code is based on...
Similar Questions

Frigidaire Dryer Gleq2152eso Will Not Heat
(Posted by meagVilma 9 years ago)


Where Is Heating Element On Frigidaire Dryer Model Gleq2152eso
(Posted by tomwiorzoroa 10 years ago)

Dryer Heating Element
Dryer heating element gets to hot and stays on even when the dryer is shut off.Gets hot enough that ...
Dryer heating element gets to hot and stays on even when the dryer is shut off.Gets hot enough that ...
(Posted by slong1022 10 years ago)
Frigidaire Gleq2152es Electric Dryer Runs A While, Heats On Then Stops After 10m
(Posted by thespen691 13 years ago)