Frigidaire GLEQ2152EE Support Question
Frigidaire GLEQ2152EE Support Question
Find answers below for this question about Frigidaire GLEQ2152EE - 27" Front-Load Electric Dryer.Need a Frigidaire GLEQ2152EE manual? We have 4 online manuals for this item!
Question posted by jffryrndll on August 1st, 2017
Where Is The Sensor Bar?
My new (to me) Frigidaire Gallery Series, model #GLEQ2152EE dryer runs cold air for about 5 minutes, then the horizontal control lights all light up at once, and 'Ad' reads in the timer readout window. First advice i see is to clean the Sensor Bar in the drum - just looking to find where exactly that is - it's not obvious...
Current Answers
Answer #1: Posted by waelsaidani1 on August 2nd, 2017 7:25 AM
waelsaidani1

Member since:
May 12th, 2013 Points: 19,501,797

Member since:
May 12th, 2013 Points: 19,501,797
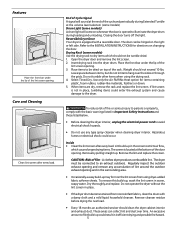
the moisture sensor in your dryer consists of two metal bars mounted on a black plate. The two metal bars will protrude into the dryer's drum.
In newer dryers, typically, the moisture sensor is located on the front, often mounted to the lint filter housing.
In older dryers, this sensor is typically found on the back wall of the dryer drum.
Related Frigidaire GLEQ2152EE Manual Pages
Use and Care Manual - Page 2
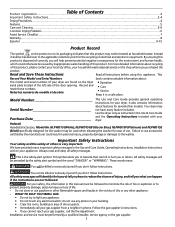
...model and serial numbers of your dryer are not followed. Model Number This Use and Care Guide provides general operating
instructions for the environment and human health,
which could result in the vicinity of life. - This is very important.
Read and Save These Instructions
Read... about recycling
of electrical and electronic equipment. Failure to light any appliance. &#...
Use and Care Manual - Page 3
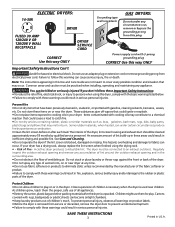
... materials after each load. Do not stack or place laundry or throw rugs against the front or back of the dryer. • Do not spray any type of children is necessary when the dryer is unpacked. The interior of lint build-up in these warnings could result in serious personal injuries. ELECTRIC DRYERS:
14-30R
FUSED...
Use and Care Manual - Page 4
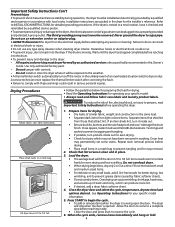
... same load. • Separate dark items from light-colored items. Separate items that shed lint from the electrical supply before reaching into the dryer if the drum is clean and in this dryer.
1.... disconnect the dryer from those that lint screen is moving. To reduce the risk of fire, electrical shock, or injury to persons, read and follow fabric care labels and laundry product labels....
Use and Care Manual - Page 5
Closing the door turns off the light. Reversible Dryer Door Your dryer is located at the volume level selected. (some models) Drum Light (some models) Use the drying rack to an exhaust outdoors. Place items to be connected to dry items which causes longer drying times. Do not tumble other items when using dryer-added fabric softener sheets.
Do...
Use and Care Manual - Page 6
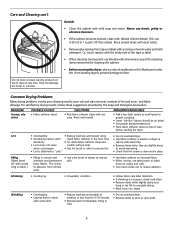
...; Leaving items in washer or dryer to
electricity.
• Or, add a fabric softener sheet and
reduce static electricity.
• Lint screen not ...air dried. • Use proper drying temperature. • Place fabric softener sheet on top of load
before starting the dryer. Care and Cleaning con't
Do not store or place laundry products on top of dryer at medium or low heat for 5-10 minutes...
Use and Care Manual - Page 7
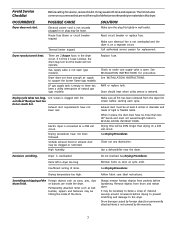
... from the dryer lint screen before starting each cycle.
Dryer runs but the ...air supply to a 208 volt circuit. Thermal limiter tripped. Call authorized service person for procedure.
Lint screen is open (gas models). Drying procedures have not been met. High humidity. When in diameter and made of natural gas (gas models).
It may be necessary to the dryer.
Electric dryer...
Use and Care Manual - Page 8

Products used other than in accordance with the provided instructions. Service calls to repair or replace appliance light bulbs, air filters, water filters, other consumables, or knobs, handles, or other than authorized service companies; LIMITATION OF REMEDIES
CUSTOMER'S SOLE AND EXCLUSIVE REMEDY UNDER THIS LIMITED ...
Technical Data Sheet - Page 1

... Readout Display Models: rotate the timer knob (1) click counterclockwise. The four indicator lights and the START indicator light start flashing at fault. To exit this code would appear on to exit test modes.
Key (button) Struck One of the keys (buttons) is exited.
If reading is within 50 K (± 10%), check wiring between thermistor and electronic control...
Technical Data Sheet - Page 2
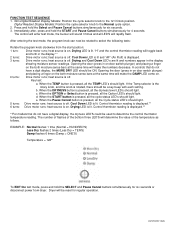
... start position: 1 turn: Drive motor runs; Control thermistor reading is pressed, all the dryness level LED's should light. When the TEMP button is displayed.** 6 turns: Drive motor runs; When the START button is pressed, all the cycle status LED's should light.
5 turns: Drive motor runs; FUNCTION TEST SEQUENCE 1. Non-Digital Readout Display Models: Position the cycle selector knob to...
Installation Instructions - Page 2
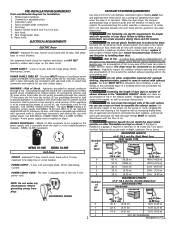
...ELECTRICAL REQUIREMENTS
ELECTRIC Dryer...(5.49 m)
22 ft. (6.71 m)
14 ft. (4.27 m)
14 ft. (4.27 m)
10 ft. (3.05 m)
NOT RECOMMENDED
Printed in ...dryer where gasoline or other obstruction. If the dryer is made up inside exhaust system and create a fire hazard and restrict air...New branch circuit installations (2) mobile homes; (3) recreational vehicles; branch circuit fused with clothes dryers...
Installation Instructions - Page 3
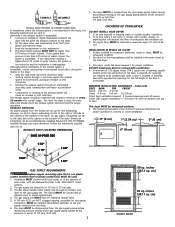
...Set the dryer timer and temperature to determine if the exhaust system is acceptable: 1. Read the measurement on electric dryers, exhausting can be inspected and cleaned a minimum of 1/2 inch (1.27 cm) pipe. 3. The more the dryer is ...contact with normal usage. The system back pressure MUST NOT be used to air fluff (cool
down drafts causing an increase in excess of water column, the...
Installation Instructions - Page 4

... to clear knobs (70.49cm) 28.5 to clear door handle (72.39cm)
2.375" (6.03cm)
(34.29cm) 13.5" To rear & base exhausts
27.0"
(68.58cm)
Stacked Dryer Installation Dimensions
(68.58cm) 27.0"
Electrical supply on rear of unit
28.25" to front of cabinet(71.76cm)
28.75" to clear knobs (73.03cm) 29.5" to...
Installation Instructions - Page 5

...prevent damage, do not use the control panel as a means to the mobile home structure.
3. Remove the four hinge hole plugs from each side), carefully lay the dryer on the right side of the ... Rotate the door 180° and reinstall the door hinges to the dryer front panel with the termination securely fastened to pick up air. REMOVE 4 SCREWS (ONE FROM EACH HINGE FIRST)
5 This provision ...
Installation Instructions - Page 6

... may need a plastic knife to help remove the plugs. Be careful to the dryer front panel. Remove the four screws that secure the door hinges to avoid scratching...from the opposite side of the hinges. 10. Remove the two hinges and reinstall the four screws. Open the dryer door. Apply moderate downward pressure on a flat surface. Be careful to reinstall the hinges. 11. Remove the screws...
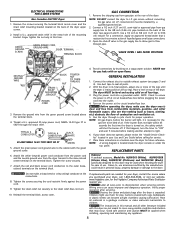
Installation Instructions - Page 7

... movement of the dryer with two screws.
Tighten screws securely.
7. Do not use an aluminum wired receptacle with a copper wired power cord and plug (or vice versa). approved strain relief must be run with the circuit conductors and connected to the silver colored center terminal on the terminal block. The laundry center is...
Installation Instructions - Page 8
... be bled of combustion and ventilation air. 5. Run the dryer through a cycle check for play. If your dryer does not operate, please review the "Avoid Service Checklist" located in your dryer, call 1-800-944-9044, or visit our website, www.frigidaire.com, for future reference. REPLACEMENT PARTS
Pedestal A pedestal accessory, Model No. NLPWD15 (White), NLPWD15GB (Glacier Blue...
Operating Instructions - Page 1
...sensors. The dryer uses sensing bars to another selection will not change the selection after the cycle has begun, press Pause/ Cancel twice, select a new...loads. The signal will beep and the status lights will flash, but the original cycle will light up in a circular track to persons, read.... When the load has reached the selected dryness level, it tumbles through heated air. Delicate Select ...
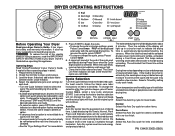
Operating Instructions - Page 2
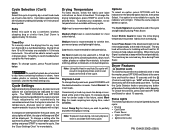
... No Heat setting only. See the "Dryer Settings Chart" for 30 minutes to tumbling without heat for more details.
Dryer Features
(Control Lock) To avoid having someone accidentally start...load might not be indicated for about 10 seconds until the (Control Lock) lights up of just a few items. It provides approximately 20 minutes of the cycle and periodically during Press Saver. The load...
Operating Instructions - Page 3
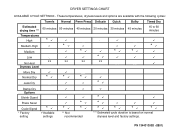
... minutes
*
*
*
**
**
**
Quick 30 minutes
*
Bulky 45 minutes
*
Timed Dry 15 to 90 minutes
*
More Dry
Normal Dry
*
*
*
Less Dry
*
Damp Dry Options
Shrink Guard
Press Saver
Cycle Signal * Factory
setting
*
Available settings
*
*
*
** Not recommended
*
*
*
*
*
*
*** Estimated cycle duration is based on normal dryness level and factory settings. PN 134431300D (0801) DRYER...
Similar Questions

Trouble Restarting Electric Dryer
After an electric dryer warms it will not restart unless the selector nob is tapped. Which part need...
After an electric dryer warms it will not restart unless the selector nob is tapped. Which part need...
(Posted by jrpetrick 5 years ago)

Gallery Series Gas Dryer Beeping. Which Buttons Do I Press To Reset?
(Posted by queendeb4 8 years ago)

Trouble With The Temp Settings
i can only use the high or medium high settings. I can't switch it to medium, low or no heat setting...
i can only use the high or medium high settings. I can't switch it to medium, low or no heat setting...
(Posted by nelmgal 8 years ago)
Frigidaire Electric Dryer Fer641fs. No Heat. Timer Not Advancing.
My electric dryer has no heat and the timer is not advancing like it suppose to. It just keeps spinn...
My electric dryer has no heat and the timer is not advancing like it suppose to. It just keeps spinn...
(Posted by mouatech 10 years ago)

Frigidaire Gleq2152es Electric Dryer Runs A While, Heats On Then Stops After 10m
(Posted by thespen691 13 years ago)