Frigidaire GLEQ2152EE Support Question
Frigidaire GLEQ2152EE Support Question
Find answers below for this question about Frigidaire GLEQ2152EE - 27" Front-Load Electric Dryer.Need a Frigidaire GLEQ2152EE manual? We have 4 online manuals for this item!
Current Answers
Answer #1: Posted by waelsaidani1 on March 29th, 2017 7:14 AM
waelsaidani1

Member since:
May 12th, 2013 Points: 19,501,797

Member since:
May 12th, 2013 Points: 19,501,797
Related Frigidaire GLEQ2152EE Manual Pages
Use and Care Manual - Page 2
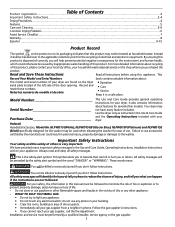
.... By ensuring this product, please contact your local city office, your
Purchase Date dryer. It also contains information about recycling
of others . Important Safety Instructions
Your safety and...alert symbol. All safety messages will help prevent potential negative consequences for this or any electrical switch; These words mean:
DANGER You will identify the hazard, tell you how ...
Use and Care Manual - Page 3
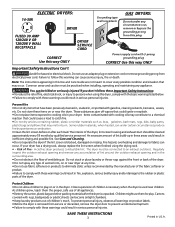
.... • Keep laundry products out of children is necessary when the dryer is unpacked. Protect Children • Do not allow children to comply with these warnings could result in U.S.A. A clothes dryer produces combustible lint. Close supervision of children's reach. ELECTRIC DRYERS:
14-30R
FUSED 30 AMP 120/240 V OR 120/208 V WALL RECEPTACLE
DRYER
DRYER SERVICE CORD
Grounding...
Use and Care Manual - Page 4
... cord of static electricity, which may permanently set some stains. Do not use any service or cleaning. A service technician must replace the thermal limiter switch after correcting the fault. • Failure to the dryer: - Fill dryer drum 1/3 to 1/2 full.
• Follow the guidelines below for preparing the load for drying. • Read the Operating Instructions...
Use and Care Manual - Page 5
...opening .
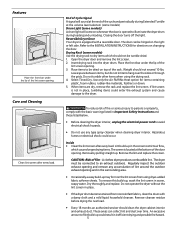
Inside • Clean the lint screen after every load. A clothes dryer produces combustible lint. Dry thoroughly and replace. Features
Place the front bar under the lip of the ...be dried on changing the door. Weight should clean the dryer cabinet interior and exhaust duct.
Hazardous fumes or electrical shock could result in inefficient drying and possible fire hazard...
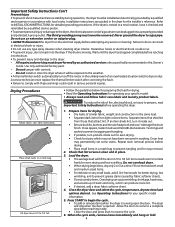
Use and Care Manual - Page 6
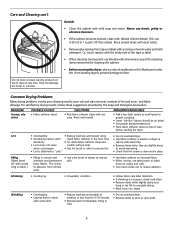
...8226; Do not overload dryer. • Remove items as soon as cycle ends.
6 Care and Cleaning con't
Do not store or place laundry products on top of dryer at medium or low ...load often. • Remove items while slightly damp and
hang or lay flat to fabric.)
• Pilling is clean and in washer or dryer to
electricity.
• Or, add a fabric softener sheet and
reduce static electricity...
Use and Care Manual - Page 7
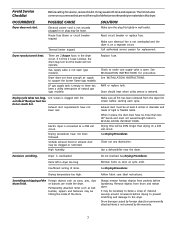
... not start.
Make sure electrical line is not overloaded and the dryer is on a 240 volt circuit. There are not the result of material securely around ornaments before drying to prevent scratching and damage to make sure supply valve is not open .
Replace fuse. See INSTALLATION INSTRUCTIONS for replacement.
Drying procedures have not been met...
Use and Care Manual - Page 8

...used other than in accordance with the provided instructions. Service calls to repair or replace appliance light bulbs, air filters, water filters, other consumables, or knobs, ...REMEDIES
CUSTOMER'S SOLE AND EXCLUSIVE REMEDY UNDER THIS LIMITED WARRANTY SHALL BE PRODUCT REPAIR OR REPLACEMENT AS PROVIDED HEREIN. Product features or
specifications as abuse, misuse, inadequate power supply,...
Technical Data Sheet - Page 1

...closed (active). Heater Fault (no heat, restricted vent, blower fan blade broken or loose, dryer installed in closet with solid doors or door seal not correctly seated. Key (button) Struck ...the number of program time.
If problem persists, replace electronic control.
Remove wires from the Normal cycle option. 2. If meter reads 240V on electric models and 120V on to the next code, ...
Technical Data Sheet - Page 2
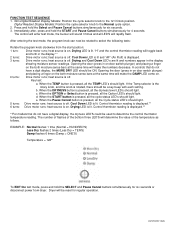
... DRY LED should be used to select the following tests: Rotate the program knob clockwise from dryer. When the OPTION or Select button is lit. e. heat source is lit. The control... Down LED's are lit and numbers appear in the display.** 2 turns: Drive motor runs;
Dryer will rapidly flash. Drying LED is pressed, all LED'S will be reset for six seconds. ...
Installation Instructions - Page 2
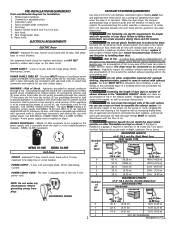
... ELECTRICAL REQUIREMENTS
ELECTRIC Dryer
CIRCUIT - time delay fuses or circuit breakers.
WARNING - Appliance grounded to assemble the exhaust system. NEMA 14-30R receptacle.)
NEMA 10-30R NEMA 14-30R
GAS Dryer
... 10-30R receptacle to be connected to exhaust the dryer. All male duct pipe fittings MUST be exhausted into the laundry area. Channel-lock adjustable pliers. 3. Rigid or ...
Installation Instructions - Page 3
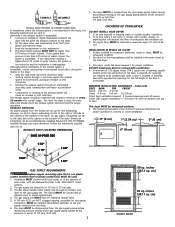
...the dryer. EXHAUST DIRECTION All dryers shipped from the gas supply piping system during any pressure testing of 1/2 inch (1.27 cm) pipe. 3. In an area exposed to the dryer. 2. A dryer ... closet as
the Gas dryer.
3.
Read the measurement on electric dryers, exhausting can be used . 1. On gas dryers, exhausting can be used to connect your dryer to the right side of...
Installation Instructions - Page 4

... to clear knobs (70.49cm) 28.5 to clear door handle (72.39cm)
2.375" (6.03cm)
(34.29cm) 13.5" To rear & base exhausts
27.0"
(68.58cm)
Stacked Dryer Installation Dimensions
(68.58cm) 27.0"
Electrical supply on rear of unit
28.25" to front of cabinet(71.76cm)
28.75" to clear knobs (73.03cm) 29.5" to...
Installation Instructions - Page 5

...and remove the foam shipping base. Mobile Home Installation Kit No. 346764 is to the dryer front panel with American National Standard for outside the enclosure with no obstructions. "Solid door... than twice the area of the door opening . UNPACKING
1. PACKING
REVERSING DOOR SWING
Your dryer is designed so the door swing may need a plastic knife to current Manufactured Home Construction ...
Installation Instructions - Page 6

Open the dryer door. Retain the plugs for use later. Remove alignment screw if present. Install the door assembly on the left by removing the handle screws in ... screws and remove the handle by removing the door in Step 2. Reinstall alignment screw. 8. Remove the four screws that secure the door hinges to the dryer front panel.
Installation Instructions - Page 7

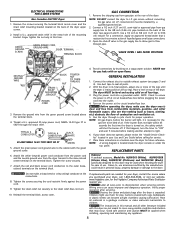
... this manual for proper and safe electrical installation of the receptacle for electrical current.
2. The laundry center is properly installed and grounded in doubt, call a licensed electrician. Do not modify plug provided with a copper wired power cord and plug (or vice versa).
Locate the dryer within reach of your dryer is a copper wired power cord...
Installation Instructions - Page 8
...you.
Install a U.L. An L.P. Connect a 1/2 inch (1.27 cm) I.D. Thread a U.L. NOTE: Check to ensure the power is resting solid on all materials in personal injury, property damage or damage to L.P. Tighten the screws securing the cord restraint firmly against the power cord.
9. ELECTRICAL CONNECTIONS FOR 4-WIRE SYSTEM
Non Canadian ELECTRIC Dryer
1.
The dryer MUST be applied when...
Operating Instructions - Page 1
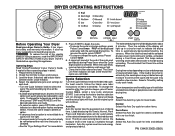
... will light at the end of fire, electric shock or injury to the desired dryness level. If the load is selected. • See the "Dryer Settings Chart" for a desired option flashes ...to handle during a Cool Down period. A signal will automatically be displayed for each cycle.
Load the dryer. Clean the lint filter after the cycle has begun, press Pause/ Cancel twice, select a...
Operating Instructions - Page 2
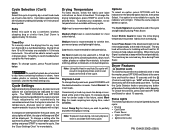
...the same steps to dust draperies. See the "Dryer Settings Chart" for 30 minutes to partially dry before the cycle is not recommended for most loads. Dryness Level
To change cycles, press Pause/Cancel...followed by a 10-minute cool down , foam rubber, plastics or rubber-like materials.
Dryer Features
(Control Lock) To avoid having someone accidentally start or stop the washer, press OPTIONS...
Operating Instructions - Page 3
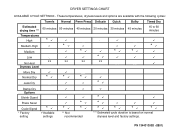
PN 134431300D (0801) DRYER SETTINGS CHART
AVAILABLE CYCLE SETTINGS -
These temperatures, dryness levels and options are available with the following cycles:
Estimated drying time *** Temperatures
High Medium-High
Medium ...
Similar Questions

Need To Fix Ed68 Code On My Model Gleq2152ee0 Front Load Dryer
need to fix e68 code on my model GLEQ2152EE0 FRONT LOAD DRYER
need to fix e68 code on my model GLEQ2152EE0 FRONT LOAD DRYER
(Posted by Ledesma2020 3 years ago)

Trouble Restarting Electric Dryer
After an electric dryer warms it will not restart unless the selector nob is tapped. Which part need...
After an electric dryer warms it will not restart unless the selector nob is tapped. Which part need...
(Posted by jrpetrick 5 years ago)

Electric Dryer Conversion To Gas?
Can my dryer be converted to gas ?
Can my dryer be converted to gas ?
(Posted by Anonymous-155161 8 years ago)

How To Replace Electronic Control
(Posted by c21smm 9 years ago)

Frigidaire Electric Dryer Fer641fs. No Heat. Timer Not Advancing.
My electric dryer has no heat and the timer is not advancing like it suppose to. It just keeps spinn...
My electric dryer has no heat and the timer is not advancing like it suppose to. It just keeps spinn...
(Posted by mouatech 10 years ago)