
Frigidaire FMV152KS Support Question
Frigidaire FMV152KS Support Question
Find answers below for this question about Frigidaire FMV152KS - 1.5 Cu Ft Microwave.Need a Frigidaire FMV152KS manual? We have 6 online manuals for this item!
Question posted by sweetpeaphoto on September 23rd, 2011
Exhaust
Having a issue with the exhaust on the microwave. My fire alarm goes off everytime there is the smallest amount of smoke. The vent is exhaustiung the air out the top on an angle away from the intake. DO you have an idea if it can be switched?
Current Answers


Related Frigidaire FMV152KS Manual Pages
Installation Instructions (All Languages) - Page 1
... our Website at: KWWS
ZZZIULJLGDLUHFRP
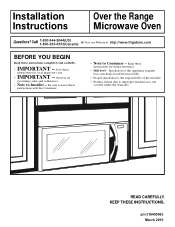
BEFORE YOU BEGIN
Read these
instructions with the Consumer.
• Note to Consumer - Installation Instructions
Over the Range Microwave Oven
Questions?
Installation Instructions (All Languages) - Page 2

... to Wall 12 Preparation of Top Cabinet 13 Adapting Microwave Blower for Outside top Exhaust 13-14 Checking for Proper Damper Operation 14 Mount the Microwave Oven ..........14-15 Adjust the Exhaust Adaptor 15 Connecting Ductwork 15
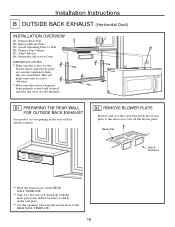
B Outside Back Exhaust 16-19
Preparing Rear Wall for Outside Back Exhaust 16 Remove Blower Plate 16 Attach Mounting Plate...
Installation Instructions (All Languages) - Page 3
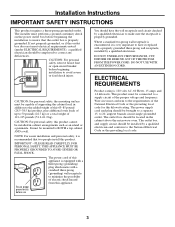
...the added weight of this 63-85 pound (28.5-38.5 kg) product, plus additional oven loads of up to a supply circuit of 113-135 pounds (51.3-61.2 kg). Where... noted (under ELECTRICAL REQUIREMENTS), a qualified electrician should be installed in the cabinet above the microwave oven.
PLEASE READ CAREFULLY.
ELECTRICAL REQUIREMENTS
Product rating is equipped with a three-prong (grounding) ...
Installation Instructions (All Languages) - Page 5
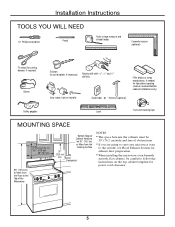
...Cabinet Needs to follow the instructions on the top cabinet template for exhaust duct preparation.
• When installing the microwave oven beneath
smooth, flat cabinets, be careful to be 30w (76...the Microwave
13"Maximum (33 cm) 161⁄2" (41.9 cm)
30" (76.2 cm)
2" (5.1 cm)
Bottom Edge of obstructions.
• If you are going to vent your microwave oven
to the outside, see Hood Exhaust ...
Installation Instructions (All Languages) - Page 6
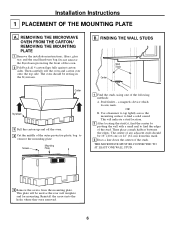
... surface to find the edges of the studs. a magnetic device which locates nails.
Reinstall the screws into the holes where they were removed.
6 REMOVING THE MICROWAVE
OVEN FROM THE CARTON/ REMOVING THE MOUNTING PLATE
1 Remove the installation instructions, filters, glass tray and the small hardware bag.
Then place a mark halfway between the...
Installation Instructions (All Languages) - Page 9
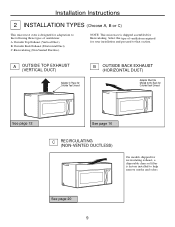
... Place for Outside Top Exhaust
B OUTSIDE BACK EXHAUST (HORIZONTAL DUCT)
Adaptor Must Be Moved to the Back for Outside Back Exhaust
See page 12
See page 16
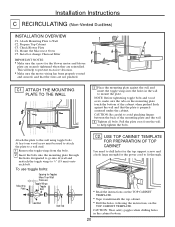
C RECIRCULATING (NON-VENTED DUCTLESS)
On models shipped for your installation and proceed to help remove smoke and odors.
Installation Instructions
2 INSTALLATION TYPES (Choose A, B or C)
This microwave oven is designed for...
Installation Instructions (All Languages) - Page 12
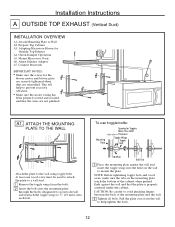
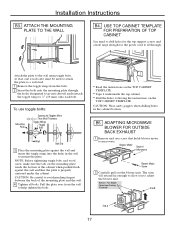
Mount Microwave Oven A6. Connect... plate against the wall and that the wires are reinstalled. Pull the plate away from the bolts.
2 Insert the bolts into the mounting plate through the holes... from the wall to the wall using toggle bolts. Adjust Exhaust Adaptor A7.
Prepare Top Cabinet A3. Adapting Microwave Blower for Toggles More Than Wall Thickness
Toggle Wings Toggle Bolt...
Installation Instructions (All Languages) - Page 13
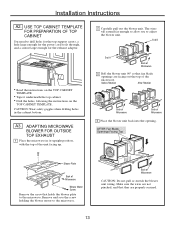
... screw that fan blade openings are properly secured.
13
Before Rotation
After Rotation
Back of Microwave
Back of the unit facing up.
2 Carefully pull out the blower unit. A3. ADAPTING MICROWAVE BLOWER FOR OUTSIDE TOP EXHAUST
1 Place the microwave in the cabinet bottom. USE TOP CABINET TEMPLATE FOR PREPARATION OF TOP CABINET
You need...
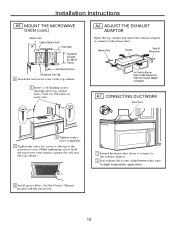
Installation Instructions (All Languages) - Page 14

... tight. Make sure the screw is installed. CHECK FOR PROPER DAMPER OPERATION
Blower Plate Exhaust Adaptor
Damper
Back of the blower plate. A5. MOUNT THE MICROWAVE OVEN
FOR EASIER INSTALLATION AND PERSONAL SAFETY, WE RECOMMEND THAT TWO PEOPLE INSTALL THIS MICROWAVE OVEN.
IMPORTANT: If filler blocks are not used, case damage may occur from overtightening...
Installation Instructions (All Languages) - Page 15
...
A7.
CONNECTING DUCTWORK
House Duct
6 Tighten center screw completely.
7 Tighten the outer two screws to the top of Cabinet Recess
Self-Aligning Screw
Microwave Oven Top 4 Attach the microwave oven to the exhaust adaptor.
2 Seal exhaust duct joints using furnance duct tape for high temperature applications.
8 Install grease filters. See the Owner's Manual packed with the...
Installation Instructions (All Languages) - Page 16
...; Read the instructions on the REAR
WALL TEMPLATE.
• Tape it to the microwave. Remove Blower Plate B3.
Prepare Top Cabinet B5. Mount the Microwave Oven
IMPORTANT NOTES:
• Make sure the screws for outside exhaust. B2. REMOVE BLOWER PLATE
Remove and save the screw that the wires are reinstalled. Lift off the blower...
Installation Instructions (All Languages) - Page 17
Attach the plate to adjust the blower unit. ADAPTING MICROWAVE BLOWER FOR OUTSIDE BACK EXHAUST
1 Remove and save screw that the plate is properly ... to the wall using toggle bolts.
CAUTION: Wear safety goggles when drilling holes in the wall to microwave. Pull the plate away from the bolts.
2 Insert the bolts into the mounting plate through . Installation Instructions
B3. NOTE...
Installation Instructions (All Languages) - Page 18
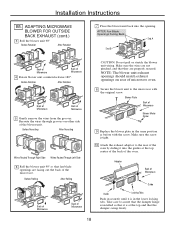
... the lower locking tabs. Installation Instructions
B5. NOTE: The blower unit exhaust openings should match exhaust openings on other side
of microwave oven.
8 Secure the blower unit to the rear of the oven by sliding it is tight.
10 Attach the exhaust adaptor to the microwave with the screw. Before Rerouting
After Rerouting
Wires Routed Through Right...
Installation Instructions (All Languages) - Page 19
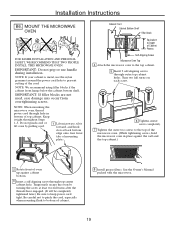
... used, case damage may occur from overtightening screws. Cabinet Front Cabinet Bottom Shelf Filler Block
Equivalent to Depth of Cabinet Recess Self-Aligning Screw Microwave Oven Top 4 Attach the microwave oven to prevent cutting of mounting plate. Keep it forward, and hook slots at least two full turns after the threads have engaged. (It...
Installation Instructions (All Languages) - Page 20
...TO THE WALL
3 Place the mounting plate against the wall and that the wires are reinstalled. Pull the plate away from the bolts.
2 Insert the bolts into the mounting plate through .
• Read the instructions on the... Mounting Plate to the wall using toggle bolts. Mount the Microwave Oven C5.
Installation Instructions C RECIRCULATING (Non-Vented Ductless)
INSTALLATION OVERVIEW
C1.
Complete Owner's Guide (English) - Page 7
...time.
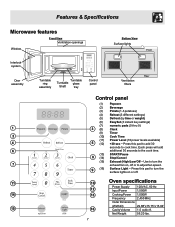
(13) START/Pause
8 (14) Stop/Cancel
(15) Exhaust (High/Low/Off ~ Use to turn the
exhaust fan on, off or to adjust fan speed.
9
(16)
...Oven specifications
Power Supply
120VAC, 60 Hz
Input Power
1,550W
Cooking Power 1,000W
Frequency
2,450 MHz
Outer Dimensions
(WxHxD)
29.88"x15.75"x 15.04"
Cavity Volume 1.5 cubic ft. Net Weight
56.20 lbs. Features & Specifications
Microwave...
Complete Owner's Guide (English) - Page 9
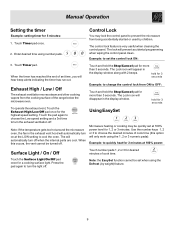
... range below the microwave oven. Note: the EasySet function cannot be turned off . The control lock feature is very useful when cleaning the control panel.
Touch Timer pad. Exhaust High / Low / Off
The exhaust ventilation moves steam and other cooking vapors from the cooking surface of cook time (this occurs, the vent cannot be set...
Complete Owner's Guide (English) - Page 19
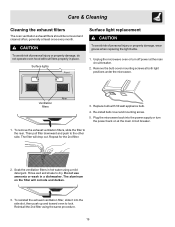
Unplug the microwave oven or turn
the power back on the filter will drop out. Replace bulb with 30 watt appliance bulb.
4. Then pull filter downward and push to the rear.
To remove the exhaust ventilation filters, slide the filter to the other side. Repeat for the 2nd filter.
2.
Re-install bulb cover and...
Complete Owner's Guide (English) - Page 20
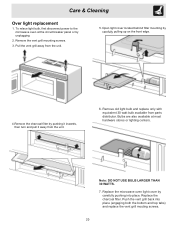
... place (engaging both the bottom and top tabs) and replace the vent grill mouting screws.
20
Replace the microwave oven light cover by pushing it inwards, then turn and pull it away from the unit.
6. Care & Cleaning
Over light replacement
1. Pull the vent grill away from parts distributor. Bulbs are also available at the circuit breaker...
Product Specifications Sheet (English) - Page 2
... White 13-1/2"
Yes
Yes
24 10
Over-the-Range Microwave Oven
Frigidaire Baseline
Yes
Yes
Yes 3
Weight / Time
Yes Yes
Yes
Ventilation System
Ducted / Ductless Installation Option
Yes
A
Exhaust Fan (CFM)
2-Speed 170 / 300
Cooktop Light
Yes
Auto-Start Heat Sensor
Yes
Dishwasher-Safe Vent Filter (Ductless Installation)
Yes
Power Ratings Frequency (Mhz) Watts...
Similar Questions

I Am Looking To Buy A New Above Stove Microwave.
Hi, I currently own a fmv152ksa model frigidaire above stove microwave. I need to know how many cubi...
Hi, I currently own a fmv152ksa model frigidaire above stove microwave. I need to know how many cubi...
(Posted by markruzparvin 3 years ago)

Does The Frigidaire Microwave Model # Ffmv164lsa Have To Be Vented Outside
(Posted by LoutDa 10 years ago)

Frigidaire Gallery 1.7 Cu Ft Over-the-range Microwave (stainless-steel) Won't
heat
heat
(Posted by rmrWillia 10 years ago)

Frigidaire Microwave Exhaust Fan Will Not Stop Running. Model # Ffmv164lsa
frigidaire microwave exhaust fan will not stop running. model # FFMV164LSA. IS this a overheating sa...
frigidaire microwave exhaust fan will not stop running. model # FFMV164LSA. IS this a overheating sa...
(Posted by korkianj 11 years ago)

Trying To Find A Top And Back Exhaust Template For A Frigidaire Microwave
(Posted by aac0853 11 years ago)