
2001 Ford Excursion Support Question
2001 Ford Excursion Support Question
Find answers below for this question about 2001 Ford Excursion.Need a 2001 Ford Excursion manual? We have 6 online manuals for this item!
Question posted by shadotha on January 10th, 2014
How To Install Rear Intertainment System In Excursion
The person who posted this question about this Ford automobile did not include a detailed explanation. Please use the "Request More Information" button to the right if more details would help you to answer this question.
Current Answers
Related Manual Pages
Owner's Manual - Page 3
... and without incurring obligation. Before you along with your vehicle. Snowplowing The Excursion is provided to break in loss of this guide was in your Owner's... Direct Injection Turbo Diesel Owner's Guide Supplement for information regarding the potential for snowplow installation. SPECIAL NOTICES Notice to Bumper Coverage, Safety Restraint Coverage, Corrosion Coverage, and ...
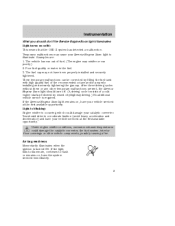
Owner's Manual - Page 4

... you may see on your vehicle. Vehicle Symbol Glossary Safety Alert See Owner's Guide
Fasten Safety Belt
Air Bag-Front
Air Bag-Side Child Seat Installation Warning Brake System Brake Fluid Non-Petroleum Based Master Lighting Switch
Child Seat Child Seat Tether Anchorage Anti-Lock Brake System Traction Control
Hazard Warning...
Owner's Manual - Page 7

Instrumentation
Gearshift lever (pg. 128) Rear window defroster control (pg. 28) Audio system (pg. 29)
VOL PUSH ON
DISC EJ
FM 1 AMC BL
ST
RF
MUTE
AM SEEK TUNE
REW
2WD ...
Owner's Manual - Page 9
...do if the Service Engine Soon light illuminates Light turns on , have been properly installed and securely tightened. These temporary malfunctions can be corrected by mixed city/highway driving... 3. The fuel cap may misfire or run out of the recommended octane and/or properly installing and securely tightening the gas cap. The vehicle has run poorly.) 2. Instrumentation
What you ...
Owner's Manual - Page 94
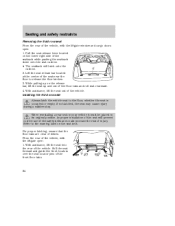
... floor to release the floor latches. 3. Seating and safety restraints
Removing the third row seat From the rear of the vehicle, with the liftgate open : 1. Improper installation of the seat will latch onto the cushion. 2. Installing the third row seat Always latch the vehicle seat to the warning label on the release bar...
Owner's Manual - Page 97

...belt will lock to use the automatic locking mode • Anytime a child safety seat is installed in the shoulder belt. When to use the automatic locking mode • Buckle the combination ...on the driver safety belt. The safety belt system can also be properly restrained in the rear seat whenever possible. Refer to Safety Restraints for Children or Safety Seats for Children later in ...
Owner's Manual - Page 109
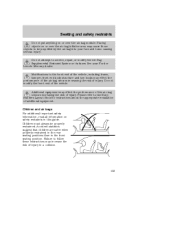
... module. Accident statistics suggest that children are safer when properly restrained in the rear seating positions than in this guide. Additional equipment may effect the performance of the... seating position. Modifications to the Body Builders Layout Book for instructions about the appropriate installation of injury. Please refer to the front end of the vehicle, including frame, ...
Owner's Manual - Page 115
... lap and shoulder belt.
For more information on top tether straps, refer to Automatic locking mode (passenger side front and outboard rear seating positions) (if equipped). If you do not install and use the safety seat properly, the child may be properly restrained in a child seat. Children 12 and under should be...
Owner's Manual - Page 143

... lower gear when towing up trailer lamps. The trailer brakes must be installed. Trailer lamps Trailer lamps are safe if installed properly and adjusted to the manufacturer's specifications. Make sure your vehicle's brake... rated for hooking up or down steep hills. Using a step bumper (if equipped) The rear bumper is equipped with an integral hitch and only requires a ball with a 25.4 mm ...
Owner's Manual - Page 161
... the wheel is only meant for changing the tire. • Never use the front or rear differential as a jacking point. 9. Do not fully tighten the lug nuts until the wheel is completely off... the ground and high enough to install the spare tire. Lower the wheel by turning the jack handle counterclockwise.
161
2001 U137 (hdw) Owners...
Owner's Manual - Page 207

... next time the headlamps are aligned, push the bulb into the headlamp assembly. Install bulb retaining ring over the plastic base and lock the ring into the rear of the plastic base until the plastic base contacts the rear of the new bulb into the lamp assembly until it counterclockwise about 1⁄4 turn...
Owner's Manual - Page 209

.... Grasp the bulb only by rotating clockwise. Rotate the foglamp bulb counterclockwise and remove from foglamp (the rear side of the tail lamp assembly, one just below the other.
Avoid touching the glass envelope. 1. Install the foglamp bulb in the same portion of the foglamp is dropped. Connect the electrical connector to...
Owner's Manual - Page 211

...a qualified service technician or your dealer. Install the bulb socket in the new bulb. 4. USING THE RIGHT BULBS Replacement bulbs are located behind the rear bumper to assure lamp performance, light brightness...North America and an "E" for Europe to locate the bulb socket. 2. Reach behind the rear bumper. The correct bulbs will not damage the lamp assembly or void the lamp assembly ...
Owner's Manual - Page 223

... Stroke Direct Injection Turbo Diesel Owner's Guide Supplement for diesel engine information. DO NOT mix MERCON and MERCON V. VEHICLE DIMENSIONS EXCURSION Dimension (1) Overall length (2) Overall width (3) Overall height (4) Wheelbase (5) Track (Front / Rear) 5 2 1 3 1 1 4x2 mm (in) 757 (226.7) 031 (80.0) 967 (77.4) 480 (137.0) 738 (68.4)/ 729 (68.1) 4x4 mm (in an automatic...
Scheduled Maintenance Guide 5th Printing - Page 32
...engine coolant, if equipped Change automatic transmission/transaxle fluid and filter Change rear axle lubricant on all rear wheel drive (RWD) vehicles (See page 34) Replace accessory drive...lubricate and adjust bearings Inspect and lubricate steering linkage (E and F Series, Expedition, Navigator, Excursion)
Additional services for: 4x4 Change front axle lubricant (See page 34) Change transfer case...
7.3L Diesel Supplement 2nd Printing - Page 15

... maximum weights can be calculated by volume, so you cannot necessarily use all available space when loading a vehicle. F-Series and Excursion trailer towing tables GCWR (Gross Combined Weight Rating)/Trailer Weights Maximum Rear axle Maximum trailer Model GCWR-kg ratio weight-kg (lbs.) 1 (lbs.) F-250 and 3.73 9 072 (20 000) 4 536 (10...
7.3L Diesel Supplement 2nd Printing - Page 19
... run roughly and smoke until it runs. Remove and discard old fuel filter element and fuel filter o-ring. 9. F-Series Super Duty and Excursion only The engine will purge the trapped air as it contacts the housing. 5. Install new fuel filter o-ring onto fuel filter element. 3. Tighten cap until the air is not...
Rear Seat Entertainment System Supplement 1st Printing - Page 2
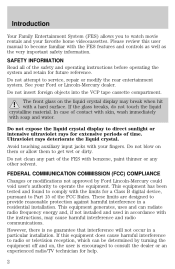
...Lincoln-Mercury could void user's authority to radio or television reception, which can radiate radio frequency energy and, if not installed and used in accordance with the instructions, may break when hit with the FES features and controls as well as the...VCP tape cassette compartment. Do not expose the liquid crystal display to service, repair or modify the rear entertainment system.
Rear Seat Entertainment System Supplement 1st Printing - Page 8

...) - Volume adjustment will affect the speakers and headphone jacks on VCP. Dual Play Mode The rear speakers are only operational when in your vehicle, the radio display will either show "Dual Play-.../ control: following events may occur when pressing the • If done while the VCP is installed in Dual Play mode. Connect these terminal(s) to radio mode and the media control panel will ...
Rear Seat Entertainment System Supplement 1st Printing - Page 9
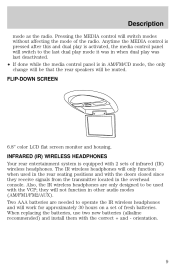
...control panel will switch to operate the IR wireless headphones and will be that the rear speakers will work for approximately 30 hours on a set of fresh batteries. Two ... in the overhead console. When replacing the batteries, use two new batteries (alkaline recommended) and install them with 2 sets of the radio. Pressing the MEDIA control will switch modes without affecting the...
Similar Questions

How To Install Rear Seat Entertainment Ford Excursion
(Posted by Jibardstitz 9 years ago)

How To Retane Rear Seat Entertament On 2001 Excursion
(Posted by Crbo 9 years ago)
Can You Install A Snow Plow On A 2001 Ford Excursion Without Harm?
(Posted by peato 10 years ago)

Where Is The Rear A/c Fuse Located On My 2000 Ford Excursion
(Posted by satjaso 10 years ago)

Why Isnt Rear Air Not Cold And Front Air Is On 2001 Ford Excursion
(Posted by scareLanist 10 years ago)