Epson Stylus NX230 Support Question
Epson Stylus NX230 Support Question
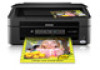
Find answers below for this question about Epson Stylus NX230.Need a Epson Stylus NX230 manual? We have 3 online manuals for this item!
Question posted by jdavidpryor on January 13th, 2013
Nx230 Ink Cartridge Tray Won't Move
We unboxed a brand new Epson Sylus NX230, followed the simple initial steps to prep it for installing the ink cartridges for the first time, but the cartridge tray doesn't respond to the Stop button & won't move out in order to drop the cartridges in. Any ideas why?
Current Answers
Related Epson Stylus NX230 Manual Pages
Notices - Page 2
... operation of the following conditions: if the power cord or plug is in the home (far right) position and the ink cartridges are in place.
■ When storing or transporting the product, do not use aerosol products that contain flammable gases inside the product or touch any cartridges during printing.
■ Install a new ink cartridge immediately after opening...
Notices - Page 3

... needed to the following two conditions: (1) this device may cause undesired operation. and/or CPU Boards and Power Supplies used with 47CFR Part 2 and 15 of Product: Model:
Epson Multifunction printer C461D
Notices 3 Declaration of Conformity
According to warm up at room temperature for at :
Epson America, Inc.
Do not touch the ink cartridge ink supply port or...
Notices - Page 4

...Epson service technician will be free from the date of one . This warranty does not cover ribbons, ink cartridges or third party parts, components, or peripheral devices...Epson, e.g., dealer or user-added boards or components. Epson requires a debit or a credit card number to secure the cost of misuse, abuse, improper installation...may be new or refurbished to the Epson product ...
User Guide - Page 3
Top...14 Product Parts - Inside ...16 Product Parts - Windows 33 Basic Print Options - Contents
EPSON Stylus NX230 User's Guide ...11
Product Basics ...12 Setting Up the Control Panel ...12 Control Panel Buttons and Lights 12 Adjusting Control Panel Position 13 Product Parts Locations ...13 Product Parts - Windows 38 Advanced Print Options - Back...17
Loading Paper...
User Guide - Page 13
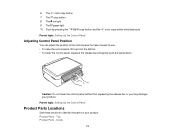
... control panel, squeeze the release bar and gently push the panel down. Inside
13 6 The color copy button 7 The stop button 8 The ink light 9 The paper light 10 Scan by pressing the B&W copy button and the
color copy button simultaneously
Parent topic: Setting Up the Control Panel
Adjusting Control Panel Position
You can adjust the position...
User Guide - Page 32
... the color copy button and press the stop button.
Note: Copies may not be exactly the same size as your product.
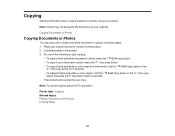
Copying Documents or Photos
Copying Documents or Photos
You can copy color or black-and-white documents or photos onto plain paper.
1. Do one of the following to copy documents or photos using...
User Guide - Page 69

..." and click Resume. • To check ink status, click Supply Levels. Parent topic: Printing Your Document or Photo - Mac OS X 10.4
Cancelling Printing Using a Product Button
If you need to cancel printing, press the stop button on your product. Parent topic: Printing From a Computer
69 Select the following options as necessary: • To cancel printing...
User Guide - Page 114
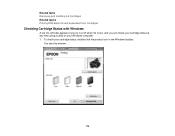
... your Windows computer. 1. Related tasks Removing and Installing Ink Cartridges Related topics Printing With Black Ink and Expended Color Cartridges
Checking Cartridge Status with Windows
A low ink reminder appears if you try to print when ink is low, and you can check your cartridge status at any time using a utility on your cartridge status, double-click the product icon in the...
User Guide - Page 120

... or expended cartridges. You must install new cartridges immediately after removing the old ones.
Caution: Do not move the print head by hand; Do not touch the flat white cable inside the printer. 3. Press the stop button. • If a cartridge is low or expended, the print head moves that cartridge to the indicator position. Removing and Installing Ink Cartridges
Make sure...
User Guide - Page 121
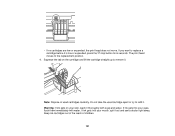
... you want to remove it is low or expended, press the stop button for 6 seconds. Warning: If ink gets on the cartridge and lift the cartridge straight up to replace a cartridge before it . Do not take the used cartridges carefully. Keep ink cartridges out of the reach of used cartridge apart or try to the replacement position.
4. The print head...
User Guide - Page 123

... moves to its home position and the printer starts charging the ink. This takes about 2 minutes. When the power light stops flashing and remains on, ink charging is flashing or you will waste ink. 123 Press the stop button. 8. Lower the scanner unit.
10. Insert the new cartridge into the holder and push it down until it clicks...
User Guide - Page 124

...You see one of these windows:
124 Press the stop button, then press the ink cartridge down .
This method allows you remove an ink cartridge for later use, protect the ink supply area from dirt and dust and store it clicks into place. Parent topic: Replacing Ink Cartridges Related concepts Purchase EPSON Ink Cartridges
Replacing Ink Cartridges Using a Computer Utility
You can use the...
User Guide - Page 131

..., clean the print head. If there are gaps or the pattern is clean
Print head needs cleaning
6. Do one of the following:
• Windows: Right-click the product icon in the lines. When the product turns on your Windows or Mac computer. ... You can continue printing. If there are gaps in the Windows taskbar.
131 Hold down the stop button and press the power button to turn the product on. 4.
User Guide - Page 134

... Print Head Using the Product Buttons Cleaning the Print Head Using a Computer Utility Parent topic: Print Head Maintenance Related topics Replacing Ink Cartridges Cleaning the Print Head Using the Product Buttons You can clean the print ...not be able to start the cleaning cycle. Hold down the stop button for 3 seconds to clean it .
134
Make sure no gaps, click Finish. If there are indicating...
User Guide - Page 135

... errors, the CD/DVD tray is not inserted in the product, and
the CD/DVD feed tray is clean. If quality still does not improve, one of the ink cartridges may be old or damaged... Queue. 4. Run a nozzle check to 4 times, turn off the product and wait at least 6 hours. Make sure that the print head is closed. 2. Load a few sheets of the following:
• Windows: Right-click the product icon...
User Guide - Page 143

...
little glass cleaner. Caution: During transportation and storage, follow these sections if you need to ship your product or...ink may prevent
the product from dust. Removing the cartridges can dry out the print head and may leak. • Leave the ink cartridges installed...from printing.
143 Close the output tray and paper support when you should clean it several times a year. Turn off the ...
User Guide - Page 144

Lower the scanner unit. 5. Close the output tray and paper support.
144 Secure the ink cartridge holder to see if the print head is in the far right position (the home
position).
otherwise, you may damage the product. 1. Remove all the ...
User Guide - Page 149

..., the product may have problems while setting up your product after installing ink, check these sections if you may prime improperly and use excess ink the next time you install ink cartridges, the product must prime its print head. Hold down the stop button and press the power button to Get Help
Solving Setup Problems
Check these explanations: • The...
User Guide - Page 158
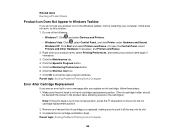
... the ink cartridge installation steps. Click OK to move it all the way into its slot. 3. Make sure the print head is in the ink cartridge replacement position. (The ink cartridge holder should
be beneath the cutout in the product case, allowing access to the cartridges.)
Note: If the print head is not in the correct position, press the stop button...
User Guide - Page 165
...• Remove each sheet from the output tray as it is not damp, curled, old,..., or load special paper one sheet at a time. • Make sure your paper meets the ...EPSON inks. • Make sure the paper type setting in your product software matches the type of the paper faceup. • Turn off any high speed settings in your product. • Use EPSON papers to replace the ink cartridges...
Similar Questions

Eoson Stylus Nx330 Does Recognize New Ink Cartridge
(Posted by MaynSaySanDi 9 years ago)

How To Determine If Nx230 Ink Cartridge Is Empty
(Posted by duderredafe 10 years ago)

Epson Nx330 Wont Read Ink Cartridges But Theyre Brand New
(Posted by sandArya 10 years ago)


Epson Stylus Nx230 Ink Cartridges Cannot Be Recognized
(Posted by stewtec 10 years ago)