Epson RX500 Support Question
Epson RX500 Support Question
Find answers below for this question about Epson RX500 - Stylus Photo Color Inkjet.Need a Epson RX500 manual? We have 9 online manuals for this item!
Question posted by clem531 on November 13th, 2012
Red ! Light On
I did not follow proper procedure when I replaced cartridges. Power on - I press color button and opened the cover. Printer head moved to center and I changed cartridges. Now when I turn printer on, the red warning light is lit - message says 'documentation error' and none of the buttons are lit or responsive.
Current Answers
Related Epson RX500 Manual Pages
How To Copy and Print Booklet - Page 8
... and the print is copied.
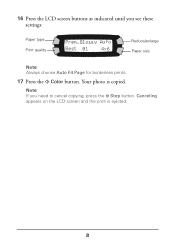
16 Press the LCD screen buttons as indicated until you need to cancel copying, press the y Stop button. Note: If you see these settings:
Paper type Print quality
Prem.Glossy Auto Best 01 4x6
Reduce/enlarge Paper size
Note: Always choose Auto Fit Page for borderless prints.
17 Press the x Color button.
How To Copy and Print Booklet - Page 13

... index prints, Scan Index appears on the LCD screen.
1.Print Index OK
(If Print Index doesn't appear, press the top left LCD button repeatedly until it appears.) 2 Press the OK button. 3 Press the x Color button to print the index. Color button
Memory card button
OK button
Print Index appears on the LCD screen.
2.Scan Index OK
13
Selecting and Printing Your...
How To Copy and Print Booklet - Page 16

Your photo(s) are scanned and printed.
16 10 Flip the feeder guard back over the paper.
11 Open the scanner lid and place the index face down on the glass, in the upper left corner.
12 Close the scanner lid. Then press the x Color button.
Product Information Guide - Page 6
... only a 0.06-inch border around the edges*
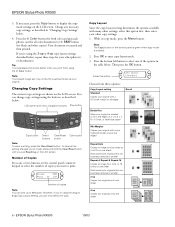
Repeat Auto Copies an image as described below .
4. EPSON Stylus Photo RX500
3. If necessary, press the Copy button to select the number of copies
Note: You can print up copy layout settings described below . If you can change copy settings using the 2-up or 4-up to select one sheet...
Product Information Guide - Page 7

...these settings:
Paper setting Plain
Glossy
Prem. While in copy mode, press the Menu button.
2.
Glossy Photo
100% LTR
Press this button
Glossy Photo
100% LTR
Choose from 25% to 400%. 1. Letter Letter ! 5 × 7 5 × 7 ! EPSON Stylus Photo RX500
Copy Layout setting
Mirror
Copies a mirror image of your photo onto transfer paper so that you can manually adjust the size...
Product Information Guide - Page 8
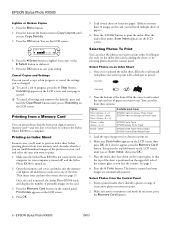
... Panel
1. Press the x Color button. Letter Prem. Press the Menu button. 2. Print Index appears on . 2. Glossy - 4 × 6 Prem. Load the type of paper you 're in the correct oval to use. Near the bottom of paper you face the scanner. Press OK.
5.
Open the memory card cover, and make sure the memory card light is off ) and the Stylus Photo RX500 is...
Product Information Guide - Page 9
... the LCD screen until you want to print (up to 99), and press OK.
5.
EPSON Stylus Photo RX500
3. Press the top left button next to print. Press the Memory Card button to print your images. Then press the x Color button to enter memory card mode.
4. Press the top left button next to the LCD screen to print your images. Select EPSON Smart Panel...
Product Information Guide - Page 10

... or marking is oriented as described on page 11.
Ink cartridge error - - - > Cartridge There is something wrong with templates, frames, and borders. Replace the cartridge
the Color button to begin replacing the ink ink.
Press the P On button to turn off the Stylus Photo RX500, then turn off the Stylus Photo RX500. button to save settings in the XXX You can edit, retouch...
Product Information Guide - Page 11
...a long time, the print quality can replace the cartridge. EPSON Stylus Photo RX500
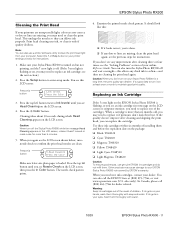
Cleaning the Print Head
If your printer settings window for instructions.
1. error light on the LCD screen, unless it hasn't moved or made noise for more than 5 minutes.
5.
or Help button on the LCD screen. Note: You can deliver ink properly. Press this button
1.Ink levels Press the Color
3.
Product Information Guide - Page 12
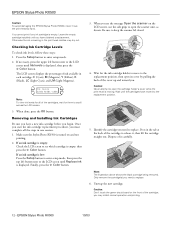
...start the ink cartridge replacement procedure, you see which cartridge is displayed. Finally, press the x Color button.
3. Wait until Replace ink is empty, then press the x Color button. Dispose of the cartridge to release it carefully. EPSON Stylus Photo RX500
10/03 You cannot print if any ink cartridge is moving. Checking Ink Cartridge Levels
To check ink levels, follow these steps...
Product Information Guide - Page 13
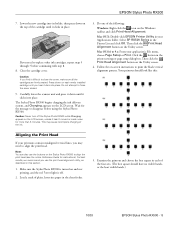
... the red ! Then click the Print Head Alignment button on the LCD screen.
Mac OS X: Double-click EPSON Printer Utility in the sheet feeder.
5. For best results, we recommend you use the buttons on each of the cartridge until it hasn't moved or made noise for instructions). EPSON Stylus Photo RX500
7.
If you find it down on the Stylus Photo RX500 to print...
Product Support Bulletin - Page 1
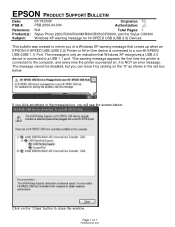
... (USB 2.0) Printer or All-in the red box below :
Click on the "Close" button to close it by clicking on . The message cannot be disabled, but you can close the window. EPSON PRODUCT SUPPORT BULLETIN
Date: PSB #:
Reference: Product(s): Subject:
03/18/2004 PSB.2004.04.004
Originator: TC Authorization:
N/A
Total Pages: 1
Stylus Photo 2200...
Start Here Card - Page 3
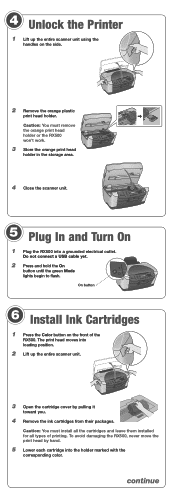
... 4 Unlock the Printer
1 Lift up the entire scanner unit.
3 Open the cartridge cover by hand.
5 Lower each cartridge into the holder marked with the
corresponding color.
Do not connect a USB cable yet.
2 Press and hold the On
button until the green Mode lights begin to flash. Caution: You must remove the orange print head holder or the RX500 won't work.
3 Store...
User's Guide - Page 23

...; 7 8 × 10
When you loaded. Note: Never open the scanner lid while copying, or your printed copy.
Your photo or document is copied. Choose this size Letter 4 × 6-inch 5 × 7-inch 8 × 10-inch
17. Press the x Color button (for color copies) or x B&W button (for black and white copies). Press the bottom left of the arrow) to the...
User's Guide - Page 36
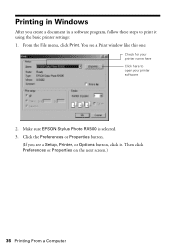
... Print. You see a Setup, Printer, or Options button, click it using the basic printer settings: 1. Click the Preferences or Properties button.
(If you create a document in a software program, follow these steps to open your printer software
2. Then click Preferences or Properties on the next screen.)
36 Printing From a Computer Make sure EPSON Stylus Photo RX500 is selected. 3. Printing in...
User's Guide - Page 45

... instructions for the paper you 're using OS X 10.2, click the Print Center icon instead, then double-click Stylus Photo RX500 in the printer software.
10. Click Print. 12. If you 've loaded.
To monitor the progress of your print job, click the Stylus Photo RX500
icon when it appears in the pull-down menu: ■ Copies & Pages...
User's Guide - Page 91

... on the LCD screen.
13. Press the OK button.
12. Continue with the next section. Then insert a card into a shared memory card slot.
Open the memory card cover:
9. this message on your computer off and that you see page 85).
8.
Press the x Color button to enter memory card mode. Disconnect the RX500 from it finds any of the...
User's Guide - Page 93

... form as shown, or the RX500 can't read it
Move the form about 0.1 inch from the edges
6. Selecting Photos Using the Buttons on .
4.
Once you've printed the index form, identify a photo or range of consecutive photos you 're in the upper left corner of paper you see Scan Index and press OK.)
5.
The form is scanned...
User's Guide - Page 94

..., as needed. Then press the OK button.
6. Your photos are in the camera. Open the memory card cover:
2. 4.
See your card:
1. Then insert a card into the correct slot (see One image, Range of images, or All images
2.Scan Index OK
5. Enter the number of copies of images, follow the instructions on selecting photos. Change any of Images, or...
User's Guide - Page 107

... the following options:
■ Graphic for the document type
■ Photo for the image quality
■ Auto for the scan area; Press the x Color button. The photo is scanned to finish, then remove the card. Press the OK button. if the edges of the photo are light in color, select Max.
9. You see a message on the scanner glass and press the x Color button. Wait...
Similar Questions

Why Is My Printer Saying Document Error Then Cancelling The Copying?'
im also seeing a blue box with the letter I in the box
im also seeing a blue box with the letter I in the box
(Posted by harleylife4life 7 years ago)

I Am Trying To Load Ink And I Am Getting A Message That Says Scanner Error
(Posted by mbarett09 9 years ago)

How To Fix My Epson Stylus Photo Rx500 That Says Printer Error See
documentation and call service
documentation and call service
(Posted by Melomrspa 10 years ago)

Red Light And Error Message Saying Cartridges Empty
I have just replaced 3 compatible ink cartridges on Epson RX500 and now have error message saying al...
I have just replaced 3 compatible ink cartridges on Epson RX500 and now have error message saying al...
(Posted by Judy34 11 years ago)

Thr Red Light Stays On & The Printer Error Is On The Screen
It will not print,tried shutting on & off also, no help
It will not print,tried shutting on & off also, no help
(Posted by miked 14 years ago)