Get support for Electrolux EW30IS65JS

Electrolux EW30IS65JS Support Question

Electrolux EW30IS65JS Support Question

Find answers below for this question about Electrolux EW30IS65JS.
Need a Electrolux EW30IS65JS manual? We have 4 online manuals for this item!
Question posted by Amirkabir on May 14th, 2023

Hi I Am Getting Error E 21

The person who posted this question about this Electrolux product did not include a detailed explanation. Please use the "Request More Information" button to the right if more details would help you to answer this question.

Current Answers

Answer #1: Posted by SonuKumar on May 15th, 2023 1:59 AM
SonuKumar

Member since:
May 9th, 2021

Points: 16,604,590
100
points
Error code E21 on the Electrolux EW30IS65JS induction cooktop indicates a communication problem between the user interface board and the main control board. When this error occurs, it means there is an issue with the control system of the appliance.

To troubleshoot the E21 error code, you can follow these steps:

Power off the cooktop: Turn off the power supply to the cooktop by either unplugging it from the power outlet or flipping the circuit breaker that controls it.

Wait for a few minutes: Allow the cooktop to sit without power for approximately 5 minutes. This will reset the control system.

Power on the cooktop: Restore power to the cooktop by plugging it back in or flipping the circuit breaker.

Check for error recurrence: If the error code is still displayed, it indicates a persistent problem. In this case, it's best to contact Electrolux customer support or a qualified service technician to diagnose and repair the cooktop.

It's worth noting that error codes can sometimes be cleared by power cycling the appliance, but if the problem persists, professional assistance is recommended to ensure proper resolution and avoid any potential safety risks.


Please respond to my effort to provide you with the best possible solution by using the "Acceptable Solution" and/or the "Helpful" buttons when the answer has proven to be helpful.

Regards,
Sonu
Your search handyman for all e-support needs!!

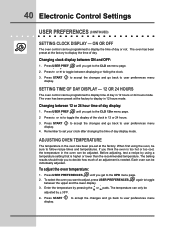
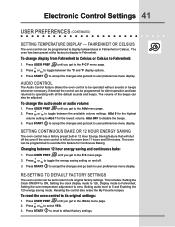
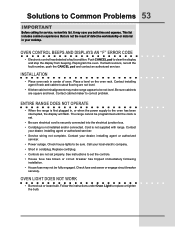
Related Electrolux EW30IS65JS Manual Pages

Installation Instructions (All Languages) - Page 1

... in the cabinet before reading next two pages. pages 25-36 30" ELECTRIC SLIDE-IN RANGE INSTALLATION INSTRUCTIONS United States INSTALLATION AND SERVICE MUST BE PERFORMED BY A QUALIFIED INSTALLER. IMPORTANT:...) 36 5/8" (93 cm) 31 1/2" (80 cm) D. TOTAL DEPTH TO FRONT OF RANGE 28 5/16" (71,9 cm) E. CUTOUT DEPTH 21 3/4" (55,2 cm) Min. 22 1/8" (56,2 cm) Max 24" (61 cm) Min. with backguard G. G...
Installation Instructions (All Languages) - Page 2

...64 cm) flame retardant millboard covered with backguard G. Make sure the unit is unprotected. 4. A. CUTOUT DEPTH 21 3/4" (55,2 cm) Min. 22 1/8" (56,2 cm) Max 24" (61 cm) Min. with...FRONT OF RANGE 28 5/16" (71,9 cm) E. Do not seal the range to the side cabinets. 3. 24" (61 cm) minimum clearance between the range and the wall. 2. 30" ELECTRIC SLIDE-IN RANGE INSTALLATION ...
Installation Instructions (All Languages) - Page 7

... to the circuit breaker, fuse box or junction box, use flexible, armored or nonmetallic sheathed copper cable (with grounding wire). Supply a U.L. 30" ELECTRIC SLIDE-IN RANGE INSTALLATION INSTRUCTIONS Direct Electrical Connection to the Circuit Breaker, Fuse Box or Junction Box If the appliance is connected directly to remove the supplied grounding...
Installation Instructions (All Languages) - Page 9

... section (see section 6). Install base cabinets 30" (76.2 cm) apart. Standard Installation The range cooktop overlaps the countertop at its final 7 position. Shave raised countertop edge to make the top...With Backguard The cutout depth of (21 3/4" (55.2 cm)Min., 22 1/8" (56.2cm) Max.) needs to be made or gaps between the countertop and the range cooktop may occur. Follow the installation...
Product Specifications Sheet (English) - Page 1

... to cook two different items at two different temperatures. 30" INDUCTION BUILT-IN RANGE Control Panel Features Wave-Touch™ Electronic Oven Control Yes Perfect Set® ... it to change. Wall Ovens Warmer Drawers Cooktops Built-In Ranges Freestanding Ranges Microwaves Induction Built-In Range EW30IS65J S Featuring Wave-Touch™ Controls & Induction Cooktop Exceptional Temperature ...
Product Specifications Sheet (English) - Page 2

...min. 1/2" min. We reserve the right to improve our products. Induction Built-In Range EW30IS65J S Side Overall depth including oven door in 90°open position - 45 1/4" 285...or discontinue models without notice. clearance 3/8" min. Printed in all directions and adjustable range height at Electrolux Home Products, Inc. min. 21 3/4" min. 22 1/8" max.** Approx. 17/8" 30 ±1/16"* 35 ...
Complete Owner's Guide (English) - Page 3

... 4-7 Feature Overview 8 Your Slide-In Range 8-9 Oven Rack Supports and Oven Vents 10 Removing and Replacing Oven Racks 11 Control Pad Functions 12-14 Getting Started 15 Setting Clock at Power Up ...Cookware Recommendations 18 Use Quality Cookware in Good Condition........ 19 Setting the Cooktop 20-21 Setting Power Boost Feature 22 Power Sharing 22 Operational Noises 22 Setting the Lower ...
Complete Owner's Guide (English) - Page 13

... save or recall the favorite 2 cooking mode. 24 My Favorite 3 Pad- Used to select the bread proof mode. 21 Clean Pad- Used to start a 4 hours self-clean cycle. 28 Upper Oven Pad- Used to select the dehydrate ... set or cancel the minute timer. Feature Overview 13 Oven Control pad functions (Continued) 18 19 20 21 28 22 23 24 25 29 26 27 30 32 34 32 31 33 35 36 18 Defrost Pad...
Complete Owner's Guide (English) - Page 15

... shown in the display and will be active with a temperature visual display for 1:30): + - 1. Getting Started 15 Setting clock at power up When the unit is first plugged in, or when the power supply to the range has been interrupted, the timer in the display will flash with a time of 12:00...
Complete Owner's Guide (English) - Page 16

... lower oven is equipped with 1 incandescent light. To toggle the Control Lock ON and OFF: 1. Press 5 pad to accept and start or stop cooking. 16 Getting Started Oven light Your appliance includes "theater" style oven lighting feature that gradually lights both ovens at the same time at regular intervals until the...
Complete Owner's Guide (English) - Page 21

...areas surrounding the elements may still be set again and used for the type of the range when it is touched before the indicator light has turned OFF. bring water to a moderate... may be hot and burns may be transferred from heat transferred by the cookware. Setting Surface Controls 21 Setting the cooktop (continued) Setting cooktop elements • If needed, wake the control panel. ...
Complete Owner's Guide (English) - Page 24

... 170°F to 10,2cm) around the utensil(s) for directions). To change to the desired temperature. 3. Press the HI hi or LO lo pads to get to a Bake Temperature of this manual. Baking Problems Refer to the Baking Problems Table in this cooking mode. LOWER OVEN 3. The Temperature Probe and Rapid...
Complete Owner's Guide (English) - Page 34

... Proofing Tips: • No need to preheat for this function. Press START to the desired temperature. 3. Press the HI + hi or LO lo pads to get to begin the bread proofing. 5. Arrange interior oven racks and place bread dough in bulk. • For best results, place a shallow pan with 1 to 3 cups...
Complete Owner's Guide (English) - Page 36

... temperature must be used with your food completely before inserting the Probe to pull the cable when inserting or removing the Probe. The Temperature Probe gets the exact temperature you press CANCEL .
Complete Owner's Guide (English) - Page 38

... details). Press START . The cooking sequence will sound. 20. Press CANCEL to enter a temperature. 15. Enter a temperature using the numeric pads 0 to 9 . 16. Remove food. 21. At the end of the sequence, the display will show "End" and a chime will begin. Press START . Enter a cook time using the numeric pads 0 to...
Complete Owner's Guide (English) - Page 39

...user preferences The User Preferences menu includes all user defined options. This feature enables you get back to default factory settings. To browse through the menu pages. + - 3. ...display. Setting the clock - time of the electronic controls. When the range is on /off . • AUd ; When power to the range has been interrupted, the display will show "CLO 12:00". To set...
Complete Owner's Guide (English) - Page 40

... been preset at the factory to follow recipe times and temperatures. Press START display. If you get to the CLO on or off The oven control can be sure to display in 12 hours ...: 1. Before adjusting, test a recipe by using the oven, be individually adjusted. Press USER PREF until you get to the CLO 12hr menu page. - + 2 Press lo or hi to set at the factory. Remember to...
Complete Owner's Guide (English) - Page 41

... menu page. 2. Changing between 12 hour energy saving and continuous bake: 1. Press USER PREF until you get to select YES. 3. Press + hi or lo to its original settings: 1. Press hi or lo to...control has a factory preset built-in Fahrenheit or Celsius. Press USER PREF until you get to 5 and Enabling the 12h energy saving mode. Reseting the control also erase the...
Complete Owner's Guide (English) - Page 53

...you both time and expense. Be sure cabinets are not the result of oven. The range cannot be sure. Contact your dealer, installing agent or authorized servicer. • Power...Beeps and Displays an "F" ERROR COde • Electronic control has detected a fault condition. Entire range does not operate • When the range is not supplied with range. Installation • Place ...
Complete Owner's Guide (English) - Page 54

... the oven rack supports from the oven. • Controls not set properly. Oven smokes Excessively during broiling • Meat too close to prevent curling, but get hot enough to drip into broiler pan. Cut remaining fatty edges to the broiler element. Follow instructions under "Using the Self-Clean Feature". Grease has...

Similar Questions

Ew30is65jsd Induction Range Getting F15 In The Clock Display And E39 In The Cook
Ew30is65jsd induction range getting F15 in the clock display and E39 in the cooktop user interface. ...
(Posted by Unsanedilljl 6 years ago)
Ew30is6cjs Error E39
just replaced full induction housing after error e31 I now get error e39 what do i do noow
(Posted by Rusty1969 9 years ago)
Error Code E 21
(Posted by Mrtanners 12 years ago)
Error Code E11
Stove top won't turn on, we get error code E11. Any ideas?
(Posted by marilynmccaulley 13 years ago)
Ask a New Question
Use the box below to post a new question about this Electrolux product .
Points & Prizes
  • You can earn points for nearly everything you do on HelpOwl.com
  • You can trade in those points for gift cards at leading retailers such as Amazon.com and Walmart
  • It's that simple!
See How it Works
Create a Free Account

Electrolux Manuals

Find free Electrolux EW30IS65JS manuals and user guides available at ManualOwl.com. Try out our unique manual viewer allowing you to interact with manuals from directly within your browser!

Electrolux Reviews

View thousands of Electrolux user reviews and customer ratings available at ReviewOwl.com.

Contact Information

Complete Electrolux customer service contact information including steps to reach representatives, hours of operation, customer support links and more from ContactHelp.com.

Scoreboard Ratings

See detailed Electrolux customer service rankings, employee comments and much more from our sister site.

Electrolux Recalls

Find comprehensive Electrolux recall information updated hourly on RecallOwl.com.