Electrolux EIED55HIW Support Question
Electrolux EIED55HIW Support Question
Find answers below for this question about Electrolux EIED55HIW - 8.0 cu. Ft. Electric Dryer.Need a Electrolux EIED55HIW manual? We have 6 online manuals for this item!
Question posted by deanfdcor on July 1st, 2014
How To Bypass The Door Open Light For Dryer
The person who posted this question about this Electrolux product did not include a detailed explanation. Please use the "Request More Information" button to the right if more details would help you to answer this question.
Current Answers
Related Electrolux EIED55HIW Manual Pages
Complete Owner's Guide (English) - Page 3
...other appliance.
Power cord with unit except those manufactured for future reference.
240 v Electric Dryer
120 v Gas Dryer
10-30R 3-wire
(fused 30 amp)
14-30R 4-wire
(fused 30 amp...electrical switch;
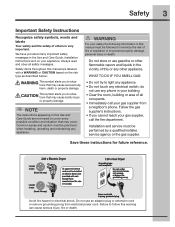
WARNING
For your safety the following information in your appliance.
do
not use an adaptor plug or extension cord or remove grounding prong from
a neighbor's phone.
Failure to light...
Complete Owner's Guide (English) - Page 4
... fire, electrical shock, or injury to fabrics can under certain circumstances produce fire by spontaneous combustion.
• Clean the lint screen before or after the dryer is used near the dryer. An excessive amount of all warnings on or in your dryer. You can become airtight chambers.
• Keep laundry products out of the dryer, lint...
Complete Owner's Guide (English) - Page 6
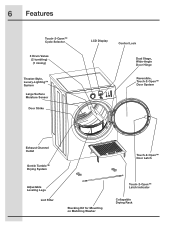
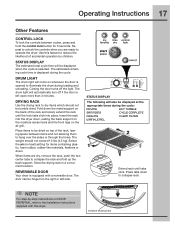
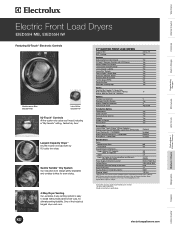
...; Cycle Selector
3 Drum Vanes (2 tumbling)
(1 mixing)
Theater-Style, Luxury-Lighting™ System
Large Surface Moisture Sensor
Door Strike
LCD Display
Control Lock
Dual Stage, Wide-Angle Door Hinge
Reversible, Touch-2-Open™ Door System
Exhaust Channel Outlet
Gentle Tumble™ Drying System
Adjustable Leveling Legs
Lint Filter
Stacking Kit for Mounting on Matching Washer
Touch...
Complete Owner's Guide (English) - Page 7
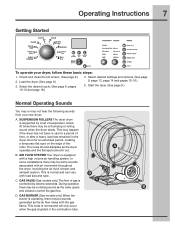
...13, page 14 and pages 15-16.)
5.
During operation
there may be a clicking sound as the valve opens
B
and closes to control the gas flow. Check and clean the lint screen. (See page 9.)
2. ...(Gas models only.) When the burner is supported by electric solenoids. At times there may be a thumping or rolling
sound when the dryer starts.
GAS VALVE (Gas models only.) The flow ...
Complete Owner's Guide (English) - Page 8
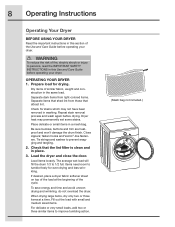
...electric shock or injury to persons, read the IMPORTANT SAFETY INSTRUCTIONS in this section of the Use and Care Guide before operating your dryer. Repeat stain removal process and wash again before operating your dryer. Tie strings and sashes to improve tumbling action.
(Mesh bag not included.) Load the dryer and close the door...OPERATING YOUR DRYER 1. Separate dark items from light-colored ...
Complete Owner's Guide (English) - Page 9
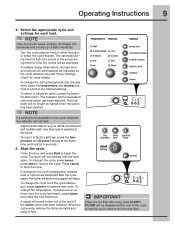
... selected. See the "Dryer Settings Chart" for that cycle is not available for the cycle selected. To select or delete an option, press the button for more details.
IMPORTANT
Clean the lint filter after the cycle starts, the lights will blink and a signal will not operate with the door open.
Adjustments made to the...
Complete Owner's Guide (English) - Page 15
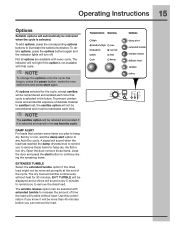
... corresponding options buttons to hang dry, dry flat or iron dry.
The indicator will not light if the option is selected.
EXT. The wrinkle release option can remove the load. Use...Suitable options will automatically be indicated when the cycle is not available with every cycle.
Open the door, remove those items to illuminate the selections desired. Not all options are available with ...
Complete Owner's Guide (English) - Page 17
... the rack into place.
Store the drying rack in a convenient location. REVERSIBLE DOOR
Your dryer is opened to illuminate the drum during loading and unloading. DRUM LIGHT
The drum light will automatically turn off the light. Closing the door turns off if the door is displayed during the cycle:
DRYING
EXT.
Extend rack until the lock tabs click...
Complete Owner's Guide (English) - Page 19
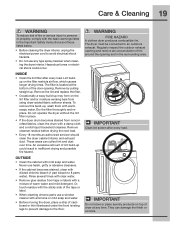
...opening and in the Important Safety Instructions and those listed below.
• Before cleaning the dryer interior, unplug the electrical power cord to avoid electrical shock hazards.
• Do not use any type spray cleanser when cleaning the dryer...8226; If the cabinet becomes stained, clean with a mixture of the door opening and remove any time. Care & Cleaning 19
WARNING
To reduce risk ...
Wiring Diagram (All Languages) - Page 1
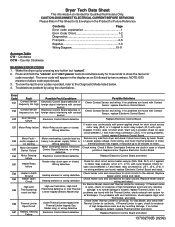
... . 4. Dryer Tech Data Sheet
This information is intended for continuity. CAUTION: DISCONNECT ELECTRICAL CURRENT BEFORE ...SERVICING Please Return This Sheet to its Envelope in the display as an E followed by hand. Clockwise CCW - If Thermal Limiter
High Limit
High vent restriction, High Limit
is open circuit between L1 and motor relay connection (J3-2). Laundry...
Wiring Diagram (All Languages) - Page 2
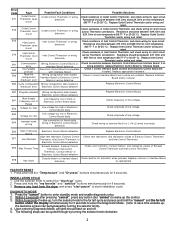
...and Interface Board.
Upon entering Diagnostic Mode, all lights should be cycled through by turning the selector knob). 4. Resistance should be bypassed by turning the selector knob clockwise:
2 Resistance ...Console button or Interface Board Check buttons for open circuit. Within 10 seconds after pressing "cancel", press any load from the dryer and press "start pause" to enter ...
Product Specifications Sheet (English) - Page 1
...Lighting
Yes
Luxury-Dry™ System
Yes
Touch-2-Open™/ (Close) Door
Yes
Exact Dry™ Moisture Sensor
Yes
Stainless Steel Dryer Drum
Yes
Tumble Speed (RPM)
50
Reversible Door...installation instructions on manufacturer specifications. Ft. Wall Ovens
Warmer Drawers
Cooktops
Built-In Ranges
Freestanding Ranges
Microwaves
Electric Front Load Dryers
EIED55H MB, EIED55H IW
...
Product Specifications Sheet (English) - Page 2
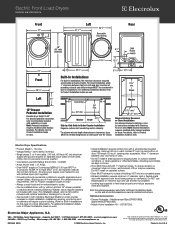
... to Product Installation Guide on the web at Electrolux Home Products, Inc.
Dryer
90° Countertop 54" min.
90°
38" min. High standards of units. opening also acceptable. Electric Front Load Dryers
EIED55H MB, EIED55H IW
Front
27"
31 1/2"*
Left
50 5/8"*
Reversible Door Swing
Rear
38" (53" with or without notice. For details, refer...
Installation Instructions (All Languages) - Page 2

... WARNING - This dryer is not recommended for play. WHAT TO DO IF YOU SMELL GAS: • Do not try to light any appliance. &#...dryer according to the manufacturer's instructions and local codes.
• The electrical service to the dryer must conform with local codes and ordinances and the latest edition of the National Electrical Code, ANSI/NFPA 70, or in Canada, the Canadian electrical...
Installation Instructions (All Languages) - Page 4
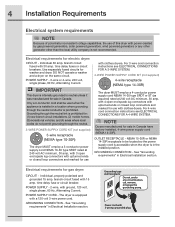
...open end spade lug connectors with upturned ends or closed loop connectors and marked for sale in Electrical Installation section. GROUNDING CONNECTION - GROUNDING CONNECTION - branch circuit fused with a 120 volt 3-wire power cord.
NOTE
Dryers manufactured for use
with clothes dryers...4 Installation Requirements
Electrical system requirements
NOTE
Because of this dryer with power created...
Installation Instructions (All Languages) - Page 8
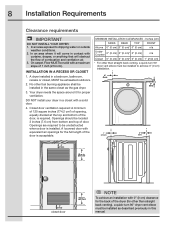
..., recess or closet, MUST be located 3 inches (7.6 cm) from bottom and top of the door, is installed. Closet door ventilation required: A minimum of 120 square inches (774.2 cm²) of opening, equally divided at the top and bottom of door.
A dryer installed in this manual. In an area exposed to dripping water or outside
weather...
Installation Instructions (All Languages) - Page 9
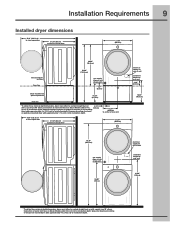
...) to center of rear vent
50.6" (128.5cm)* to clear open door
31.50" (80cm)* to front of closed door
27.00" (68.5cm)
electrical supply on rear of unit
centerline height for rear vent
41.00" (104cm)
* To obtain these minimal depth dimensions, dryer must either be vented straight back or with a quick-turn...
Installation Instructions (All Languages) - Page 17
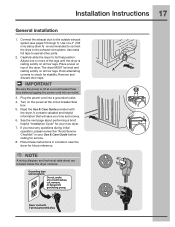
..., or bypass the grounding prong. Place these instructions in your new dryer.
7. Use of the dryer. Plug the power cord into an outlet.
3.
Power cord with the dryer. Connect ... dryer for your Use & Care Guide before plugging the power cord into a grounded outlet.
4. Remove and
discard door tape.
NOTE
A wiring diagram and technical data sheet are located inside the dryer ...
Installation Instructions (All Languages) - Page 19

... bit
A) Removing Trim Ring
1 Open door to 90 degree angle.
2 Remove 4 long, course-thread, counter-sunk hinge screws from door.
3 Close door.
4 Rotate door trim approximately ¾" counterclockwise and pull ring away from door.
3 While supporting the weight of dryer or floor near dryer,
with both hands, separate the door from Hinge
1 Reopen door to 90 degree angle. 2 Remove...
Installation Instructions (All Languages) - Page 23
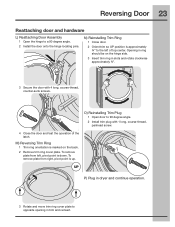
... is marked on the hinge side.
3 Insert trim ring in dryer and continue operation.
3 Rotate and move trim ring cover plate to 90 degree angle. 2 Install trim plug with 4 long, course-thread, counter-sunk screws.
Reversing Door 23
Reattaching door and hardware
L) Reattaching Door Assembly
1 Open the hinge to the left , pivot point is up...
Similar Questions

Frigerdaire Dryer
model fer641fs0 wiring diagram. Where does green and double red wire g
model fer641fs0 wiring diagram. Where does green and double red wire g
(Posted by fredporche7 8 years ago)

Electrolux Gas Dryer Door Open Error When Door Not Open
(Posted by debikMsswe 10 years ago)

How To Change Heating Element In Dryer Eied55hiw
(Posted by coniDS 10 years ago)
How To Remove The Front Face Of A Electrolux Dryer Eied55hiw
(Posted by Azro 10 years ago)
