Dell XPS 8500 Support Question
Dell XPS 8500 Support Question
Find answers below for this question about Dell XPS 8500.Need a Dell XPS 8500 manual? We have 2 online manuals for this item!
Question posted by 1ssanti2 on October 11th, 2013
Xps 8500 Does'nt Recognize Sd Card
The person who posted this question about this Dell product did not include a detailed explanation. Please use the "Request More Information" button to the right if more details would help you to answer this question.
Current Answers
Related Dell XPS 8500 Manual Pages
Owner's Manual (PDF) - Page 2
... Corporation in trademarks and trade names other countries. Other trademarks and trade names may be used in this text: Dell™, the DELL logo, and XPS™ are either potential damage to hardware or loss of data, and tells you make better use of these materials in this document to refer...
Owner's Manual (PDF) - Page 4
...(s 27 Replacing Memory Module(s 28 Postrequisites 30
6 Front Bezel 31
Prerequisites 31 Removing the Front Bezel 31 Replacing the Front Bezel 33 Postrequisites 34
7 Graphics-Card Bracket (optional) . . . . . 35
Prerequisites 35 Removing the Graphics-Card Bracket 35 Replacing the Graphics-Card Bracket 36 Postrequisites 36
4
Contents
Owner's Manual (PDF) - Page 5
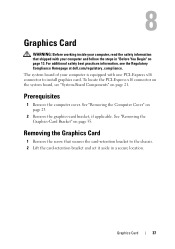
8 Graphics Card 37
Prerequisites 37 Removing the Graphics Card 37 Replacing the Graphics Card 39 Postrequisites 41
9 PCI-Express x1 Card(s 43
Prerequisites 43 Removing the PCI-Express x1 Card(s 44 Replacing the PCI-Express x1 Card(s 46 Postrequisites 48
10 Wireless Mini-Card 49
Prerequisites 49 Removing the Mini-Card 50 Replacing the Mini-Card 51 Postrequisites 51
Contents
5
Owner's Manual (PDF) - Page 6
... 53
Prerequisites 53 Removing the Mini-Card Antennas 53 Replacing the Mini-Card Antennas 55 Postrequisites 55
12 mSATA Drive 57
Prerequisites 57 Removing the mSATA Drive 57 Replacing the mSATA Drive 58 Postrequisites 59
13 Hard Drive(s ...
Owner's Manual (PDF) - Page 7
... Optical Drive 67 Replacing the Optical Drive 69 Postrequisites 69 Secondary Optical-Drive 69 Prerequisites 69 Installing a Secondary Optical-Drive 70 Postrequisites 71
15 Media-Card Reader 73
Prerequisites 73 Removing the Media-Card Reader 74 Replacing the Media-Card Reader 75 Postrequisites 75
Contents
7
Owner's Manual (PDF) - Page 13
... contacts.
After you finish working inside the computer, replace all open programs. 2 Click Start and click Shut Down.
CAUTION: To avoid damaging the components and cards, handle them by their electrical outlets.
4 Disconnect all power sources before opening the computer cover or panels. Safety Instructions
Use the following safety guidelines to...
Owner's Manual (PDF) - Page 15
...
CAUTION: Before turning on your computer, replace all screws and ensure that no stray screws remain inside your computer • Connect any external devices, cables, cards, and any other part you
removed before working on your computer • Connect your computer and all screws and ensure no stray screws remain in...
Owner's Manual (PDF) - Page 19
...-drive eject buttons (2) 7 accessory tray 9 microphone port 11 USB 2.0 port with PowerShare
2 media-card reader 4 USB 3.0 ports (2) 6 power button 8 headphone port 10 USB 2.0 port
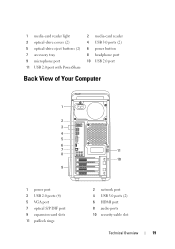
Back View of Your Computer
1
2 3 4 5 6 7 8
9
1 power port 3 USB 2.0 ports (4) 5 VGA port 7 optical S/P DIF port 9 expansion-card slots 11 padlock rings
11 10
2 network port 4 USB 3.0 ports (2) 6 HDMI port...
Owner's Manual (PDF) - Page 20
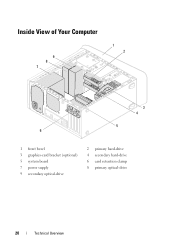
Inside View of Your Computer
9 8 7
1 2
3 4
5 6
1 front bezel 3 graphics-card bracket (optional) 5 system board 7 power supply 9 secondary optical-drive
2 primary hard-drive 4 secondary hard-drive 6 card retention clamp 8 primary optical-drive
20
Technical Overview
Owner's Manual (PDF) - Page 35
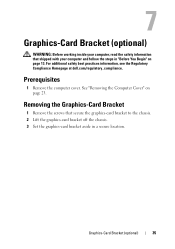
... inside your computer, read the safety information that secure the graphics-card bracket to the chassis. 2 Lift the graphics-card bracket off the chassis. 3 Set the graphics-card bracket aside in "Before You Begin" on page 23.
Prerequisites
1 Remove the computer cover.
Graphics-Card Bracket (optional)
35 See "Removing the Computer Cover" on page...
Owner's Manual (PDF) - Page 36
... Cover" on page 25.
2 Follow the steps in "After Working Inside Your Computer" on chassis.
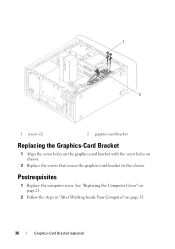
2 Replace the screws that secure the graphics-card bracket to the chassis. 1
2
1 screws (2)
2 graphics-card bracket
Replacing the Graphics-Card Bracket
1 Align the screw holes on the graphics-card bracket with the screw holes on page 15.
36
Graphics...
Owner's Manual (PDF) - Page 37
... computer is equipped with your computer, read the safety information that secures the card-retention bracket to install graphics card. Removing the Graphics Card
1 Remove the screw that shipped with one PCI-Express x16 connector to the chassis. 2 Lift the card-retention bracket and set it aside in "Before You Begin" on page 23...
Owner's Manual (PDF) - Page 38

...-cable connectors.
4 Press the releasing clips on the system board.
NOTE: Your graphics card may be different on your computer.
5 Press and hold the securing tab on page 21. 1 2
1 screw
2 card-retention bracket
3 Locate the graphics card (PCI-Express x16 card) on the power-cable connectors and disconnect the power cable from the graphics...
Owner's Manual (PDF) - Page 39
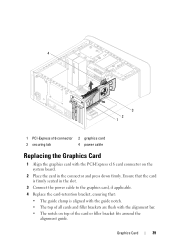
... clamp is aligned with the guide notch. • The top of all cards and filler brackets are flush with the PCI-Express x16 card connector on top of the card or filler bracket fits around the
alignment guide. Graphics Card
39
Ensure that the card is firmly seated in the connector and press down firmly.
Owner's Manual (PDF) - Page 40
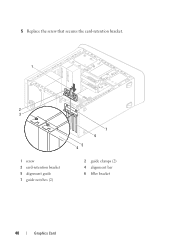
5 Replace the screw that secures the card-retention bracket. 1
2 3
1 screw 3 card-retention bracket 5 alignment guide 7 guide notches (2)
7 6 5 4
2 guide clamps (2) 4 alignment bar 6 filler bracket
40
Graphics Card
Owner's Manual (PDF) - Page 41
See "Replacing the Computer Cover" on page 25.
3 Follow the steps in "After Working Inside Your Computer" on page 36.
2 Replace the computer cover.
See "Replacing the Graphics-Card Bracket" on page 15. Graphics Card
41 Postrequisites
1 Replace the graphics-card bracket, if applicable.
Owner's Manual (PDF) - Page 43
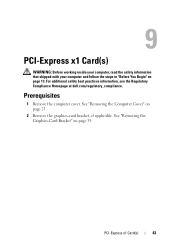
... page 13. For additional safety best practices information, see the Regulatory Compliance Homepage at dell.com/regulatory_compliance. Prerequisites
1 Remove the computer cover.
9
PCI-Express x1 Card(s)
WARNING: Before working inside your computer, read the safety information that shipped with your computer and follow the steps in "Before You Begin" on page...
Owner's Manual (PDF) - Page 44

Removing the PCI-Express x1 Card(s)
1 Remove the screw that secures the card-retention bracket. 2 Lift the card-retention bracket and set it aside in a secure location.
1 2
1 screw
2 card-retention bracket
44
PCI-Express x1 Card(s)
Owner's Manual (PDF) - Page 45

3 Locate the PCI-Express x1 card on page 21.
4 Disconnect any cables connected to the card, if applicable.
5 Grasp the card by its top corners, and ease it out of its connector.
1 PCI-Express x1 card slot
2 1
2 PCI-Express x1 card
PCI-Express x1 Card(s)
45 See "System-Board Components" on the system board.
Owner's Manual (PDF) - Page 46

... bracket, ensuring that:
• The guide clamp is aligned with the guide notch. • The top of all cards and filler brackets are flush with the alignment bar. • The notch on top of the card or filler bracket fits around the
alignment guide. 3 Replace the screw that the PCI-Express x1...
Similar Questions


Dell Laptop Studio 1558 Does Not Recognize Sd Card
(Posted by MULjknudt 10 years ago)

Latitude E5530 Manual For The Sd Card Reader
I want to put my SD card right into the computer but I do not know how to get the card reader to ope...
I want to put my SD card right into the computer but I do not know how to get the card reader to ope...
(Posted by mrozekclaire 10 years ago)