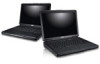
Dell Vostro 3560 Support Question
Dell Vostro 3560 Support Question
Find answers below for this question about Dell Vostro 3560.Need a Dell Vostro 3560 manual? We have 2 online manuals for this item!
Question posted by ahmejjb on July 13th, 2014
How To Remove The Hard Drive From A Dell Vostro 3560
The person who posted this question about this Dell product did not include a detailed explanation. Please use the "Request More Information" button to the right if more details would help you to answer this question.
Current Answers
Answer #1: Posted by DellJesse1 on July 15th, 2014 8:05 AM
DellJesse1

Member since:
April 19th, 2012 Points: 1,551,500

Member since:
April 19th, 2012 Points: 1,551,500
ahmejjb,
You can click the link to download the online manual. The manual provides information for removing/replacing parts on your computer.
Thank You,
Dell-Jesse1
Dell Social Media and Communities
email:[email protected]
Dell Community Forum.
www.en.community.dell.com
Dell Twitter Support
@dellcares
Dell Facebook Support
www.facebook.com/dell
#iwork4dell
Related Dell Vostro 3560 Manual Pages
User Manual - Page 1

... View
Figure 1. Windows Mobility Center 6. camera status light
4. Dell Support Center
Regulatory Model: P34G,P24F Regulatory Type: P34G001,P24F001
2012 - 01 camera 3. Dell Vostro 3460/3560
Setup And Features Information
About Warnings
WARNING: A WARNING indicates a potential for property damage, personal injury, or death. Vostro 3460 - Front View
1. microphone 2.
display 5.
User Manual - Page 3

... hard disk status light 20. Front View
1. Dell Support Center 7. Front And Back View
Figure 3. Dell Instant Launch Manager 8. USB 3.0 connectors (2) 10. fingerprint reader 13. touchpad buttons (2) 17. touchpad disable LED 22. camera status light 4. display 5. optical drive eject button 12. ExpressCard slot
14. keyboard 23. power status light 21. Vostro 3560 - microphone...
Owner's Manual - Page 3

... the ExpressCard...10 Installing the ExpressCard...10 Removing the Base Cover...10 Installing the Base Cover...12 Removing the Memory...12 Installing the Memory...12 Removing the Optical Drive...12 Installing the Optical Drive...14 Removing the Hard Drive...14 Installing the Hard Drive...16 Removing the Keyboard...16 Installing the Keyboard...18 Removing the Display Hinge Cover...18 Installing the...
Owner's Manual - Page 14
... drive to release the hard drive from the hard drive connector.
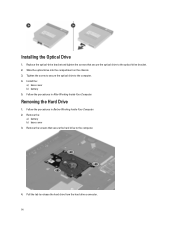
14 Replace the optical-drive bracket and tighten the screws that secure the hard drive to the optical-drive bracket. 2. Remove the screws that secure the optical drive to the computer.
4. Follow the procedures in After Working Inside Your Computer. Pull the tab to the computer. 4. Removing the Hard Drive
1. Remove...
Owner's Manual - Page 15

Remove the screws that secure the hard-drive bracket to the hard drive. 7. 5. Lift up the hard drive and remove from the hard drive bracket.
15 Lift up and remove the hard drive from the computer.
6.
Owner's Manual - Page 16

... that secures the keyboard to the computer.
4. Using of a flat-head screwdriver release the latches that secures the hard drive bracket to the computer. 5. Tighten the screws that secure hard drive to the hard drive. 3. Removing the Keyboard
1. Remove the battery. 3.
Follow the procedures in After Working Inside Your Computer. Follow the procedures in Before Working Inside...
Owner's Manual - Page 19

...
1.
Replace the display hinge cover back to the computer. 3. Install the battery. 4. Follow the procedures in After Working Inside Your Computer. Removing the Palmrest
1. Remove the:
a) battery b) base cover c) memory d) optical drive e) hard drive
19 Push to release the hinge cover from the computer. Tighten the screws that secure the display hinge cover to the...
Owner's Manual - Page 24

... the screws on the computer. 2. Install the:
a) display hinge cover b) keyboard c) hard drive d) optical drive e) memory f) base cover g) battery 11. Connect the LEDs fingerprint cable to the system board. 5.
Remove the:
a) SD Card b) express card c) battery d) base cover e) keyboard
24 Removing the ExpressCard Reader
1. Follow the procedures in place. 9. Connect the touchpad cable...
Owner's Manual - Page 26

Place the express card reader into its slot on the chassis. 2.
Removing the Speakers
1. Disconnect the speaker cable.
26 Installing the Express Card Reader
1. Remove the:
a) SD card b) express card c) battery d) base cover e) optical drive f) hard drive g) keyboard h) display hinge cover i) palmrest j) express card reader 3. Follow the procedures in After Working Inside Your Computer....
Owner's Manual - Page 28

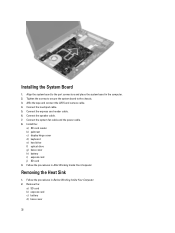
... procedures in Before Working Inside Your Computer. 2. Removing the System Board
1. Remove the:
a) SD Card b) express card c) battery d) base cover e) optical drive f) hard drive g) keyboard h) display hinge cover i) palmrest
28 Install the:
a) express card reader b) palmrest c) display hinge cover d) keyboard e) hard drive f) optical drive g) base cover h) battery i) express card j) SD...
Owner's Manual - Page 32
... and connect the LVDS and camera cable. 4. Connect the speaker cable. 7. Install the:
a) SD card reader b) palmrest c) display hinge cover d) keyboard e) hard drive f) optical drive g) base cover h) battery i) express card j) SD card 9. Remove the:
a) SD card b) express card c) battery d) base cover
32 Connect the system fan cable and the power cable. 8. Connect the touchpad...
Owner's Manual - Page 34

Removing the Processor
1. Remove the:
a) battery b) base cover c) memory d) optical drive e) hard drive f) keyboard g) palmrest h) WLAN card i) ExpressCard reader
34...2. Install the:
a) system board b) palmrest c) display hinge cover d) keyboard e) hard drive f) optical drive g) memory h) base cover i) battery j) express card k) SD card 4. Follow the procedures in Before Working Inside Your Computer...
Owner's Manual - Page 35

... d) WLAN card e) palmrest f) keyboard g) hard drive h) optical drive i) memory j) base cover k) battery 4. Remove the processor cover and lift the processor from the socket. Place it in an antistatic package.
Remove the screw. Removing the Coin-Cell Battery
1. Remove the:
a) battery b) base cover c) memory d) optical drive e) hard drive f) keyboard g) palmrest h) ExpressCard reader...
Owner's Manual - Page 36

...procedures in After Working Inside Your Computer. Installing the Coin-Cell Battery
1. Remove the screw that secures the WLAN card, till it pops out. 5.
...out, lift and remove the battery from the computer. Install the:
a) system board b) WLAN card c) ExpressCard reader d) palmrest e) keyboard f) hard drive g) optical drive h) memory i) base cover j) battery 4. Removing the Wireless Local...
Owner's Manual - Page 37

... from the chassis.
37 Follow the procedures in place.
4. Removing the LAN Board
1. Remove the screws that secure LAN board in Before Working Inside Your Computer. 2. Follow the procedures in After Working Inside Your Computer. Remove the:
a) SD Card b) express card c) battery d) base cover e) optical drive f) hard drive g) keyboard h) display hinge cover i) palmrest j) system board k) WLAN...
Owner's Manual - Page 38

Tighten the screws to secure the LAN board to the chassis. 2. 5. Install the:
a) WLAN card b) system board c) palmrest d) display hinge cover e) keyboard f) hard drive g) optical drive h) base cover i) battery
38 Insert the LAN board into its compartment and align on to the chassis. 3.
Installing the LAN Board
1. Pull out and remove the LAN board from the system.
Owner's Manual - Page 39

... j) system board k) WLAN board l) LAN board 3. Install the: a) LAN board b) WLAN card c) system board d) palmrest e) display hinge cover f) keyboard g) hard drive h) optical drive i) base cover j) battery k) express card l) SD card
3. Removing the mini-SATA Card
1. Remove the screw that secure the mini-SATA card in After Working Inside Your Computer. Follow the procedures in Before...
Owner's Manual - Page 40

Pull out the SD card reader cable.
4. Remove the:
a) SD card b) express card c) battery d) base cover e) optical drive f) hard drive g) keyboard h) display hinge cover i) palmrest 3. Removing the Secure Digital (SD) Card Reader
1. Remove the screw the secure the SD card reader in Before Working Inside Your Computer. 2. Follow the procedures in place.
40
Owner's Manual - Page 41

...:
a) SD card b) express card c) battery d) base cover e) memory f) optical drive g) hard drive h) keyboard i) display hinge cover j) palmrest
41 5. Lift up and remove the SD card reader from the system.
Follow the procedures in After Working Inside Your Computer. Tighten the screw to secure the SD card reader ...
Owner's Manual - Page 53

...optical drive or hard drive). During the Power-on Self Test (POST), when the Dell logo... appears, you can:
• Access System Setup by pressing key • Bring up the one-time boot menu by pressing key
The one-time boot menu displays the devices that you make are :
• Removable Drive (if available) • STXXXX Drive...
Similar Questions

How To Remove The Hard Drive From Dell Vostro 3560 Laptop
(Posted by Sammlis 9 years ago)


How Do You Disable The Touchpad On The Dell Vostro 3560?
How do you disable the touchpad on the Dell Vostro 3560?
How do you disable the touchpad on the Dell Vostro 3560?
(Posted by garethhumphris 11 years ago)

Remove Hard Drive Dell Vostro 1440 Laptop
how i remove hard drive dell vostro 1440 laptop step by step.
how i remove hard drive dell vostro 1440 laptop step by step.
(Posted by hiteshsethi73 12 years ago)