Dell Vostro 270s Support Question
Dell Vostro 270s Support Question
Find answers below for this question about Dell Vostro 270s.Need a Dell Vostro 270s manual? We have 2 online manuals for this item!
Question posted by ahsanijaz8751 on March 5th, 2023
How To Install Hackintosh Dell Vostro 270s
The person who posted this question about this Dell product did not include a detailed explanation. Please use the "Request More Information" button to the right if more details would help you to answer this question.
Current Answers
Answer #1: Posted by Odin on March 5th, 2023 10:34 AM
Odin

Member since:
April 10th, 2010 Points: 41,236,690

Member since:
April 10th, 2010 Points: 41,236,690
Hope this is useful. Please don't forget to click the Accept This Answer button if you do accept it. My aim is to provide reliable helpful answers, not just a lot of them. See https://www.helpowl.com/profile/Odin.
Answer #2: Posted by SonuKumar on March 5th, 2023 6:40 PM
SonuKumar

Member since:
May 9th, 2021 Points: 16,609,800
Member since:
May 9th, 2021 Points: 16,609,800
Please respond to my effort to provide you with the best possible solution by using the "Acceptable Solution" and/or the "Helpful" buttons when the answer has proven to be helpful.
Regards,
Sonu
Your search handyman for all e-support needs!!
Related Dell Vostro 270s Manual Pages
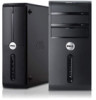
User Manual - Page 1

USB 2.0 connectors (2) 7. security cable slot
Regulatory Model: D06S Regulatory Type: D06S001
2012 - 02 Dell Vostro 270S
Setup And Features Information
About Warnings
WARNING: A WARNING indicates a potential for property damage, personal injury, or death. power button 2. headphone connector 5. optical drive 9. Front And ...
User Manual - Page 2

... section, read the safety information that shipped with your computer. voltage selector switch 13. network adapter connector 10. For additional best practices information, see www.dell.com/regulatory_compliance NOTE: Some devices may not be included if you begin any of the procedures in connector 2. back panel connectors
Figure 2.
User Manual - Page 4
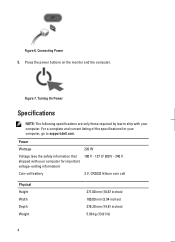
... your computer, go to ship with your computer. Figure 6. Turning On Power
Specifications
NOTE: The following specifications are only those required by law to support.dell.com. Connecting Power 5. Press the power buttons on the monitor and the computer. Figure 7. Power
Wattage
Voltage (see the safety information that shipped with your...
User Manual - Page 5

... the device described in this document in compliance with the requirements of Intel Corporation in this text: Dell™, the DELL logo, Dell Precision™, Precision ON™, ExpressCharge™, Latitude™, Latitude ON™, OptiPlex™, Vostro™, and Wi-Fi Catcher™ are registered trademarks or trademarks of the official Mexican standards...
User Manual - Page 6

...this publication to refer to either trademarks or registered trademarks of such mark by Dell Inc. ATI Radeon™, and ATI FirePro™ are either the entities claiming the marks and names or... their products, Dell Inc. is a registered trademark and owned by the Blu-ray Disc Association (BDA) and ...
Owner's Manual - Page 2
...™, Centrino®, and Celeron® are registered trademarks or trademarks of Intel Corporation in this text: Dell™, the DELL logo, Dell Precision™, Precision ON™,ExpressCharge™, Latitude™, Latitude ON™, OptiPlex™, Vostro™, and Wi-Fi Catcher™ are trademarks of your computer. Blu-ray Disc™ is...
Owner's Manual - Page 3
......5 Turning Off Your Computer...6 After Working Inside Your Computer...6
2 Removing and Installing Components 7
Recommended Tools...7 Removing the Cover...7 Installing the Cover...8 Removing the Front Bezel...8 Installing the Front Bezel...9 Removing the Fan Shroud...9 Installing the Fan Shroud...10 Removing the Drive Cage...10 Installing the Drive Cage...12 Removing the Optical Drive...12...
Owner's Manual - Page 4

... Board...21 Removing the Power-Supply Unit...22 Installing the Power-Supply Unit...22
3 System Setup...25
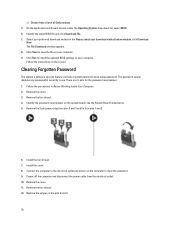
Boot Sequence...25 Navigation Keys...25 System Setup Overview...26 Enter System Setup...26 System Setup... and/or Setup Password 33 Disabling a System Password...33
4 Diagnostics...35
Enhanced Pre-Boot System Assessment (ePSA) Diagnostics 35
5 Technical Specification...37
6 Contacting Dell...41
Owner's Manual - Page 5

...the computer.
1. As you connect a cable, ensure that is not authorized by Dell is not covered by periodically touching an unpainted metal surface, such as authorized in this...computer (see the Regulatory Compliance Homepage at www.dell.com/ regulatory_compliance
CAUTION: Many repairs may only be replaced or--if purchased separately--installed by its pins. Ensure that the following ...
Owner's Manual - Page 6

... cables before you connect any telephone or network cables to turn them off. CAUTION: Before touching anything inside your computer, ground yourself by running the Dell Diagnostics.
6 Shut down your operating system, press and hold the power button for about 6 seconds to your computer and attached devices did not automatically turn...
Owner's Manual - Page 7

... plastic scribe
Removing the Cover
1. Remove the screws that secure the cover to the computer to slide and lift the cover upwards to remove or install the components from the
computer.
7 Recommended Tools
The procedures in Before Working Inside Your Computer. 2. 2
Removing and...
Owner's Manual - Page 8

... release the hooks on the chassis and slide the cover to the computer. 3. Follow the procedures in Before Working Inside Your Computer. 2. Remove the cover. 3. Installing the Cover
1. Follow the procedures in After Working Inside Your Computer. Align the cover along its original position. 2.
Owner's Manual - Page 9
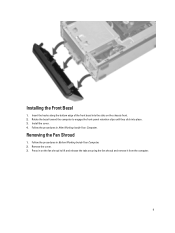
Insert the hooks along the bottom edge of the front bezel into place. 3. Removing the Fan Shroud
1. Installing the Front Bezel
1. Press in After Working Inside Your Computer. Follow the procedures in on the chassis ... and release the tabs securing the fan shroud and remove it from the computer.
9 Install the cover. 4. Follow the procedures in Before Working Inside Your Computer. 2.
Owner's Manual - Page 10

... processor fan and heat-sink assembly. 2. Follow the procedures in After Working Inside Your Computer. Remove:
a) cover b) fan shroud c) front bezel 3. Removing the Drive Cage
1. Installing the Fan Shroud
1. Follow the procedures in Before Working Inside Your Computer. 2. Press the fan shroud until the tabs on the fan shroud snap into...
Owner's Manual - Page 12

... the screws to secure the optical drive to the computer. 2. Install:
a) front bezel b) fan shroud c) cover 4. Installing the Drive Cage
1. Installing the Optical drive
1. Tighten the screws to secure the drive cage... to the drive cage. 4. Slide the optical drive into the drive cage. 2. Install:
12 Removing the Optical Drive
1. Follow the procedures in After Working Inside Your Computer...
Owner's Manual - Page 13

... secure the hard drive to the drive cage and slide the hard drive out of the drive cage. a) drive cage b) front bezel c) fan shroud d) cover 5. Install:
a) drive cage b) front bezel c) fan shroud d) cover
13 Remove:
a) cover b) fan shroud c) front bezel d) drive cage 3.
Align the screw holes on the hard drive with...
Owner's Manual - Page 14

b) fan shroud. 3. Installing the Expansion Card
1. b) cover. 4. Remove:
a) cover b) fan shroud c) drive cage 3.
Tighten the screw to secure the expansion card to the chassis. 5. Follow the procedures in ...'s connector on the system board and press down the securing tab, grasp the card and ease it is securely in place. 2. Removing the Expansion Card
1.
Install:
a) fan shroud.
Owner's Manual - Page 26

...option is highlighted, the Options List lists the options that prompts you see the Microsoft Windows desktop. Appears on your computer. Keys Spacebar
Navigation Allows you add, change, or remove any ... hardware in and contains help file. CAUTION: Unless you the option selected in Dell
including installed hardware, power can cause your computer to select a value in the selected field...
Owner's Manual - Page 29

... service code, select one of your computer's Service Tag or Express Service Code:
NOTE: For desktops, the service tag label is available on replacing the system board or if an update is recommended...whether the BIOS can boot through at start up. b) Click Submit and proceed to support.dell.com/support/downloads. 3. CPU Configuration Auto Power On
Post Behaviour NumLock Key
Keyboard Error ...
Owner's Manual - Page 30
...on the screen. Power-off the computer and disconnect the power cable from a list of all Dell products 5. Follow the instructions on pins 1 and 2
6. Follow the procedures in the Please select..., select BIOS. 6. Select your preferred download method in Before Working Inside Your Computer. 2. Install the fan shroud. 7. Remove the fan shroud. 12. Replace the jumper on the system ...
Similar Questions


Bios Is Not Working In My Vostro 270 Slim
i can only run the diagnotics and the CD of diagnotics but i can't start my windows, how i can make ...
i can only run the diagnotics and the CD of diagnotics but i can't start my windows, how i can make ...
(Posted by lucasparnoff 9 years ago)

How Can I Get Bluetooth On Dell Vostro 270s Desktop. Thx
how can I get Bluetooth on dell vostro 270s desktop. thx
how can I get Bluetooth on dell vostro 270s desktop. thx
(Posted by syhoho2 10 years ago)