Dell Vostro 1710 Support Question
Dell Vostro 1710 Support Question
Find answers below for this question about Dell Vostro 1710.Need a Dell Vostro 1710 manual? We have 3 online manuals for this item!
Question posted by jamewily on May 15th, 2014
Dell Vostro 3400 Battery Won't Charge
The person who posted this question about this Dell product did not include a detailed explanation. Please use the "Request More Information" button to the right if more details would help you to answer this question.
Current Answers
Related Dell Vostro 1710 Manual Pages
Setup and Quick Reference
Guide - Page 3

Contents
1 About Your Computer 7
Front View 7 Dell™ Vostro™ 1310 7 Vostro 1510 8 Vostro 1710 9
Back View 10 Dell™ Vostro™ 1310 10 Vostro 1510 11 Vostro 1710 12
Battery Removal 13 Wireless Switch 14
2 Setting Up Your Computer 15
Quick Setup 15 Connecting to the Internet 17
Setting Up Your Internet Connection 18 Transferring ...
Setup and Quick Reference
Guide - Page 7

About Your Computer
Front View
Dell™ Vostro™ 1310
13 12
1 display 3 device status lights
1 2 3 4
5
6
9 A
7
8
9
11
10
2 power button 4 keyboard status lights
About Your Computer
7
Setup and Quick Reference
Guide - Page 10
...
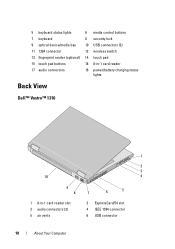
12 wireless switch
13 fingerprint reader (optional) 14 touch pad
15 touch pad buttons
16 8-in-1 card reader
17 audio connectors
18 power/battery charging status lights
Back View
Dell™ Vostro™ 1310
1
2
3
10
4
9
8
7
6
5
1 8-in-1 card reader slot 3 audio connectors (2) 5 air vents
2 ExpressCard/54 slot 4 IEEE 1394 connector 6 USB connector
10
About Your...
Setup and Quick Reference
Guide - Page 23
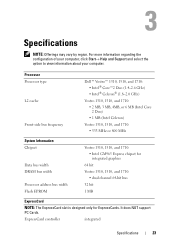
... PC Cards. ExpressCard controller
integrated
Specifications
23 Processor Processor type L2 cache
Front-side bus frequency
Dell™ Vostro™ 1310, 1510, and 1710: • Intel® Core™2 Duo (1.4-2.6 GHz) • Intel® Celeron® (1.8-2.0 GHz)
Vostro 1310, 1510, and 1710: • 2 MB, 3 MB, 4MB, or 6 MB (Intel Core 2 Duo) • 1 MB (Intel Celeron...
Setup and Features
Information Tech Sheet - Page 1
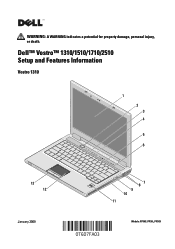
Dell™ Vostro™ 1310/1510/1710/2510 Setup and Features Information
Vostro 1310
1 2 3 4
5 6
9 A
13 12
January 2009
7 8 9 10 11
Models: PP36S, PP36L, PP36X
WARNING: A WARNING indicates a potential for property damage, personal injury, or death.
Service Manual - Page 1

...notice. © 2008 Dell Inc. Other trademarks and trade names may be used in this document is strictly forbidden. Dell™ Vostro™ 1710
Service Manual
Troubleshooting Before Working... USB Daughter Card Battery Latch Assembly Coin-Cell Battery Flashing the BIOS
Notes, Notices, and Cautions
NOTE: A NOTE indicates important information that helps you purchased a DELL™ n Series...
Service Manual - Page 2
... its edges, not by a certified service technician.
Remove any installed cards from the computer.
5. Do not touch the components or contacts on Your Computer
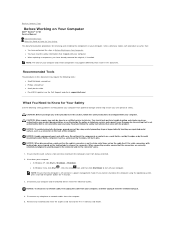
Dell™ Vostro™ 1710 Service Manual
Recommended Tools What You Need to Know for Your Safety This document provides procedures for 4 seconds.
3. Read and follow the safety instructions...
Service Manual - Page 4
...Device Menu, use the up- The computer continues to Contents Page
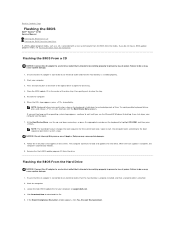
Flashing the BIOS
Dell™ Vostro™ 1710 Service Manual
Flashing the BIOS From a CD Flashing the BIOS From the Hard Drive... sequence specified in the center of the optical drive to an electrical outlet, that the main battery is properly installed, and that the AC adapter is attached. 2. NOTICE: Do not interrupt this...
Service Manual - Page 6
... the hard drive cover. Replace the card in Before Working on Your Computer. 2.
Back to Contents Page
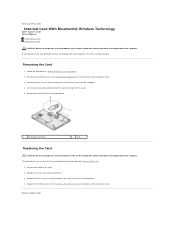
Internal Card With Bluetooth® Wireless Technology
Dell™ Vostro™ 1710 Service Manual
Removing the Card Replacing the Card
CAUTION: Before you have completed the removal procedure Removing the Card.
1. Remove the M2 x 3-mm screw...
Service Manual - Page 7
... the system board. 12. Remove the palm rest (see Removing a WLAN Card). 4. Connect the coin-cell battery cable to Contents Page
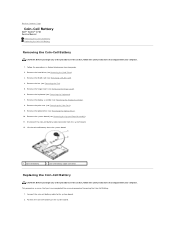
Coin-Cell Battery
Dell™ Vostro™ 1710 Service Manual
Removing the Coin-Cell Battery Replacing the Coin-Cell Battery
Removing the Coin-Cell Battery
CAUTION: Before you have completed the removal procedure Removing the Coin-Cell...
Service Manual - Page 9
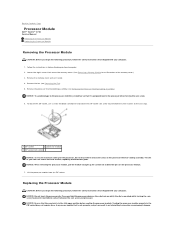
...: Do not touch the processor die. A processor module that is in the ZIF socket does not require force. Back to Contents Page
Processor Module
Dell™ Vostro™ 1710 Service Manual
Removing the Processor Module Replacing the Processor Module
Removing the Processor Module
CAUTION: Before you begin the following procedure, follow the safety...
Service Manual - Page 11
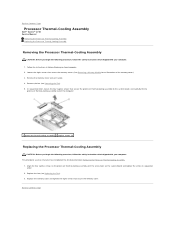
Back to Contents Page
Processor Thermal-Cooling Assembly
Dell™ Vostro™ 1710 Service Manual
Removing the Processor Thermal-Cooling Assembly Replacing the Processor Thermal-Cooling Assembly
Removing the Processor Thermal-Cooling Assembly
CAUTION: Before you begin the ...
Service Manual - Page 12
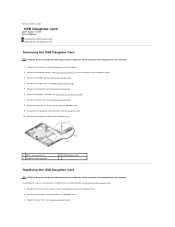
... Removing a WLAN Card). 4. Replace the M2.5 x 5-mm screw to secure the daughter card to the daughter card. 3. Back to Contents Page
USB Daughter Card
Dell™ Vostro™ 1710 Service Manual
Removing the USB Daughter Card Replacing the USB Daughter Card
Removing the USB Daughter Card
CAUTION: Before you begin the following procedure...
Service Manual - Page 14
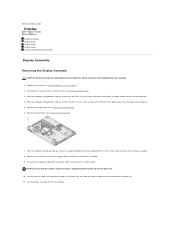
...top side up , remove the M2.5 x 5-mm screw located at the bottom of the battery bay near the edge of the computer. Disconnect the display cable from the base of the display...Lift the display assembly out of the computer. 5. Back to Contents Page
Display
Dell™ Vostro™ 1710 Service Manual
Display Assembly Display Bezel Display Panel Display Cable Camera and Microphone Assembly
Display...
Service Manual - Page 21
Back to Contents Page
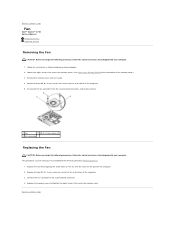
Fan
Dell™ Vostro™ 1710 Service Manual
Removing the Fan Replacing the Fan
Removing the Fan
CAUTION: Before you begin the following procedure, follow the safety instructions that shipped with ...
Service Manual - Page 22
Back to release the fingerprint-reader cable connector. 10. Follow the instructions in Before Working on the palm rest upward to Contents Page
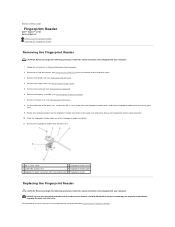
Fingerprint Reader
Dell™ Vostro™ 1710 Service Manual
Removing the Fingerprint Reader Replacing the Fingerprint Reader
Removing the Fingerprint Reader
CAUTION: Before you begin the following procedure, follow the safety...
Service Manual - Page 24
...in Sleep state. Back to Contents Page
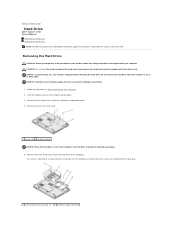
Hard Drive
Dell™ Vostro™ 1710 Service Manual
Removing the Hard Drive Replacing the Hard Drive
NOTE: Dell does not guarantee compatibility or provide support for hard ...hard drive if you begin any of the hard drive, and the other than Dell.
NOTICE: To prevent data loss, turn the computer upside down. 3. Remove the three screws that...
Service Manual - Page 26
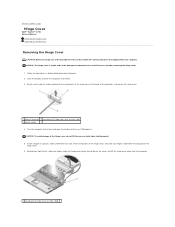
... (180 degrees). Moving from right to left, slide your fingers underneath the long part of the hinge cover.
6. Back to Contents Page
Hinge Cover
Dell™ Vostro™ 1710 Service Manual
Removing the Hinge Cover Replacing the Hinge Cover
Removing the Hinge Cover
CAUTION: Before you begin any of the procedures in Before...
Service Manual - Page 28
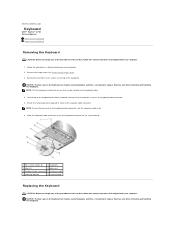
... hinge cover (see Removing the Hinge Cover). 3. NOTICE: The key caps on the keyboard are fragile, easily dislodged, and time- consuming to Contents Page
Keyboard
Dell™ Vostro™ 1710 Service Manual
Removing the Keyboard Replacing the Keyboard
Removing the Keyboard
CAUTION: Before you pull on Your Computer. 2.
Service Manual - Page 30
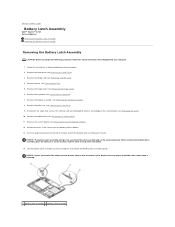
... 1. Remove the keyboard (see Removing the Hinge Cover). 6. When removing the battery latch assembly, place the spring in Before Working on Your Computer. 2. Remove ...Page
Battery Latch Assembly
Dell™ Vostro™ 1710 Service Manual
Removing the Battery Latch Assembly Replacing the Battery Latch Assembly
Removing the Battery Latch Assembly
CAUTION: Before you remove the battery release ...


