Dell PowerEdge 2850 Support Question
Dell PowerEdge 2850 Support Question
Find answers below for this question about Dell PowerEdge 2850.Need a Dell PowerEdge 2850 manual? We have 6 online manuals for this item!
Question posted by karolHutc on May 31st, 2014
How To Remove 2850 Riser Card For Raid
The person who posted this question about this Dell product did not include a detailed explanation. Please use the "Request More Information" button to the right if more details would help you to answer this question.
Current Answers
Related Dell PowerEdge 2850 Manual Pages
Upgrade the BIOS Before
Upgrading Your System (.pdf) - Page 1
... 4.3 implements native operating system installation tools to ensure that ships with their respective operating system install technologies. See the Dell OpenManage Server Administrator Compatibility Guide located on updating your specific PowerEdge system. SUU compares the drivers and firmware versions on the SUU CD repository and allows you can automatically update Dell OpenManage...
Upgrade the BIOS Before
Upgrading Your System (.pdf) - Page 2
... are running the latest software and firmware updates.
The installation procedure saves your current system settings and upgrades your PowerEdge systems. These
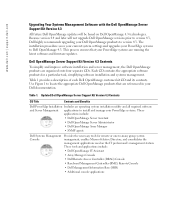
applications include: • Dell OpenManage Server Assistant • Dell OpenManage Server Administrator • Dell OpenManage Array Manager • SNMP agents
Dell Systems Management Console
Provides the necessary tools for...
Upgrade the BIOS Before
Upgrading Your System (.pdf) - Page 3
... for installing the latest BIOS, drivers, and firmware NOTE: See the Dell Support website at support.dell.com for all PowerEdge systems updated by the Dell OpenManage Server Support Kit Version 4.3 CDs. Dell PowerEdge Product Documentation
Includes system and software documentation for the latest updates. www.dell.com | support.dell.com
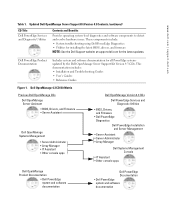
Table 1. This...
Upgrade the BIOS Before
Upgrading Your System (.pdf) - Page 5
...support.dell.com 上的《Dell OpenManage Server Administrator PowerEdge
Dell Server Update Utility 概览
Dell Server Update Utility (SUU PowerEdge 系统。 SUU SUU CD PowerEdge Dell OpenManage 4.3 SUU Dell support.dell.com 上的 《Dell Server Update Utility 1.0 PowerEdge
注 : Dell OpenManage Subscription Service CD Kit...
Upgrade the BIOS Before
Upgrading Your System (.pdf) - Page 17
... Service Pack Dell OpenManage Red Hat と Novell PowerEdge Web support.dell.com Dell OpenManage Server Administrator
Dell Server Update Utility の概要
Dell Server Update Utility (SUU PowerEdge SUU SUU CD PowerEdge Dell OpenManage 4.3 SUU PowerEdge Web support.dell.com Dell Server Update Utility 1.0
Dell OpenManage Subscription Service キ...
Processor Upgrade Installation
Guide - Page 6
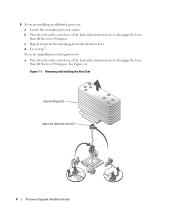
... lever 90 degrees. c Repeat step b for the remaining heat-sink retention lever. 6 If you are installing an additional processor: a Locate the secondary processor socket. Figure 1-1. Removing and Installing the Heat Sink
heat sink (typical)
heat-sink retention lever (2)
4
Processor Upgrade Installation Guide See Figure 1-1.
Processor Upgrade Installation
Guide - Page 7
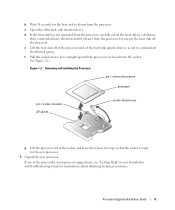
c Open the other heat-sink retention lever. Figure 1-2. Removing and Installing the Processor
pin-1 corner of processor
processor
pin-1 corner of socket ZIF socket
socket-release lever
g Lift the processor out of the socket ...
Processor Upgrade Installation
Guide - Page 8
... sink in the socket. Place this corner in step 6. Be careful not to remove the existing grease from the heat sink. NOTICE: Positioning the processor incorrectly can permanently damage the processor... and the system when you removed in the same corner of the ZIF socket identified by locating the tiny gold triangle on...
Activating the Integrated RAID
Controller - Page 5
... Guide for complete information about safety precautions, working inside the system.
NOTE: See your PowerEdge 1850 riser card supports the RAID option. If you have a PowerEdge 2850, remove the riser card.
5 Locate the RAID memory module connector on removing or replacing components.
1 Remove the bezel (if applicable).
2 Turn off the system, including any of the components inside...
Activating the Integrated RAID
Controller - Page 6
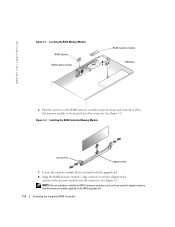
... connector. Use the memory module supplied in the RAID upgrade kit.
1-4
Activating the Integrated RAID Controller
Figure 1-2.
See Figure 1-2. www.dell.com | support.dell.com
Figure 1-1. Locating the RAID Memory Module RAID battery
RAID battery holder
RAID memory module RAID key
B A
SCSI A SCSI B
6 Push the ejectors on the RAID memory module connector down and outward to allow the...
Activating the Integrated RAID
Controller - Page 7
... latches on the riser card. See the system information label on the inside of the system cover for more information. b Route the battery cable through the notch in your Product Information Guide for important battery disposal instructions.
16 Connect the RAID battery to step 13. 12 If you have a PowerEdge 2800 system, remove the memory...
Activating the Integrated RAID
Controller - Page 8

... to step 18. If you have a PowerEdge 2850 system, replace the riser card.
18 Close the system. 19 Reconnect the system to its electrical outlet and turn on the two plastic rivets to 4 hours of the RAID hardware. 21 Install and configure the RAID software. NOTICE: The newly-installed RAID battery must be charged for more
information...
Updating Your NIC Teaming
Drivers (.pdf) - Page 3
... support PCI-e expansion cards. b If a SCSI data cable is not covered by your warranty. See Figure 1-1. NOTE: See your
Installation and Troubleshooting Guide. 8 Remove the riser board:
a Lift the two plastic rivets that came with the product. Removing and Replacing the System Board and Riser Board In A Dell™ PowerEdge™ 1850 System
Removing the System Board...
Updating Your NIC Teaming
Drivers (.pdf) - Page 4
...plastic rivet riser board insulator
riser board
9 Remove the memory modules. NOTE: While removing the memory modules, record the memory module socket locations to ensure proper installation.
10 If applicable, remove the RAC card. See "Installing a RAC Card" in "Installing System Options" in your Installation and Troubleshooting Guide.
11 If applicable, remove the RAID key.
12 Remove the...
Updating Your NIC Teaming
Drivers (.pdf) - Page 5
... the system board out of the system.
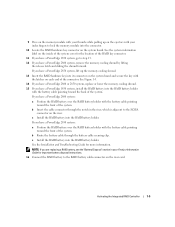
Figure 1-2. Removing the System Board
retention pin
slots
system board tabs
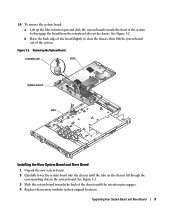
Installing the New System Board and Riser Board
1 Unpack the new system board. 2 Carefully ...retention tabs on the chassis fit through the
corresponding slots in their original locations. 14 To remove the system board: a Lift up the blue retention pin and slide the system board ...
Updating Your NIC Teaming
Drivers (.pdf) - Page 6
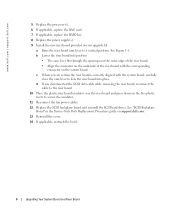
...card. 7 If applicable, replace the RAID key. 8 Replace the power supply(s). 9 Install the new riser board provided in the Service-Only Parts Replacement Procedures guide on the system board. a Raise the riser board cam lever to lock the riser... cable while removing the riser board, reconnect the
cable to the riser board. 10 Place the plastic riser board insulator over the riser board and ...
Updating Your NIC Teaming
Drivers (.pdf) - Page 7
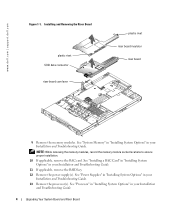
... Replacing the System Board and Riser Board In A Dell PowerEdge 2850 System
Removing the System Board
1 If applicable, remove the bezel. 2 Turn off the system and attached peripherals, and disconnect the system from the electrical
outlet and peripherals. 3 Remove the system from the expansion-card riser board. 8 Remove the expansion-card cage. See "Expansion Cards" in "Installing System Options...
Updating Your NIC Teaming
Drivers (.pdf) - Page 8

...back edge of the system.
8
Upgrading Your System Board and Riser Board c Lift the front-fan tray from its three securing posts.
18 To remove the system board: a Lift up the blue retention pin ...from the retention tabs on the chassis. See Figure 1-3. Removing the System Board system board
retention pin
slots tabs
drive-bay retraction bar
17 Remove the front-fan tray: a Press and hold the front...
Updating Your NIC Teaming
Drivers (.pdf) - Page 9
.... 4 Replace the front-fan tray:
a Place the front-fan tray over the three securing posts. See Figure 1-4. Upgrading the Dell PowerEdge 2850 Expansion-Card Riser Board
1 If applicable, remove the RAID memory module from the expansion-card riser board. 2 Press both release tabs on the chassis fit through the
corresponding slots in the system board. 3 Slide the system...
Updating Your NIC Teaming
Drivers (.pdf) - Page 10
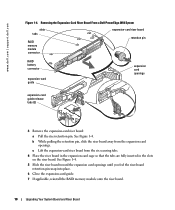
...Expansion-Card Riser Board From a Dell PowerEdge 2850 System
slots tabs
RAID memory module connector
expansion-card riser board retention pin
RAID battery connector
expansion-card guide
expansion card openings
expansion-card guide release tabs (2)
3 Remove the expansion-card riser board:
a Pull the riser retention pin.
c Lift the expansion-card riser board from the expansion card openings...
Similar Questions


How Configuration Raid 5 Disks In Poweredge 2850 From Cd
(Posted by tibrawn 10 years ago)

How To Charge Poweredge 2850 Raid Controller Battery?
(Posted by skaxmiza 10 years ago)


How To Remove Dell Expansion Card Latch On Poweredge 2950
(Posted by dmossjhop2 10 years ago)