Get support for Dell Latitude CPX - Notebook

Dell Latitude CPX Support Question

Dell Latitude CPX Support Question

Find answers below for this question about Dell Latitude CPX - Notebook.
Need a Dell Latitude CPX manual? We have 1 online manual for this item!
Question posted by wizardboy99 on July 3rd, 2013

Webcam Software Missing?

where to get one from ?

Current Answers

Answer #1: Posted by prateekk007 on July 3rd, 2013 6:18 AM
This answer was accepted by the poster of the original question.
prateekk007

Member since:
December 5th, 2012

Points: 2,137,520
1,100
points
Hi wizardboy99 

For installing Dell Webcam Central software follow the steps mentioned below:


1. Go to Dell’s Support Website: http://dell.to/Sd9ofv
2. Click “My Account” in the upper right corner and sign in with your Dell My Account in the popup box appears on the screen. 
3. Under the “My Software” section on the right side of the page, click "Download Factory Installed Software (My Dell Downloads)". 
4. Click the checkbox that agrees to the “Terms and Conditions” of the My Dell Downloads website and click “Register System” at the bottom of the page.
5. At the “My Download Locker” page, select your computer and download “Dell Webcam Central Software”.
6. In the “Title” section, look for “Dell Webcam Central Software”.
7. Select the latest version number in the “Version” column. Click the checkbox under the” Download” column for this software, and at the bottom of the page click “Download now”. 
8. Follow the on-screen instructions to complete the installation. 
9. Once the Dell Webcam Software is installed restart the computer.
10. Once restarted check if it’s working.

You can also refer to the below Dell Article that might help you:

http://dell.to/12IaBRL

Hope that helps you.

For easy access to drivers, manuals and product updates, please visit our Support Site .


Thanks & Regards
Prateek K


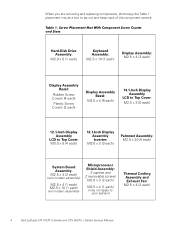
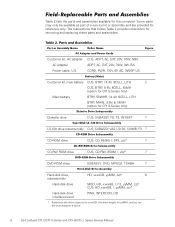
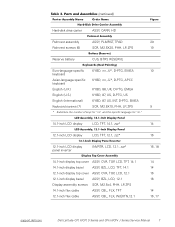
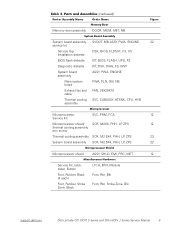
Related Dell Latitude CPX Manual Pages

Service Manual - Page 8

... or something similar to support the display assembly when it is open nearly 180 degrees. The angle of computer support.dell.com Dell Latitude CPt V/CPt S Series and CPx H/CPx J Series Service Manual 1 Unless otherwise noted, each procedure in reverse order. It is recommended that a part can be allowed to the computer are...
Service Manual - Page 9

... programs. 2. Remove any installed devices in suspend-to reduce the potential for 4 seconds. 3. Turn off and not in the modular device bay. 2 Dell Latitude CPt V/CPt S Series and CPx H/CPx J Series Service Manual Also disconnect any attached peripherals. Save any attached peripherals from the computer. 5. If the computer is turned off the computer...
Service Manual - Page 10

... out of the screw's label. M2.5x20 M2.5x10 M3.0x5 M2.5x4 M2.5x4 M3.0x3 M2.0x3 support.dell.com Dell Latitude CPt V/CPt S Series and CPx H/CPx J Series Service Manual 3 Slide the battery bay latch toward the right side of the I /O panel to check for that might harm components. A graphic...
Service Manual - Page 11

... each) (w/o modem assembly) M2.5 x 4 (1 each) M2.5 x 10 (1 each) (w/ modem assembly) Microprocessor Shield Assembly: 3 captive and 2 removable screws M2.0 x 3 (2 each) M2.5 x 4 (1 each ) 4 Dell Latitude CPt V/CPt S Series and CPx H/CPx J Series Service Manual When you are removing and replacing components, photocopy the Table 1 placement mat as a tool to your system) Thermal Cooling Assembly...
Service Manual - Page 12

... ZIF connector, and insert the end of the connector. 2. While holding the cable in place, close the ZIF connector. support.dell.com Dell Latitude CPt V/CPt S Series and CPx H/CPx J Series Service Manual 5 Grasp the interface cable and pull it releases the interface cable. 3. movable part of the connector. 1. These connectors are zero...
Service Manual - Page 13

Table 2 lists the parts and assemblies available for the manufacturer's name. 6 Dell Latitude CPt V/CPt S Series and CPx H/CPx J Series Service Manual CUS, ADPT, AC, EXT, 20V, 70W, NBK ADPT, AC, EXT, 20V, 70W, 3W, BA CORD, PWR, 110V, 6F, AC, 3W/3P, US ...
Service Manual - Page 14

... cable ASSY, CBL, FLX, TFT 12.1-inch flex cable ASSY, CBL, FLX, W/EXTN,12.1 14 14 16 16 14 16, 17 support.dell.com Dell Latitude CPt V/CPt S Series and CPx H/CPx J Series Service Manual 7
Service Manual - Page 15

... CUS, 128MB, DIMM, SDRAM Customer kit, memory module, 192-MB CUS, 192MB, DIMM, SDRAM Customer kit, memory module, 256-MB CUS, 256MB, DIMM, SDRAM 8 Dell Latitude CPt V/CPt S Series and CPx H/CPx J Series Service Manual
Service Manual - Page 16

..., Button Foot, Rubber, Black (4 each) Foot, Rubber, Strike Zone, Black LTCH, BTN, Module Foot, Rbr, Blk Foot, Rbr, Strike Zone, Blk support.dell.com Dell Latitude CPt V/CPt S Series and CPx H/CPx J Series Service Manual 9
Service Manual - Page 17

display assembly keyboard palmrest assembly hard-disk drive internal modem (may not apply to your system) system board main battery case plug for modem bottom case assembly modular bay device The following subsections provide instructions for removing and replacing field-replaceable parts and assemblies. 10 Dell Latitude CPt V/CPt S Series and CPx H/CPx J Series Service Manual
Service Manual - Page 18

... screw on the left side of the computer. 1. Slide the drive door down until it aligns with the cover. 3. support.dell.com Dell Latitude CPt V/CPt S Series and CPx H/CPx J Series Service Manual 11 Slide the drive door up and pull the drive assembly out of the computer. 2. Push the drive assembly into...
Service Manual - Page 19

... down on a flat work surface. 2. Insert a flat-blade screwdriver under the indentation in the bottom case assembly and lift the cover. 12 Dell Latitude CPt V/CPt S Series and CPx H/CPx J Series Service Manual Push the module latch toward the unlock icon. Release the memory module cover. Remove the main battery and secondary battery...
Service Manual - Page 20

inner tabs (2 per socket) memory module sockets (2) DIMM A DIMM B 1. The module should pop up slightly (see Figure 8). 4. support.dell.com Dell Latitude CPt V/CPt S Series and CPx H/CPx J Series Service Manual 13 To release a memory module from the socket. Memory modules are not interchangeable. they are keyed, or designed to disengage from its ...
Service Manual - Page 21

... turn the computer upside down until it . 4. Pivot the memory module down on a flat work surface. 10-mm screws (7) M2.5x10 14 Dell Latitude CPt V/CPt S Series and CPx H/CPx J Series Service Manual If you do not hear a click as each end of the memory module socket. 2. Align the memory module's edge connector...
Service Manual - Page 22

... the keyboard to the computer (see Figure 10), and lift the right edge of the blank key (see Figure 9). 4. support.dell.com Dell Latitude CPt V/CPt S Series and CPx H/CPx J Series Service Manual 15 Release the keyboard from the palmrest assembly by inserting a small flat-blade screwdriver under the edge of the keyboard.
Service Manual - Page 23

... the connector on the left side of this cable is face down when you insert the cable into the keyboard ZIF interface connector. 16 Dell Latitude CPt V/CPt S Series and CPx H/CPx J Series Service Manual Remove the keyboard assembly. 1.
Service Manual - Page 24

... center. Check that the track stick and keyboard cables are not twisted as you lower the keyboard into place. support.dell.com Dell Latitude CPt V/CPt S Series and CPx H/CPx J Series Service Manual 17 Ensure that the keyboard is correctly installed. Carefully turn the computer over and fit the keyboard into the palmrest...
Service Manual - Page 25

... (1) shield brace (may not apply to your system) white marks on the microprocessor shield securing the thermal cooling assembly to the microprocessor module. 18 Dell Latitude CPt V/CPt S Series and CPx H/CPx J Series Service Manual
Service Manual - Page 26

... brace as shown in Figure 12, the 4-mm screw used in step 6 secures this corner. 3. Replace the microprocessor shield. 5. support.dell.com Dell Latitude CPt V/CPt S Series and CPx H/CPx J Series Service Manual 19 Remove the microprocessor shield. 7. Use a microprocessor extractor tool to secure the microprocessor module and shield (see Figure 12). 6. Tighten...
Service Manual - Page 27

... LCD flex cable from the back of the computer (see Figure 13). NOTE: Always remove and replace the LCD panel as a complete assembly. 20 Dell Latitude CPt V/CPt S Series and CPx H/CPx J Series Service Manual

Similar Questions

Ask a New Question
Use the box below to post a new question about this Dell product .
Points & Prizes
  • You can earn points for nearly everything you do on HelpOwl.com
  • You can trade in those points for gift cards at leading retailers such as Amazon.com and Walmart
  • It's that simple!
See How it Works
Create a Free Account

Dell Manuals

Find free Dell Latitude CPX - Notebook manuals and user guides available at ManualOwl.com. Try out our unique manual viewer allowing you to interact with manuals from directly within your browser!

Dell Reviews

View thousands of Dell user reviews and customer ratings available at ReviewOwl.com.

Contact Information

Complete Dell customer service contact information including steps to reach representatives, hours of operation, customer support links and more from ContactHelp.com.

Scoreboard Ratings

See detailed Dell customer service rankings, employee comments and much more from our sister site.

Dell Recalls

Find comprehensive Dell recall information updated hourly on RecallOwl.com.