Dell Inspiron N7110 Support Question
Dell Inspiron N7110 Support Question
Find answers below for this question about Dell Inspiron N7110.Need a Dell Inspiron N7110 manual? We have 2 online manuals for this item!
Question posted by lizzie13 on March 4th, 2014
Won't Turn On - No Beeps - Status Lights Flash White
When I press the power button the lights in the upper right corner above keyboard come on white in the order 1,2,3,2. The lights on the front come on white in the order 1,4,2. There are no beeps or other sounds. I tried removing battery and adapter and held power button for 60 seconds and no change. I tried a different adapter and no change. When the battery is removed there are no lights at all. When the battery is put back and no adapter is attached the light series is the same. I can't find any info on the light patterns and what they indicate. Can anyone help? I am comfortable taking the laptop apart but don't want to until I know what might be wrong. thank you for any leads!
Current Answers
Related Dell Inspiron N7110 Manual Pages
Setup Guide - Page 5
... 7 Press the Power Button 8 Set Up the Operating System 9 Create System Recovery Media (Recommended 10 Enable or Disable Wireless (Optional 12 Set Up Wireless Display (Optional 14 Connect to the Internet (Optional 16
Using Your Inspiron Laptop 18 Right View Features 18 Left View Features 20 Back View Features 24
Front View Features 26 Status Lights and...
Setup Guide - Page 29
... Inspiron Laptop
1
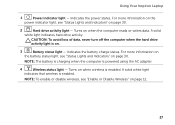
Power indicator light - NOTE: To enable or disable wireless, see "Status Lights and Indicators" on page 12.
27 Turns on page 30.
2
Hard drive activity light - Indicates the battery charge status. For more information on the
power indicator light, see "Status Lights and Indicators" on when the computer reads or writes data. Indicates the power states. A solid white...
Setup Guide - Page 30
Using Your Inspiron Laptop
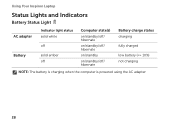
Status Lights and Indicators
Battery Status Light
AC adapter Battery
Indicator light status solid white
off
solid amber off
Computer state(s)
on/standby/off/ hibernate
on/standby/off/ hibernate
on/standby
on/standby/off/ hibernate
Battery charge status charging
fully charged
low battery (
Setup Guide - Page 31
... off /hibernate
NOTE: For information on power problems, see "Power Problems" on page 58. Ensure that your computer is turned on an airplane flight. In the search box, type Power Options and press . 4. Click Start . 3. Using Your Inspiron Laptop
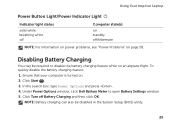
Power Button Light/Power Indicator Light
Indicator light status
solid white breathing white off
Computer state(s)
on standby off Battery Charging...
Setup Guide - Page 33
... Your Inspiron Laptop
1
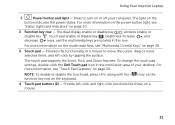
Power button and light - Provides the functionality of your computer. To change the touch pad settings, double-click the Dell Touch pad icon in this row. Press to move the cursor, drag or move selected items, and left -click and right-click functions like those on page 30.
2 Function key row - The light on the keyboard...
Setup Guide - Page 58
... into an electrical outlet and that the computer turns on . Power Problems
If the power light is off , in hibernate mode, or is off or in and not damaged. The computer resumes normal operation if it is not receiving power.
• Press the power button. Also bypass power protection devices, power strips, and power extension cables to your wireless connection.
Check...
Setup Guide - Page 59
... or the display may not be responding.
• Press a key on the keyboard, move the connected mouse or a finger on the touch pad, or press the power button to the same electrical outlet.
57
An unwanted signal is not responding, press the power button until the computer turns off and then turn it back on.
• If the problem persists...
Setup Guide - Page 61

... documentation. If a program is designed for at least 8 to 10 seconds until the computer turns off and then restart your computer. To run the Program Compatibility Wizard:
1. NOTE: Software ... are unable to get a response by pressing a key on your keyboard, or by moving the connected mouse or a finger on the touch pad, press the power button for an earlier Microsoft Windows operating system -
Setup Guide - Page 94
INSPIRON
Index
A
airflow, allowing 5
B
backup and recovery 51 battery status light 27
C
calling Dell 79 CDs, playing and creating 50 computer capabilities 50 computer, setting up 5 connect(ing)
to the Internet 16 Contacting Dell online 81 ...
Service Manual - Page 5
...
Removing the Hard Drive 49 Replacing the Hard Drive 51
A Subwoofer 53
Removing the Subwoofer 53 Replacing the Subwoofer 54
13 Status Light Board 57
Removing the Status Light Board 57 Replacing the Status Light Board 58
14 Speakers 61
Removing the Speakers 61 Replacing the Speakers 62
15 Thermal Fan 65
Removing the Thermal Fan...
Service Manual - Page 9

... and exit all open programs before you turn off when you shut down the operating system, press and hold the power button until the computer turns off. Recommended Tools
The procedures in this document may require the following conditions exist: • You have performed the steps in the reverse order.
Unless otherwise noted, each procedure assumes...
Service Manual - Page 11

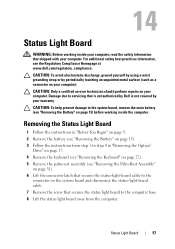
Before You Begin
11 CAUTION: To help prevent damage to the system board, remove the main battery (see "Removing the Battery" on page 15) before working inside the computer. 7 Remove the battery (see "Removing the Battery" on page 15). 8 Turn the computer top-side up, open the display, and press the power button to ground the system board.
Service Manual - Page 57
... a certified service technician should perform repairs on the system board and disconnect the status-light-board cable. 7 Remove the screw that secures the status-light-board cable to step 4 in "Removing the Optical
Drive" on page 17. 4 Remove the keyboard (see "Removing the Keyboard" on page 27). 5 Remove the palm-rest assembly (see "Removing the Battery...
Service Manual - Page 58

...
1 Follow the instructions in "Before You Begin" on page 9. 2 Place the status-light board on the computer base. 3 Slide the status-light-board cable into the connector on the system board
and press down on the connector latch to secure the status-light-board cable to the connector on the system board. 4 Replace the screw that secures...
Service Manual - Page 59

Failure to the computer. Status Light Board
59
CAUTION: Before turning on page 16). 5 Replace the palm-rest assembly (see "Replacing the Palm-Rest Assembly" on page 35).
6 Replace the keyboard (see "Replacing the Keyboard" on page 29). 7 Follow the instructions from step 4 to step 5 in damage to do so may result in "Replacing the Optical...
Service Manual - Page 61
... the instructions in "Removing the Optical
Drive" on page 17. 4 Remove the keyboard (see "Removing the Keyboard" on page 27). 5 Remove the palm-rest assembly (see "Removing the Palm-Rest Assembly"
on page 31). 6 Remove the status light board (see "Removing the Status Light Board" on
page 57). 7 Disconnect the speaker cable from the connector on...
Service Manual - Page 62

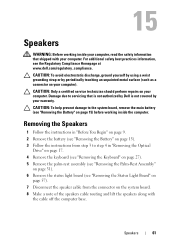
1
2
1 speaker cable
2 speakers (2)
Replacing the Speakers
1 Follow the instructions in "Before You Begin" on page 9. 2 Place the speakers on the computer base and route the speakers cable
through the routing guides. 3 Connect the speaker cable to the connector on the system board. 4 Replace the status light board (see "Replacing the Status Light Board" on
page 58).
62
Speakers
Service Manual - Page 70
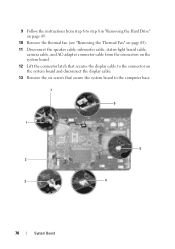
... Hard Drive" on page 49.
10 Remove the thermal fan (see "Removing the Thermal Fan" on page 65). 11 Disconnect the speaker cable, subwoofer cable, status-light board cable,
camera cable, and AC-adapter connector cable from the connectors on the system board. 12 Lift the connector latch that secures the display...
Service Manual - Page 71

System Board
71
1 AC-adapter connector cable 3 status light cable connector 5 subwoofer cable connector 7 camera cable connector
2 screws (6) 4 speaker cable connector 6 dispaly cable connector
14 Lift the system board to disconnect the connector on the system board from the connector on the I/O board.
1
1 system board 15 Turn the system-board assembly over.
Service Manual - Page 72

...Turn the system board assembly over. 6 Slide the connectors on the system board into the slots on the computer
base. 7 Gently press...status-light board cable,
camera cable, and AC-adapter cable to the connectors on the system board. 10 Slide the display cable into the connector on the system board and press... Assembly" on page 35). 14 Replace the keyboard (see "Removing the Processor Module" on page...
Similar Questions

How To Turn On Wifi Switch On Dell Laptop Inspiron N5050
(Posted by albaye 9 years ago)

How To Turn On The Wifi In Dell Laptop Inspiron N7110
(Posted by jadonspcsu 10 years ago)

How To Turn On Wireless Network On Dell Laptop Inspiron N5110
(Posted by klneojo 10 years ago)

How To Turn Off Touchpad On A Dell Laptop Inspiron N7110
(Posted by twistongui 10 years ago)