
Dell Inspiron N5050 Support Question
Dell Inspiron N5050 Support Question
Find answers below for this question about Dell Inspiron N5050.Need a Dell Inspiron N5050 manual? We have 2 online manuals for this item!
Question posted by Stagbr on December 2nd, 2013
What Is The Problem Dell Inspiron Connection To External Monitor
The person who posted this question about this Dell product did not include a detailed explanation. Please use the "Request More Information" button to the right if more details would help you to answer this question.
Current Answers
Answer #1: Posted by prateekk007 on December 2nd, 2013 1:06 PM
prateekk007

Member since:
December 5th, 2012 Points: 2,137,520

Member since:
December 5th, 2012 Points: 2,137,520
Hi Stagbr,
Press the FN+F1 key to transfer the display. In case issue still persists, please install the Quickset application from the link given below and try again:
Please reply if you have further queries.
To know more about Dell Product Support, Drivers & Downloads, Order & Dispatch status -> choose your region US Customers; India Customers. For Here for Dell support videos.Thanks & Regards
Prateek K
Related Dell Inspiron N5050 Manual Pages
Owners Manual - Page 1
P18F003 P18F002; Dell Inspiron M5040/15-N5040/ 15-N5050 Owner's Manual
Regulatory model: P18F
Regulatory type: P18F001;
Owners Manual - Page 2
... of your computer. P18F002; Trademarks used in any manner whatsoever without notice. © 2011 Dell Inc.
Regulatory model: P18F
Regulatory type: P18F001; All rights reserved.
Reproduction of these materials in this text: Dell™, the DELL logo, and Inspiron™ are trademarks of Microsoft Corporation in this document is a registered trademark owned by Bluetooth...
Owners Manual - Page 5
... USB Board 44
12 Thermal Cooling Assembly 45
Removing the Thermal Cooling Assembly 45 Replacing the Thermal Cooling Assembly 46
13 Processor Module (For Inspiron 15-N5050/15-N5040 Only 47
Removing the Processor Module 47 Replacing the Processor Module 48
14 Hinge Cover 51
Removing the Hinge Cover 51 Replacing the...
Owners Manual - Page 9
... document may require the following tools: • Small flat-blade screwdriver • Phillips screwdriver • Plastic scribe • BIOS executable update program available at support.dell.com
Turning Off Your Computer
CAUTION: To avoid losing data, save and close all open files and exit all open programs. 2 Click Start and then...
Owners Manual - Page 10
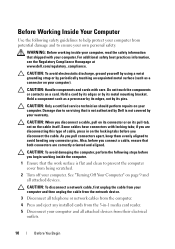
...Disconnect all attached devices. Hold a component such as a connector on the cable itself.
As you connect a cable, ensure that is not authorized by its pull-tab, not on your computer. Also... see the Regulatory Compliance Homepage at www.dell.com/regulatory_compliance. Some cables have connectors with care. Hold a card by its edges or by Dell is flat and clean to ensure your ...
Owners Manual - Page 13
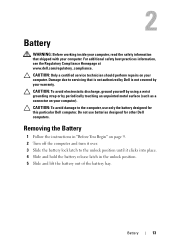
... CAUTION: To avoid damage to the computer, use batteries designed for this particular Dell computer. Damage due to the unlock position until it clicks into place. 4 ...5 Slide and lift the battery out of the battery bay. Do not use only the battery designed for other Dell computers.
Removing the Battery
1 Follow the instructions in "Before You Begin" on your computer. CAUTION: Only a ...
Owners Manual - Page 15
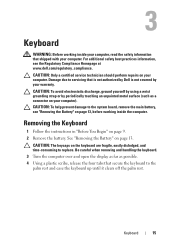
...read the safety information that secure the keyboard to servicing that is not authorized by Dell is not covered by periodically touching an unpainted metal surface (such as possible. ...consuming to the system board, remove the main battery, see the Regulatory Compliance Homepage at www.dell.com/regulatory_compliance. CAUTION: The keycaps on page 13. CAUTION: To help prevent damage to replace...
Owners Manual - Page 19
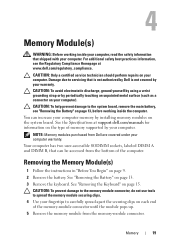
... board, remove the main battery, see the Regulatory Compliance Homepage at support.dell.com/manuals for information on the system board. See "Removing the Battery" on page 9. 2 ...user-accessible SODIMM sockets, labeled DIMM A and DIMM B, that is not authorized by Dell is not covered by your computer memory by your computer.
For additional safety best practices information, ...
Owners Manual - Page 21
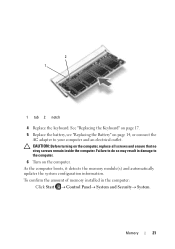
...(s) and automatically updates the system configuration information. See "Replacing the Keyboard" on page 17. 5 Replace the battery, see "Replacing the Battery" on page 14, or connect the
AC adapter to the computer. 6 Turn on the computer, replace all screws and ensure that no stray screws remain inside the computer. Memory
21...
Owners Manual - Page 23
..."Removing the Keyboard" on page 15. 4 Remove the screw that is not authorized by Dell is not covered by periodically touching an unpainted metal surface (such as a connector on page...drive to the system board, remove the main battery, see the Regulatory Compliance Homepage at www.dell.com/regulatory_compliance.
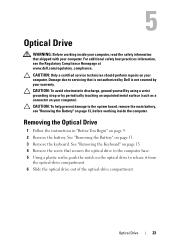
Removing the Optical Drive
1 Follow the instructions in "Before You Begin" on ...
Owners Manual - Page 25
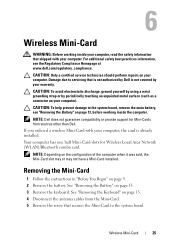
...-Card slot may or may not have a Mini-Card installed.
NOTE: Depending on your computer). Damage due to servicing that shipped with your computer. NOTE: Dell does not guarantee compatibility or provide support for Wireless Local Area Network (WLAN)/Bluetooth combo card. Removing the Mini-Card
1 Follow the instructions in "Before...
Owners Manual - Page 28
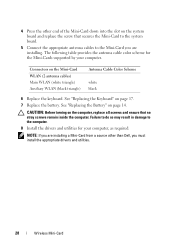
... in damage to the Mini-Card you are installing a Mini-Card from a source other than Dell, you are installing.
CAUTION: Before turning on the system board and replace the screw that no...the computer, replace all screws and ensure that secures the Mini-Card to the system board.
5 Connect the appropriate antenna cables to the computer. 8 Install the drivers and utilities for the Mini-Cards ...
Owners Manual - Page 29
... assembly to the system board, remove the main battery, see the Regulatory Compliance Homepage at www.dell.com/regulatory_compliance.
See "Removing the Battery" on page 13. 3 Remove the 11 screws that is not authorized by Dell is not covered by periodically touching an unpainted metal surface (such as a connector on page 9. 2 Remove...
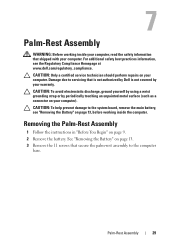
Owners Manual - Page 35
...to the system board, remove the main battery, see the Regulatory Compliance Homepage at www.dell.com/regulatory_compliance.
CAUTION: To avoid electrostatic discharge, ground yourself by using a wrist grounding... board to the palm rest. 6 Push and release the tabs that is not authorized by Dell is not covered by periodically touching an unpainted metal surface (such as a connector on your ...
Owners Manual - Page 37
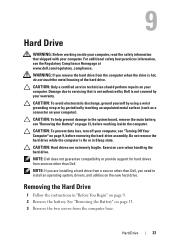
... loss, turn off your computer, see the Regulatory Compliance Homepage at www.dell.com/regulatory_compliance. NOTE: Dell does not guarantee compatibility or provide support for hard drives from the computer ...(such as a connector on page 13. 3 Remove the two screws from a source other than Dell, you are extremely fragile.
NOTE: If you need to the system board, remove the main battery,...
Owners Manual - Page 39
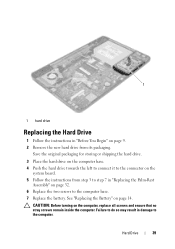
... original packaging for storing or shipping the hard drive.
3 Place the hard drive on the computer base. 4 Push the hard drive towards the left to connect it to the connector on the
system board. 5 Follow the instructions from its packaging. 1
1 hard drive
Replacing the Hard Drive
1 Follow the instructions in "Before...
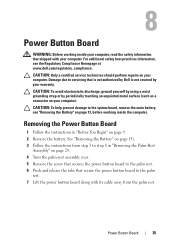
Owners Manual - Page 47
...-N5040 Only)47 13
Processor Module (For Inspiron 15-N5050/15-N5040 Only)
WARNING: Before working inside your computer, read the safety information that is not authorized by Dell is not covered by your computer. The oils in your computer. See "Removing the Thermal
Cooling Assembly" on the processor thermal-cooling assembly. CAUTION...
Owners Manual - Page 48
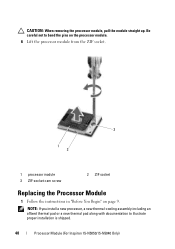
... the Processor Module
1 Follow the instructions in "Before You Begin" on page 9. Be careful not to illustrate proper installation is shipped.
48
Processor Module (For Inspiron 15-N5050/15-N5040 Only) CAUTION: When removing the processor module, pull the module straight up.
Owners Manual - Page 49
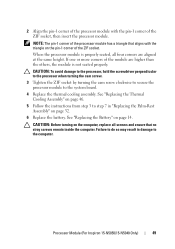
... ZIF socket by turning the cam screw clockwise to secure the processor module to the system board. 4 Replace the thermal cooling assembly. Processor Module (For Inspiron 15-N5050/15-N5040 Only)
49
2 Align the pin-1 corner of the processor module with the triangle on the pin-1 corner of the ZIF socket.
Owners Manual - Page 50

50
Processor Module (For Inspiron 15-N5050/15-N5040 Only)
Similar Questions

How To Connect External Monitor To Dell Studio 1737 Laptop
(Posted by entb 10 years ago)


How To Connect External Monitor To Dell Latitude E6430
(Posted by genedwils 10 years ago)

I Hava Dell Laptop Inspirion N5050 How Do I Turn On The Webcam
(Posted by yathka 10 years ago)

How To Disassemble A Dell Laptop Inspirion N5050
(Posted by Manbadleg 10 years ago)