Dacor EG366SCH Support Question
Dacor EG366SCH Support Question
Find answers below for this question about Dacor EG366SCH.Need a Dacor EG366SCH manual? We have 3 online manuals for this item!
Question posted by nanababyof2 on April 13th, 2023
Need Name Of Tool To Remove The Keyed Hole
The person who posted this question about this Dacor product did not include a detailed explanation. Please use the "Request More Information" button to the right if more details would help you to answer this question.
Current Answers
Answer #1: Posted by SonuKumar on April 13th, 2023 7:31 PM
SonuKumar

Member since:
May 9th, 2021 Points: 16,598,000

Member since:
May 9th, 2021 Points: 16,598,000
The Dacor EG366SCH is a gas range with a keyed hole for the burner knob. To remove the keyed hole, you will need a special tool called a "burner knob key" or a "burner valve wrench."
This tool is designed to fit into the keyed hole and allow you to unscrew the burner knob. Without this tool, it may be difficult or even impossible to remove the knob.
You can purchase a burner knob key or valve wrench at most hardware stores or online retailers that sell appliance parts. It's important to make sure that you get the correct size and shape of the tool that matches your Dacor gas range model.
Please respond to my effort to provide you with the best possible solution by using the "Acceptable Solution" and/or the "Helpful" buttons when the answer has proven to be helpful.
Regards,
Sonu
Your search handyman for all e-support needs!!
Related Dacor EG366SCH Manual Pages
Planning Guides - Page 3

...to accompanying installation instructions. Document # PG04-001
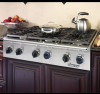
EG366, EG486
36 Inch and 48 Inch Wide Epicure® Gas Cooktops
Cutout tolerances: +1/16", -0, (+1.6 mm, -0) unless otherwise stated
Revised 05/06/10 Page 3/4
PLANNING GUIDE
Gas...
both sides
1/2" (13 mm) countertop overhang
Countertop
Hole 1/2" dia. (13 mm), 2 places, through bottom
10" (254 mm) min. EG366 EG486
B -
Planning Guides - Page 4

.... (10 mm) flat countertop overhang required behind cutout Countertop
EG366 or EG486 cooktop
Control panel
Cabinet face
IMPORTANT: See raised vent installation instructions for duct system layout/planning
Minimum...chassis to change without notice. Cutout Width
36" (914 mm)
48" (1219 mm)
D -
Model No. Hole Offset
16 5/8" (422 mm)
20 13/16" (529 mm)
E - Install all appliances according to allow for...
Installation Instructions - Page 2

... and Countertop Layout 4 Cabinet/Cutout Dimensions 5
Installation Instructions 8 Cooktop Installation 8 Gas Line Connection 9 Burner Component Installation 10 Burner... Information
If You Need Help... Friday 6:00 a.m. Leave these installation instructions for future reference and the local building inspector's use. and Canada) Monday - Model Identification EG366SCH/NG/H
SIZE (...
Installation Instructions - Page 3

... passages on the list of substances which are not meant to cover all slots, holes and passages clear of potential exposure to such substances. Also keep items that are on the cooktop and cooktop chassis. Aluminum foil linings may be burned. CALIFORNIA PROPOSITION 65 WARNING
The burning of gas cooking fuel generates some...
Installation Instructions - Page 4

... not install, repair or replace any circumstances:
• Cut or remove the third (ground) prong from the rear of or above the cooktop. Do not store items of interest to children on the cooktop. Do not place such items on top of the cooktop to a combustible material must be harmful to come into a dedicated...
Installation Instructions - Page 6

... minimum distance from reaching over a hot appliance, avoid cabinet installations directly above. • To reduce the risk of cooktop to combustible wall is less than 2 1/2" (Figure 2). A hood should be easily disconnected if the unit needs service.
• Allow for minimum corner radius, reinforcement and heat protection requirements.
• For installations with a raised...
Installation Instructions - Page 8

... specified.
6
to combustible wall above countertop,
both sides
1/2" (13 mm) countertop overhang
Countertop
Hole 1/2" dia. (13 mm), 2 places, through platform
for
combustible rear wall above countertop
Non...(254 mm) min. Top View
Cooktop Model EG366
EG486
B - Cutout Width
36" (914 mm)
48" (1219 mm)
D - for hold down bolts
1" thick mounting platform Min. Hole Offset
16 5/8" (422 mm)
...
Installation Instructions - Page 9

... behind raised vent chassis to clear stiffener
Dacor approved raised vent
EG366 or EG486 cooktop
Control panel
Cabinet face
IMPORTANT: See raised vent installation instructions for raised vent, gas... (67 mm)
3/8" (10 mm) Min. Side View
7 Hole 1/2" dia. (13 mm), 2 places, through the bottom of the cooktop when installed with a raised vent. Cabinet/Countertop Cutout Dimensions with Raised...
Installation Instructions - Page 10

... caulk to the countertop using the two (2) provided hold-down bolts. Removal of sealant to service the unit will be readily removable if service is mounted in the cutout.
2. Call the dealer, the gas supplier or a licensed electrician.
• The cooktop is missing or damaged, please contact your dealer immediately.
Do not overtighten...
Installation Instructions - Page 12

...proper seating. Installation Instructions
Burner Component Installation
warning
• Never attempt to operate the cooktop with head slots. Ridge on top of the head. Twist back and forth to assure... removed.
• Do not attempt to adjust the burner air mixture settings. STEP 1: Put burner ring on bottom of burner cap
STEP 3: Install burner cap. Burner head
Burner base Keyed hole
...
Use & Care Manuals - Page 3

...Doing so blocks air flow through the cooktop and may also trap heat, causing a fire hazard. to the appliance without updating this or any slots, holes or passages on the under side of ...the appliance. Model number
Serial number
Date of purchase
Since Dacor continuously improves the quality and performance of grease and grime. Doing so may need ...
Use & Care Manuals - Page 4

...) or a non-combustible material.
• Make sure that you the location of the gas shut off the gas supply and disconnect power to children on a cooktop. Utensils need to a combustible vertical surface must use .
• Select cookware carefully. Do not install or use on top of or above the...
Use & Care Manuals - Page 5

... content may cause spattering or spilling of the hot fat.
◊ Heat fat slowly, and stir together any circumstances:
◊ Cut or remove the third (ground) prong from the cooktop. DO NOT USE WATER, including wet dish cloths or towels - Important Safety Instructions
WARNING
• Make sure that the pan is large...
Use & Care Manuals - Page 6

... control system. Each SimmerSear burner (left front and right front) has a wider range of the cooktop. Spill Trays: The spill trays catch any food that lights the burner when you precise heat control... on the burners and adjust the flame size. Smart Flame™ Technology: All burners are removable to allow the area below and around the underside of the porcelain-coated cast iron grates. ...
Use & Care Manuals - Page 7
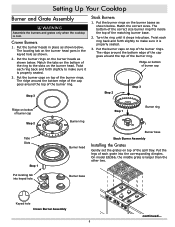
... burner cap Step 2
Tabs Slots
Step 1 Put locating tab into keyed hole
Step 1
Burner ring
Burner ring
Burner head
Burner base
Stack Burner Assembly
Installing the Grates
Gently set the grates on the burner bases as shown below .
Setting Up Your Cooktop
Burner and Grate Assembly
WARNING
Assemble the burners and grates only...
Use & Care Manuals - Page 9

... use your cooktop without the burners completely and properly assembled (see page 5).
• When the cooktop is set the flame height to reduce this type of safety, always light the burner before removing the utensil...Open a window and allow at a higher flame setting for the cooktop to cool and check to make sure the cooktop is off when you which burner it counter-clockwise to spark if...
Use & Care Manuals - Page 10

...flavor and
• Use a timer rather than repeatedly removing the
nutrients.
IMPORTANT: • During cooking be careful with metal utensils on the cooktop. A higher boil
cooking times. The larger the burner...corners of heat, such as glass, ceramic and cast iron.
cess. Operating Your Cooktop
Cooking Tips
For superior cooking performance and to save energy.
• Dacor's ...
Use & Care Manuals - Page 11

... the porcelain enamel parts on any part of the cooktop unless instructed to remove heavy spills with the maximum griddle settings. Cooktop Disassembly
1. Lift the burner caps and burner rings ... of the burner parts before attempting to touch any length of time. Remove the burner heads from the cooktop. Steam could penetrate the electrical components and cause a short circuit. caution...
Use & Care Manuals - Page 12

... after reassembling them .
4.
To minimize wear, use the mildest cleaner needed to get the surface clean.
• For extremely stubborn stains, you... to help dissolve grime.
2. IMPORTANT: The igniters may be removed by applying full-strength sprays such as Soft Scrub™, Bon...Ring
caution
Do not clean the cooktop grates, burner parts or WOK ring in the holes with plastic bristles or a ...
Use & Care Manuals - Page 13

Knobs and Trim Rings
warning
Never block the holes in hot soapy water to the center. Make sure you put the two knobs with the ... knob on metal surfaces. Doing so will impair the flow of the trim rings while the knobs are needed for cleaning or replacement.
• To remove the knobs, gently grasp each use abrasives or abrasive cleaners. To prevent damage, do not use abrasive ...
Similar Questions

I Have A Dacor Gas Cooktop #eg 366 Sch, One Of The Burner Knob Lights Has Burned
How do I replace a burned out light in burner knob for Dacor EG366 gas cooktop. I can find the repla...
How do I replace a burned out light in burner knob for Dacor EG366 gas cooktop. I can find the repla...
(Posted by allanreinhard 8 years ago)
Burner Knob Light Replacement?
How to gain access to location of burner light bulb, where is it at, do I need any special tools? Th...
How to gain access to location of burner light bulb, where is it at, do I need any special tools? Th...
(Posted by allanreinhard 8 years ago)

Several Heat Control Keys Are Blinking Repeatedly
I have a brand new cooktop that I tried to operate for the first time. After turning on and off seve...
I have a brand new cooktop that I tried to operate for the first time. After turning on and off seve...
(Posted by yakovkorenfeld 9 years ago)

I Bought An Eg366sch/lp. Need To Convert To Ng.and Suggestions?dacor Is No Help
i bought the eg366sch/lp and had it installed. low flame. didn't realize it was propane model. i wou...
i bought the eg366sch/lp and had it installed. low flame. didn't realize it was propane model. i wou...
(Posted by hendricksonconsulting 10 years ago)

Ett304-1rf Cooktop Will Not Come Out Of Ett Secure Lockout Mode.
Having trouble getting the ETT304-1RF cooktop out of ETT Secure Lockout Mode. Have tried re-setting ...
Having trouble getting the ETT304-1RF cooktop out of ETT Secure Lockout Mode. Have tried re-setting ...
(Posted by olivam 11 years ago)