Get support for Cub Cadet CC 30 H

Cub Cadet CC 30 H Support Question

Cub Cadet CC 30 H Support Question

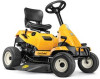
Find answers below for this question about Cub Cadet CC 30 H.
Need a Cub Cadet CC 30 H manual? We have 2 online manuals for this item!
Question posted by jbachmann on April 15th, 2023

Cc30h Transmission Maintenance

What maintenance and how often do I need to do on my cc30h cub cadet hydrostatic transmission. Did not see this info in my manual. My mower is one year old.Thanks for your time,Joe Bachmann

Current Answers

Answer #1: Posted by MarkivShah on April 18th, 2023 12:09 AM
This answer was accepted by the poster of the original question.
MarkivShah

Member since:
April 14th, 2023

Points: 15,780
1,090
points
Congratulations on your CC30H Cub Cadet!

Here are some general maintenance tips for hydrostatic transmissions:

  1. Change the transmission fluid: The transmission fluid should be changed every 100 hours of operation or at least once per year. Be sure to use the fluid recommended by the manufacturer.
  2. Check the fluid level: Check the transmission fluid level before each use. Low fluid levels can cause damage to the transmission and reduce its lifespan.
  3. Check for leaks: Inspect the transmission for leaks before each use. If you notice any leaks, have them repaired immediately.
  4. Keep it clean: Keep the transmission area clean and free of debris. Dirt and debris can cause damage to the transmission.
  5. Proper operation: Avoid harsh starts and stops, which can cause damage to the transmission. Also, avoid towing heavy loads or exceeding the maximum weight capacity of the mower.

Be sure to check your owner's manual for specific maintenance recommendations for your particular model. If you have any questions or concerns, it's always a good idea to consult with a professional mechanic or authorized dealer.

Answer #2: Posted by SonuKumar on April 15th, 2023 8:57 AM
SonuKumar

Member since:
May 9th, 2021

Points: 16,621,300
100
points
https://www.manualslib.com/manual/761901/Cub-Cadet-Cc-30.html

Congratulations on your Cub Cadet CC 30 H! Proper maintenance is important to keep your mower running smoothly and extend its lifespan. Here are some tips for maintaining the hydrostatic transmission on your Cub Cadet CC 30 H:

Check the fluid level: The hydrostatic transmission requires regular fluid checks to ensure that it has enough oil to operate efficiently. Check the fluid level regularly and add oil as needed. Refer to your owner's manual for the correct type of oil and instructions on how to check the fluid level.

Change the oil: It's important to change the oil in your hydrostatic transmission regularly to keep it clean and functioning correctly. The manufacturer recommends changing the oil after the first 10 hours of use and every 100 hours after that. Refer to your owner's manual for instructions on how to change the oil.

Inspect the belts: The belts on your mower's hydrostatic transmission can wear out over time and require replacement. Inspect the belts regularly for signs of wear or damage and replace them if necessary. Refer to your owner's manual for instructions on how to replace the belts.

Clean the transmission: The hydrostatic transmission can become dirty and clogged with debris over time. To keep it running smoothly, clean the transmission regularly with a cloth or brush. Be careful not to damage any of the parts or components.

Store the mower properly: If you live in an area with harsh winters or don't plan on using your mower for an extended period of time, it's important to store it properly. Follow the instructions in your owner's manual for storing the mower, including draining the fuel tank, changing the oil, and removing the battery.

It's a good idea to perform these maintenance tasks regularly to keep your Cub Cadet CC 30 H hydrostatic transmission in good working condition. If you have any questions or concerns, contact your local Cub Cadet dealer for assistance.


Please respond to my effort to provide you with the best possible solution by using the "Acceptable Solution" and/or the "Helpful" buttons when the answer has proven to be helpful.

Regards,
Sonu
Your search handyman for all e-support needs!!

Related Cub Cadet CC 30 H Manual Pages

Parts and Warranty - Page 1

...assembling this product, have questions regarding the controls, operation, or maintenance of this document is specific to the retailer or dealer without first..., 16 x 6.5 x 8 Tire, 16 x 6.5 x 8 Throttle Control Cable Discharge Chute Assembly Spindle Assembly Description Cub Cadet LLC, P.O. If you can seek help from the options below: ◊ Web: www.cubcadet.com/equipment/cubcadet/service...
Parts and Warranty - Page 3

... a seven year Limited Lifetime Warranty. After three (3) months, the battery replacement credit is not a Federal Emission Control Warranty Statement, as defined by the Initial Purchaser. Frames: The frame, chassis, and front axle on all XT1, XT2 and XT3 products are covered for "Residential Use" by Cub Cadet LLC with regard to Operator's Manual The...
Parts and Warranty - Page 4

...Loss of time or loss of use with the original design of maintenance and/or improper maintenance, as... 1. This includes operation in the operator's manual. 5. Box 368023, Cleveland, Ohio 44136-...30 days or 100 hours (whichever occurs first) for Product used commercially. This limited product warranty is provided by Cub Cadet LLC and is the only product warranty provided by improper maintenance...
Operation Manual - Page 1

... COMPLY WITH THESE INSTRUCTIONS MAY RESULT IN PERSONAL INJURY. Important Safe Operation Practices • Assembly & Set-Up • Controls & Operation • Product Care Operator's Manual Riding Mower Table of Contents Important Safe Operation Practices 2 Assembly & Set-Up 7 Controls & Operation 11 Product Care 15 Parts/Warranty See Separate Supplement WARNING READ AND FOLLOW...
Operation Manual - Page 2

... key before and while backing to start engine. 26. Always turn off blade(s), place transmission in neutral, set parking brake, stop engine and wait until the blade(s) come to ... operation practices in this manual before turning. Use only accessories and attachments approved for traffic when operating near rotating parts or under 14 years of the mower and attachment discharge direction...
Operation Manual - Page 3

...time frame, your skin and change the stability of the machine. Travel slowly and allow children under 14 years...greater than the operator. loaded dump cart, lawn roller, etc.) on wet grass. tractor ...at least two minutes before storing. a. b. If this manual and on towed equipment. 4. l. m. Do: 1. ...the machine and the mowing activity. The mower could cause serious injury. 7. Do ...
Operation Manual - Page 4

... the original equipment manufacturer's (O.E.M.) blade(s) only, listed in this manual. Mower blades are stopped before placing hands or feet near blades. For ...appear on this product has an Average Useful Life of seven (7) years, or 270 hours of engine governor. Symbol Description READ THE OPERATOR'S MANUAL(S) Read, understand, and follow all mechanical and safety systems are ...
Operation Manual - Page 7

...transmission will not move back in this Operator's Manual may come already installed, follow the recommended safety practices at the time. Assembly & Set-Up Thank You Thank you for purchasing this entire manual...this product. Hardware is engaged. We want to the transmission. (b) (a) (a) (b) Figure 2-2 4. Riding mower features may cause severe damage to ensure your tractor. ...
Operation Manual - Page 8

... gun or electric drill with the screw (b) previously removed. Installing the Deck Chute WARNING Never operate this riding mower without either the mulch plug or deck chute installed. 1. See Figure 2-9. (a) (a) (b) 8 Section 2... as desired. Slide the seat forward or backward as shown in your riding mower was not attached at the factory, follow the applicable instructions below to Figure ...
Operation Manual - Page 9

... by tightening the wing knobs (a) removed in place. 3. Retain the hardware for later instructions. Installing the Mulch Plug (If equipped) WARNING Never operate this riding mower without the mulch plug (b) properly in Figure 2-11 Tip the rear engine cover (b) forward to fit it backwards to cause cancer and reproductive harm. The...
Operation Manual - Page 10

...deck models. Never exceed the maximum inflation pressure shown on 30" deck models in accordance with Figure 2-15 for 24"...Pressure WARNING Equal tire pressure should be maintained at all times. Gas & Oil Fill-up The gasoline tank is...Manual packed with your fuel tank when filling with motor oil in the Product Care section prior to the tire sidewall for the fuel to NOT top off your riding mower...
Operation Manual - Page 11

... right side of the riding mower seated in use. The pedal will turn over the engine. Controls & Operation Hydro Transmission (E) (L) (A) (B) (P) (N*) (O) (C) (G) (D) (M) (N*) (K) (J) 30" 6-Speed Transmission (F) (L) (A) (B) (P) (N*) (H) (I) (M) (N*) (K) (J) 3 24" 6-Speed Transmission (F) (B) (P) (H) (I) (J) (K) (N*) (M) Note: This Operator's Manual covers several models. When set...
Operation Manual - Page 12

... is moved to identify the riding mower's fuel needs. When engaged, the rod opens a bypass within the hydrostatic transmissions, which could tip or slip. ...mower. The brake pedal must be completely depressed and the riding mower must be set if the operator leaves the seat with your application. Refer to this manual for instructions for 30" deck models and the Engine Operator's Manual...
Operation Manual - Page 13

... Maintenance & Adjustments section of this riding mower unless...time operators should use the shift lever (if equipped) to run poorly. Engage the riding mower's parking brake. 4. Note: Do NOT operate this manual...mower with speed control lever (if equipped) in the operator's seat and place your lawn ''browned'' by depressing the clutch-brake pedal or brake pedal. Driving the Riding Mower...
Operation Manual - Page 14

... the like. Your riding mower is in reverse with your mowing pattern to Cutting Blade in this manual for instructions on slopes. ...choke control (if equipped) or throttle control (if equipped) into the lawn where they act as a natural fertilizer. Once activated (indicator light ON...necessary to go back over the cut area a second time to get a clean cut. • Do NOT attempt to the REVERSE ...
Operation Manual - Page 15

... Around Fuses, Wiring and Wiring Harnesses * P P Check/Clean Around Transmission, Axle and Fans * P P Check Engine Oil Level P Check Air... Note: This Operator's Manual covers several models. Not all riding mower models and the riding mower depicted may differ from ...a level, clear spot on your lawn, near enough for detailed engine maintenance procedures and intervals. Disengage the PTO...
Operation Manual - Page 16

...The battery is sealed and is needed to premature failures. When re-installing...transmission, axle and the fan area. See the Parts/Warranty supplement for information on the topside of the engine sediment which may be hot and can also become collections sites for complete engine maintenance instructions. Refer to the Engine Operator's Manual included with a wire brush to your riding mower...
Operation Manual - Page 18

... first. If changing the deck belt with the cutting deck still installed on the riding mower. See Figure 4-12 for 30" decks and Figure 4-13 for approved disposal methods. • Remove the spark plug ...6. Dispose of engine oil through and out of the belt keeper rod. 5. Crank the engine several times to the lowest mowing position. 3. Place the PTO lever in -line clamp on the fuel filter ...
Operation Manual - Page 19

...Failures Some common causes for an extended period of time, charge the battery as follows: 1. Jump Starting...(negative -) to charging your riding mower's warranty. Read your battery charger's Owner's Manual prior to the other gas appliances. .... CAUTION When charging your hands by your tractor's battery. For 30" deck models: a. If your engine's alternating system. Protect your...
Operation Manual - Page 20

... the mower is wet. 3. Cutting blade loose. • Tighten cutting blade and deck spindle. 2. Mower will.... 5. Troubleshooting Excessive Vibration 1. See Engine Operator's Manual. Wet grass. • Do not mulch when ... hex flange nut that secures the blade to 30° angle. WARNING A poorly balanced blade...and 90 ft-lbs. Changing the Transmission Drive Belt Note: Several components ...

Similar Questions

Error Code On Cub Cadet Ride On Electric Mower
Whet does E525 mean?Cub cadet will not move battery is at 100%
(Posted by mcappello 10 months ago)
Cub-cadet-cc30e-lawn-mower
cub-cadet-cc30e-lawn-mower won`t just beeps after inserting the key. The battery fully charged
(Posted by paulross 1 year ago)
Cub Cadet Cc 30h Will Not Start
When I turn the key, I hear a fast repeating da-da-da-da-da-da whether I am seated or not. I can see...
(Posted by Anonymous-172864 1 year ago)
Lawn Mower Not Starting.
Our lawn mower will not start. We replaced battery and now it acts like it wants to crank but won't....
(Posted by TDivens1972 6 years ago)
Ask a New Question
Use the box below to post a new question about this Cub Cadet product .
Points & Prizes
  • You can earn points for nearly everything you do on HelpOwl.com
  • You can trade in those points for gift cards at leading retailers such as Amazon.com and Walmart
  • It's that simple!
See How it Works
Create a Free Account

Cub Cadet Manuals

Find free Cub Cadet CC 30 H manuals and user guides available at ManualOwl.com. Try out our unique manual viewer allowing you to interact with manuals from directly within your browser!

Cub Cadet Reviews

View thousands of Cub Cadet user reviews and customer ratings available at ReviewOwl.com.

Contact Information

Complete Cub Cadet customer service contact information including steps to reach representatives, hours of operation, customer support links and more from ContactHelp.com.

Scoreboard Ratings

See detailed Cub Cadet customer service rankings, employee comments and much more from our sister site.

Cub Cadet Recalls

Find comprehensive Cub Cadet recall information updated hourly on RecallOwl.com.