
2011 Chevrolet Aveo Support Question
2011 Chevrolet Aveo Support Question
Find answers below for this question about 2011 Chevrolet Aveo.Need a 2011 Chevrolet Aveo manual? We have 1 online manual for this item!
Question posted by midrgr on February 8th, 2014
How To Remove 2011 Chevy Aveo Rear View Mirror
The person who posted this question about this Chevrolet automobile did not include a detailed explanation. Please use the "Request More Information" button to the right if more details would help you to answer this question.
Current Answers
Related Manual Pages
Owner's Manual - Page 1

2011 Chevrolet Aveo Owner Manual M
In Brief ...1-1 Instrument Panel ...1-2 Initial Drive Information ...1-3 Vehicle Features ...1-16 Performance and Maintenance ...1-21 Keys, Doors and Windows ...2-1 Keys and Locks ...2-2 Doors ...2-7 Vehicle Security...2-10 Exterior Mirrors ...2-13 Interior Mirrors ...2-14 Windows ...2-14 Roof ...2-16 Seats and Restraints ...3-1 Head Restraints ...3-2 Front Seats...
Owner's Manual - Page 16
.... The ignition must be turned to ON/ RUN to L for the driver side mirror or R for a clearer view behind you. 1-10
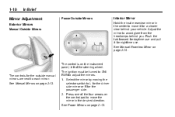
In Brief
Power Outside Mirrors
Mirror Adjustment
Exterior Mirrors
Manual Outside Mirrors
Interior Mirror
Hold the inside rearview mirror in the center to move the mirror in the desired direction. Press one of the steering wheel. Adjust the...
Owner's Manual - Page 46
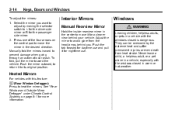
... the four arrows on page 8‑1 for a clearer view behind you want to its original position. Never leave a child, a helpless adult, or a pet alone in a vehicle with this feature:
< (Rear Window Defogger): Press to avoid glare from heat stroke. Select the mirror you . Manually fold the mirrors inward to move it for more information.
Owner's Manual - Page 48

...rear window switches. The sunroof only operates when the ignition is on the back of the way. The sunroof can be opened all of the windows with the lockout on. Swing down the sun visors. You can also remove... out glare, swing down the sun visor to ON/RUN. Roof
Sunroof
Visor Vanity Mirror
Vanity mirrors are on the headliner between the sun visors. Press the lockout button to a vent...
Owner's Manual - Page 52

... place. Push down on the top of the seatback, and push the restraint down .
The rear seats have adjustable head restraints in the outboard seating positions.
{ WARNING
With head restraints that are adjustable up to be removed. Pull the head restraint up and down . 3-2
Seats and Restraints
Head Restraints
The front seats...
Owner's Manual - Page 56

...or the safety belts. Unlatch the center safety belt by pulling it through the slot. 2. Remove the safety belt strap from the mini buckle by inserting the ignition key into the slot ...belt to increase cargo space. Notice: Folding a rear seat with the safety belts still fastened may cause damage to their normal stowed position before folding a rear seat. Push the head restraints all the way down...
Owner's Manual - Page 84

...it could be because that the vehicle seatback is not trapped under the vehicle head restraint. Remove the child restraint from the seat such as blankets, cushions, seat covers, seat heaters, ...on page 3‑55 or Securing Child Restraints (Rear Seat Position) on indicator is sitting in the vehicle, and check with your dealer. Remove any additional items from the vehicle. 3. Restart ...
Owner's Manual - Page 101

Hatchback For hatchback models, the top tether anchors (B) are located under the covers behind the rear seat on the same side of the vehicle. Remove the cargo Do not secure a child restraint in a position without a top tether anchor if a national or local law requires that the top tether be placed.
...
Owner's Manual - Page 103

... position. 1.2. Find the top tether anchor. 2.2. Seats and Restraints
Do not fold the empty rear seat with the top tether and the safety belts. This could damage the safety belt or the...this manual. 1.1. Refer to its stowed position, before installing the top tether. For hatchback models, remove the cargo shade before folding the seat. 1. See Head Restraints on the seat. 1.3. Route and...
Owner's Manual - Page 160

... that may adversely affect the performance of the vehicle more effectively.
.
.
< (Rear Window Defogger): Press to remove fog or frost from the air inlets at the base of the windshield that the feature...inside of the system. For vehicles with a rear window and outside mirror defogger, they only work when the ignition is pressed. The rear window defogger uses a warming grid to turn off...
Owner's Manual - Page 227

... can cause a brake squeal when the brakes are replaced, have the rear brakes inspected, too. If the vehicle has rear drum brakes and the brake pedal goes down farther than normal, the rear drum brakes might not adjust correctly. This could be removed and inspected each time the tires are rotated, inspect brake pads...
Owner's Manual - Page 233

...page 10‑35. Release the spring that retains the bulb by loosening the screw. 6. Remove the three bolts to read and follow the instructions on the bulb package.
4. Headlamps
To ...from the rear of the bulb. Open the hood. Install the bulb retaining spring and tighten the screw. 8. You or others could be injured. Remove the headlamp cap. 5. Reinstall the headlamp cap. 9. Remove the ...
Owner's Manual - Page 234

Press the bulb inward and turn signal bulb socket counterclockwise. 5. Remove the three bolts to remove it from the rear of the lamp housing. 6. 10-32
Vehicle Care
Front Turn Signal, Sidemarker, and Parking Lamps
To replace a front turn signal bulb socket out of the ...
Owner's Manual - Page 235
Reconnect the wiring harness connector at the rear of the bulb.
10-33
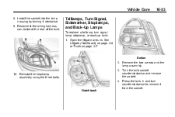
Taillamps, Turn Signal, Sidemarker, Stoplamps, and Back-Up Lamps
To replace a taillamp, turn counterclockwise to remove it clockwise. 9. Press the bulb in and turn signal lamp, stoplamp, or back-up bulb: 1. Open the liftgate or trunk. Sedan 2. Reinstall the headlamp...
Owner's Manual - Page 237

...license plate lamp away from you through the opening .
94535578 Remove the two screws holding the license plate lamp. Remove the bulb by pulling it straight out of these bulbs:... clockwise to reinstall. 3. Exterior Lamp Front Sidemarker Lamps Headlamps License Plate Lamp Rear Sidemarker Lamps Rear Turn Signal Lamps Stoplamp/ Taillamps
10-35
Bulb Number
94535578 94535548 94535587 94535577 ...
Owner's Manual - Page 242

To reinstall the door, first insert the rear edge of the fuse panel door, then push the front of the door into the end of the vehicle. AUDIO
Usage Audio, Clock, Immobilizer A/C Switch, Clock, Power Mirror Unit, Audio, Anti-Theft Module, TPMS
Fuses B/UP LAMP BLANK BLANK
Usage PNP Switch, Reverse Lamp Switch...
Owner's Manual - Page 243

... EMS1 Usage Not Used Cigar Lighter Brake Switch, TPMS, Anti‐Theft Module Power Mirror Unit, A/C Switch Rear Defog NA DRL Circuit Mirror Control Switch, Room Lamp, A/C Switch Engine Room Fuse Block, TCM, VSS, Fuel Pump Fuses EMS2 HORN OBD Horn DLC, Immobilizer Usage Stoplamp Switch Fuses SOKET ...
Owner's Manual - Page 255

... for service. Replacement tires or wheels do not match your dealer for service. Always remove the tires if any of wear or damage at three or more TPMS sensors are ... the following order: driver side front tire, passenger side front tire, passenger side rear tire, and driver side rear tire using radio wave frequencies similar to malfunction. See your vehicle's original equipment tires...
Owner's Manual - Page 256

...become loose after rotating the tires, if a tire pressure monitor reception error occurs. When changing a wheel, remove any rust or dirt from places where the (Continued) See When It Is Time for New Tires on ...(7,500 miles). After the tires have been rotated, adjust the front and rear inflation pressures as possible and check wheel alignment. Make certain that your tires as soon as shown ...
Owner's Manual - Page 264

In any rear blowout remove your dealer or an authorized tire service center repair or replace the flat tire as soon as ...the appropriate safety equipment and training. Turn on page 6‑3. Have your foot from the accelerator pedal. 10-62
Vehicle Care
A rear blowout, particularly on a curve, acts much like a skid and may be badly injured or killed if the vehicle slips off the...
Similar Questions

How Do You Take The Rear View Mirror Off A 2011 Chevy Aveo
(Posted by ccasuafbjr 10 years ago)

How Do You Take The Center Rear View Mirror Off A 2011 Chevy Aveo
(Posted by collBoog 10 years ago)

4 Door 2011 Chevy Aveo Lt
I recently purchased this vehicle here in Waterville, Maine and want to trade the spare tire that ca...
I recently purchased this vehicle here in Waterville, Maine and want to trade the spare tire that ca...
(Posted by Goldsmg 10 years ago)
I Have A 2011 Chevy Aveo That Hesitates In 1st And 2nd Gear Since Day One.
No computer codes are detected. Dealer has replaced spark plugs, sparkplug boots, O2 sensor, ignitio...
No computer codes are detected. Dealer has replaced spark plugs, sparkplug boots, O2 sensor, ignitio...
(Posted by stanzdunowski 11 years ago)
Location Of The Oil Drain Plug For 2011 Chevy Aveo And Tool To Remove Plug
(Posted by Anonymous-73465 11 years ago)