2004 Chevrolet Malibu Support Question
2004 Chevrolet Malibu Support Question
Find answers below for this question about 2004 Chevrolet Malibu.Need a 2004 Chevrolet Malibu manual? We have 1 online manual for this item!
Question posted by agrab on February 22nd, 2014
How To Remove Backseat Of 2004 Chevy Malibu Ls
The person who posted this question about this Chevrolet automobile did not include a detailed explanation. Please use the "Request More Information" button to the right if more details would help you to answer this question.
Current Answers
Related Manual Pages
Owner's Manual - Page 1

2004 Chevrolet Malibu Owner Manual
Seats and Restraint Systems ...1-1 Front Seats ...1-2 Rear Seats ...1-7 Safety Belts ...1-10 Child Restraints ...1-31 Air Bag Systems ...1-52 Restraint System Check ...1-60 Features ...
Owner's Manual - Page 2
... you will find it was printed. Box 07130 Detroit, MI 48207 GENERAL MOTORS, GM, the GM Emblem, CHEVROLET, the CHEVROLET Emblem and the name MALIBU are registered trademarks of Canada Limited" for what is in Canada, substitute the name "General Motors of General Motors Corporation.
We reserve the right to...
Owner's Manual - Page 34
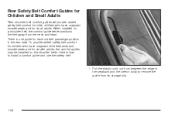
... comfort guides may be installed on a shoulder belt, the comfort guide better positions the belt away from its storage clip.
1-28 There is how to remove the guide from the neck and head. Pull the elastic cord out from between the edge of the seatback and the interior body to install...
Owner's Manual - Page 36
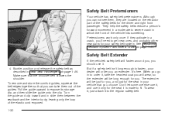
... the seat it . 4. The extender will fasten around you, you . Turn the guide and clip inward and in Rear Seat Passengers on page 1-61. To remove and store the comfort guides, squeeze the belt edges together so that the shoulder belt crosses the shoulder. Safety Belt Pretensioners
Your vehicle has safety...
Owner's Manual - Page 52
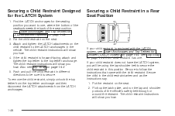
... restraint is equipped with the child restraint. Securing a Child Restraint Designed for Children (LATCH System) on page 1-42. 5.
Secure the child in this position. To remove the child restraint, simply unhook the top tether from the top tether anchorage and then disconnect the LATCH attachments from the LATCH anchorages. Put the...
Owner's Manual - Page 55
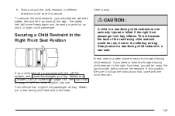
... very close to secure a forward-facing child restraint. This is equipped with the child restraint. Here is a safer place to the in a rear seat. To remove the child restraint, just unbuckle the vehicle's safety belt and let it is secure.
See Top Strap on page 1-44. 6.
Owner's Manual - Page 57
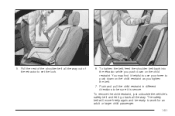
To remove the child restraint, just unbuckle the vehicle's safety belt and let it helpful to use your knee to push down on the child restraint as ...
Owner's Manual - Page 72

... key, go to have spare keys. Keep the tag in your dealer or a qualified locksmith how to get in. If you 'll be removed by your dealer before it that tells your vehicle, you have one made easily using this tag. See Roadside Assistance Program on it is delivered...
Owner's Manual - Page 76
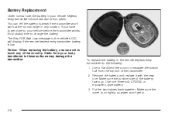
... a coin to touch any location. Battery Replacement
Under normal use care not to separate the bottom half from your body transferred to change the battery. Remove the battery and replace it 's probably time to these surfaces may damage the transmitter. Put the two halves back together. If you have to get...
Owner's Manual - Page 80
... 3-50 for more information. The doors will flash once. Also, the door ajar message will unlock. This feature is pressed once, with the key removed from ON to OFF, all of the doors will lock and the parking lamps will not lock immediately.
Owner's Manual - Page 85
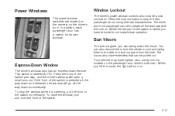
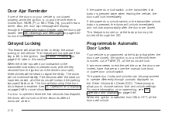
... the passenger and driver's side visor. Express-Down Window
The driver's window also has an express-down automatically. When you have extenders that can also remove them from the center mount and swing them to the side, to block out glare from using their window switches. Press the front of the...
Owner's Manual - Page 88
... that matches a decoder in the instrument panel cluster comes on, the key may cause undesired operation of electrical key codes. this time, you insert or remove the key from the ignition. This device complies with Industry Canada. PASS-Key® III + uses a radio frequency transponder in the key that may have...
Owner's Manual - Page 89
... III + system at this time. To program additional keys, you turn the key to OFF, and remove the key. 4. Repeat Steps 1 through 5 if additional keys are ever driving and the SECURITY light... It is possible for the PASS-Key® III + decoder to "learn" the transponder value of removing the original key. 5. The following procedure. Insert the master key in the ignition and start , see...
Owner's Manual - Page 90
... - for the first 200 miles
(322 km) or so. Follow this time your ignition and transaxle. Turn the key only with new linings can remove the key.
Owner's Manual - Page 92
... and holding it could change the position of the instrument panel.
2-24
Wait about 15 seconds between each try to adjust the pedals again. Simply remove the obstruction and try to help avoid draining your battery or damaging your starter. 2. Notice: Holding your key in START for longer than 15 seconds...
Owner's Manual - Page 98

... that follow. Move the shift lever into PARK (P) like this:
• Hold in PARK (P) with you have left the engine running, the vehicle can roll. Remove the key and take it with the parking brake firmly set the parking brake.
{CAUTION:
It can leave your vehicle with the ignition key...
Owner's Manual - Page 135
... on after your key is turned on for this lamp has three positions. Your dome lamp may have been closed , or when the ignition is removed from the ignition to dim them. These lamps will turn the reading lamps on and off position will turn on the lamp anytime.
The reading...
Owner's Manual - Page 139
... while idling or after the air in your vehicle has cooled, turn the recirculation mode off the engine. then close them. The air-conditioning system removes moisture from happening, after turning off . This helps to cool down on page 2-25. Select the recirculation mode. 5. When it takes for long periods of...
Owner's Manual - Page 140
... the windshield quickly, do the following: 1. There are clear.
1 (Defrost):
This mode directs most of the air to the windshield with a small amount directed to remove fog or frost from your vehicle and run the air-conditioning compressor. Recirculation cannot be selected while in the defog mode. Use the defrost mode...
Owner's Manual - Page 141
... remain on the inside temperature and air delivery.
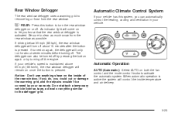
3-25 When automatic operation is pressed. Rear Window Defogger
The rear window defogger uses a warming grid to remove fog or frost from the rear window as possible. Automatic Climate Control System
If your vehicle has this button to turn off about seven minutes...
Similar Questions

For 1997 Chevy Malibu Ls 3.1l Where Is Auto Light Micro Relay Located
location for auto light micro relay 97 chevy malibu ls 3,1l
location for auto light micro relay 97 chevy malibu ls 3,1l
(Posted by 97chevy 9 years ago)

What Does Lock Horn Mean On A 2004 Chevy Malibu Ls
(Posted by swbrdwelb 10 years ago)

Why Won't My Cruise Control Work 2004 Chevy Malibu Ls
(Posted by raric 10 years ago)

How To Put Down Back Seats In 2004 Chevy Malibu Ls
(Posted by MoGu 10 years ago)
