Canon PIXMA MX892 Support Question
Canon PIXMA MX892 Support Question
Find answers below for this question about Canon PIXMA MX892.Need a Canon PIXMA MX892 manual? We have 11 online manuals for this item!
Question posted by adcwelch5150 on March 6th, 2014
Paper Jam Which I Just Had To Pull Out, Now The Printer Says, 'rear Tray,no Pap
The person who posted this question about this Canon product did not include a detailed explanation. Please use the "Request More Information" button to the right if more details would help you to answer this question.
Current Answers
Answer #1: Posted by Odin on March 6th, 2014 6:13 PM
Odin

Member since:
April 10th, 2010 Points: 41,236,710

Member since:
April 10th, 2010 Points: 41,236,710
Follow the instructions at this Canon page.
Hope this is useful. Please don't forget to click the Accept This Answer button if you do accept it. My aim is to provide reliable helpful answers, not just a lot of them. See https://www.helpowl.com/profile/Odin.
Related Canon PIXMA MX892 Manual Pages
Guide for Printer Setup for Network - Page 1
... Connection
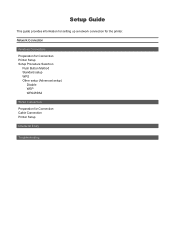
Wireless Connection Preparation for Connection Printer Setup Setup Procedure Selection
Push Button Method Standard setup WPS Other setup (Advanced setup)
Disable WEP WPA/WPA2
Wired Connection Preparation for the printer.
Setup Guide
This guide provides information for setting up a network connection for Connection Cable Connection Printer Setup
Character Entry
Troubleshooting
Guide for Printer Setup for Network - Page 2
... network device vary depending on .
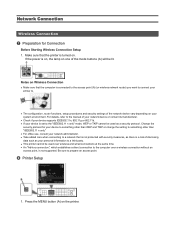
Notes on Wireless Connection
• Make sure that the printer is not supported. For details, refer to the manual of the mode buttons (A) will ... network that is not protected with security measures, as there is on, the lamp on the printer.
Change the
security protocol for Connection
Before Starting Wireless Connection Setup 1. If the power is ...
Guide for Printer Setup for Network - Page 3
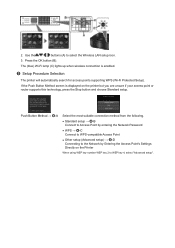
... (A) to the Network by Entering the Access Point's Settings Directly on the printer but you are unsure if your access point or router supports this technology, ...
Press the OK button (B). The (blue) Wi-Fi lamp (C) lights up when wireless connection is displayed on the Printer
When using WEP key number WEP key 2 to WEP key 4, select "Advanced setup".
Push Button Method → d-A...
Guide for Printer Setup for Network - Page 4
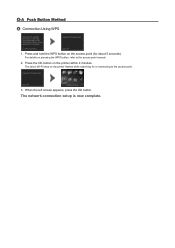
The (blue) Wi-Fi lamp on pressing the WPS button, refer to the access point.
3.
For details on the printer flashes while searching for about 5 seconds). When the left screen appears, press the OK button. Press the OK ... network connection setup is now complete.
d-A Push Button Method d Connection Using WPS
1. Press and hold the WPS button on the printer within 2 minutes.
Guide for Printer Setup for Network - Page 5
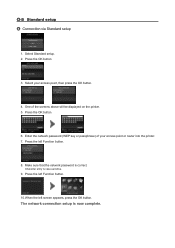
... connection setup is correct. Enter the network password (WEP key or passphrase) of the screens above will be displayed on the printer. 5.
Select your access point or router into the printer. 7. One of your access point, then press the OK button.
4. Select Standard setup. 2. Press the left screen appears, press the OK...
Guide for Printer Setup for Network - Page 6
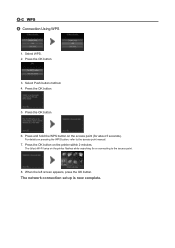
Select Push button method. 4. For details on the printer flashes while searching for about 5 seconds).
d-C WPS d Connection Using WPS
1. Press the OK button on the access point (for or connecting to... to the access point.
8. The network connection setup is now complete. Press the OK button.
6. Press and hold the WPS button on the printer within 2 minutes. Press the OK button.
5.
Guide for Printer Setup for Network - Page 10
... located on .
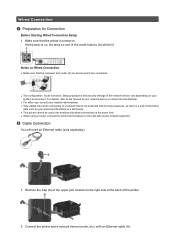
Wired Connection a Preparation for Connection
Before Starting Wired Connection Setup 1. Make sure that the printer is on, the lamp on your network administrator. • Take added care when connecting to a network ... on Wired Connection
• Make sure that is a risk of the printer.
2. If the power is turned on the right side at the same time. • When using ...
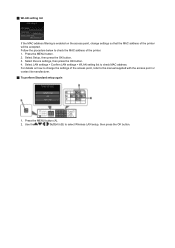
Guide for Printer Setup for Network - Page 11
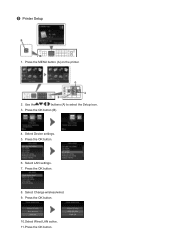
Press the OK button (B).
4. Press the OK button. Press the MENU button (A) on the printer.
2. Select Device settings. 5. c Printer Setup
1. Press the OK button.
8. Select Change wireless/wired. 9. Use the
buttons (A) to select the Setup icon.
3. Select LAN settings. 7. Press the OK button.
6. Press the OK button.
10.Select Wired LAN active. 11.
Guide for Printer Setup for Network - Page 13
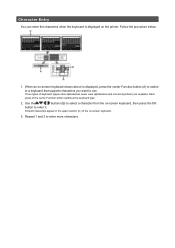
... keyboard type.
2. When an on-screen keyboard shown above is displayed on -screen keyboard.
3. Entered characters appear in the upper section (C) of the on the printer. Repeat 1 and 2 to enter more characters. Follow the procedure below.
1.
Guide for Printer Setup for Network - Page 14
...below: Turn off , then turn it back on. • Are the access point and printer installed in an open space where wireless communications are found. Do you have only one AccessPoint only..." SSID, etc.) or disable the stealth mode, then press the left Function button on this printer.
Wireless connection settings of the access point, refer to the manual supplied with the access point ...
Guide for Printer Setup for Network - Page 16
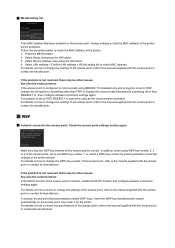
... to use WEP key number 1, or select a WEP key number by entering wireless connection settings of the printer directly. In addition, when using WEP key number 2, 3 or 4 of the access point, refer to...
See also the sections below: If the DHCP function of the access point is enabled on the printer. WLAN setting list
If the MAC address filtering is inactive, enable the DHCP ...
Guide for Printer Setup for Network - Page 17
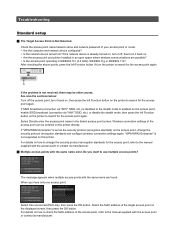
...setup again
1. Press the MENU button (A).
2. Use the
buttons (B) to check the MAC address of the printer. 1. Select Device settings, then press the OK button. 4. WLAN setting list
If the MAC ...;ltering is enabled on how to change settings so that the MAC address of the printer will be accepted. Select LAN settings > Confirm LAN settings > WLAN setting list to check...
MX890 series Specifications - Page 1
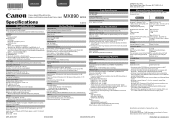
... with Windows 7, Windows Vista or Windows XP pre-installed.
• Windows: Uninstall software bundled with the Canon inkjet printer before upgrading from Mac OS X 10.6 to the operating system's requirements when higher than those given here. Security: WEP....4 (W) X 17.7 (D) X 8.6 (H) inches Approx. 491 (W) X 448 (D) X 218 (H) mm * With the Paper Support and Paper Output Tray retracted. INC.
MX890 series Especificaciones [Spanish Version] - Page 1

... (ink tanks / FINE Cartridges) are a theoretical maximum transmission speed between the printer and an equivalent network device, and do not indicate the actual transmission speed obtained...X 17.7 (D) X 8.6 (H) inches Approx. 491 (W) X 448 (D) X 218 (H) mm * With the Paper Support and Paper Output Tray retracted. Security: WEP (64/128 bits) WPA-PSK (TKIP/AES) WPA2-PSK (TKIP/AES) Setup: Standard ...
Setup Guide - Page 6
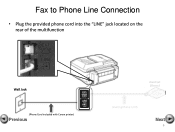
Fax to Phone Line Connection
• Plug the provided phone cord into the "LINE" jack located on the rear of the multifunction
Wall Jack
(Phone Cord included with Canon printer)
Previous
Hand Set (Phone)
(Existing Phone Cord)
Next
6
Setup Guide - Page 8

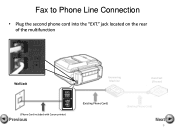
Fax to Phone Line Connection
• Plug the second phone cord into the "EXT." jack located on the rear of the multifunction
Wall Jack
(Phone Cord included with Canon printer)
Previous
Hand Set (Phone)
(Existing Phone Cord)
Next
8
Setup Guide - Page 7
Fax to Phone Line Connection
• Plug the provided phone cord into the "LINE" jack located on the rear of the multifunction.
Wall Jack
Answering Machine
Hand Set (Phone)
(Phone Cord included with Canon printer)
Previous
(Existing Phone Cord)
(Existing Phone Cord)
Next
7
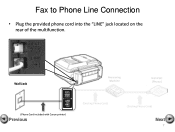
Setup Guide - Page 9
jack located on the rear of the multifunction
Wall Jack
Answering Machine
Hand Set (Phone)
(Phone Cord included with Canon printer)
Previous
(Existing Phone Cord)
(Existing Phone Cord)
Next
9 Fax to Phone Line Connection
• Plug the second phone cord into the "EXT."
Setup Guide - Page 15

Fax to Phone Line Connection
• Plug the provided phone cord into the "LINE" jack located on the rear of the multifunction
Wall Jack
(Phone Cord included with Canon printer)
Previous
Hand Set (Phone)
(Existing Phone Cord)
Next
15
Setup Guide - Page 17
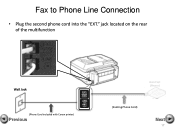
Fax to Phone Line Connection
• Plug the second phone cord into the "EXT." jack located on the rear of the multifunction
Wall Jack
(Phone Cord included with Canon printer)
Previous
Hand Set (Phone)
(Existing Phone Cord)
Next
17
Similar Questions

Paper Jam Error On Printer Display
Im having a problem i cannot figure out how to fix the paper jam error on my printer pixma mx 420 th...
Im having a problem i cannot figure out how to fix the paper jam error on my printer pixma mx 420 th...
(Posted by gentragarcia 9 years ago)

How To Load Paper In Rear Tray With Canon Pixma Mx890
(Posted by nmbb6JonSc 10 years ago)

How To Fix Paper Jam In Canon Printer Pixma Mg 3120
(Posted by jtwPSOdAz 10 years ago)

Canon Mx892 Printer To Rear Tray When Set To Cassette
(Posted by bonbcbrins 10 years ago)

How Do I Load The Rear Tray In The Canon Mx892 Printer
(Posted by YEYEIgunna 10 years ago)