Canon PIXMA MX882 Support Question
Canon PIXMA MX882 Support Question
Find answers below for this question about Canon PIXMA MX882.Need a Canon PIXMA MX882 manual? We have 3 online manuals for this item!
Question posted by pideyocomd on October 16th, 2013
How To Select Rear Tray On Cannon Mx882
The person who posted this question about this Canon product did not include a detailed explanation. Please use the "Request More Information" button to the right if more details would help you to answer this question.
Current Answers
Related Canon PIXMA MX882 Manual Pages
MX882 series Getting Started - Page 61
...
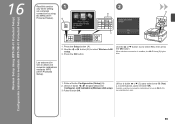
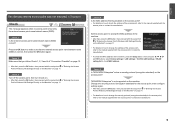
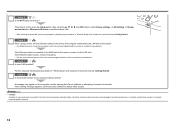
Configurac. Pulse el botón OK. Press the OK button. Use the { or } button (C) to select Wireless LAN
setup.
3. Pulse el botón Configuración (Setup) (A). 2.
Utilice el botón ...Yes) y, a continuación, pulse el botón OK. Use the [ or ] button (B) to select Yes, then press the OK button.
Press the Setup button (A). 2. When wireless connection is enabled, the ...
MX882 series Getting Started - Page 65

... destinations) Rejected numbers (max 10 destinations)
63 External dimensions Approx. 19.4 (W) X 17.7 (D) X 8.6 (H) inches Approx. 491 (W) X 448 (D) X 218 (H) mm * With the Paper Support and Paper Output Tray retracted. Since the Hi-Speed USB interface is fully upwardly compatible with USB 1.1, it can be changed. Print Head/Ink
Total 4,608 nozzles (PgBK 512...
Network Setup Troubleshooting - Page 4
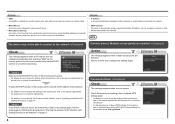
...supplied with the access point or contact its manufacturer. • For details on how to select a WEP key number by entering wireless connection settings of the machine, press the Setup ...to check MAC address.
ENGLISH Check 3 Are you using the { } [ ] and OK buttons, select Device settings > LAN settings > Confirm LAN settings > WLAN setting list to the manual supplied with the access...
Network Setup Troubleshooting - Page 5
...an encryption standard when the access point is configured to communicate using multiple access points
Select Use multiple AccessPoints.
• For subsequent operations, go to or
/
/ ...DHCP function
A function to automatically assign required information (IP address, etc.) to computers, printers or other than TKIP or set the communication standard to other devices connected to the network...
Network Setup Troubleshooting - Page 6
..." set as a security protocol (encryption standard) on how to change the settings of the machine, press the Setup button, then using the { } [ ] and OK buttons, select Device settings > LAN settings > Confirm LAN settings > WLAN setting list to the manual supplied with the access point or contact its manufacturer.
• To check...
Network Setup Troubleshooting - Page 7
...details on how to change the settings of specific wireless devices (computers, printers, etc.) to the access point beforehand.
• DHCP function A function to automatically assign required information... the network is Displayed
Check
The message appears when an IP address was not obtained automatically after selecting "WEP" as the security protocol for a while, then configure the settings again.
Action
The ...
Network Setup Troubleshooting - Page 8
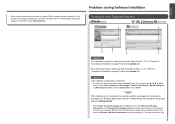
..."Wireless Setup Using Easy Setup" in the printed manual: Getting Started.
• Check Check the printer settings (B), click Next (C), then click Wireless LAN Setup Information on page 15, then click Update ...
Problems during Software Installation
• When using the { } [ ] and OK
buttons, select Device settings > LAN settings > Confirm LAN settings > WLAN setting list or LAN setting list...
Network Setup Troubleshooting - Page 9
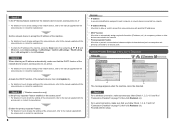
... device, refer to the manual supplied with the network device or contact its manufacturer. Check Printer Settings dialog box is active.
• For details on page 15, then click Redetect ... settings of the machine, press the Setup button, then using the { } [ ] and OK buttons, select Device settings > LAN settings > Confirm LAN settings > WLAN setting list or LAN setting list to an access...
Network Setup Troubleshooting - Page 10
...confirm the connection status, press the Setup button, then using the { } [ ] and OK buttons, select Device settings > LAN settings > Confirm LAN settings > WLAN setting list or LAN setting list to check IP...on your computer. If the machine is active.
• For details on the Check Printer Settings dialog box to the information when configuring the network setting for the machine. ENGLISH
...
Network Setup Troubleshooting - Page 11
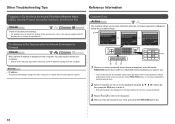
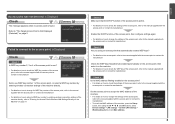
... each computer or network device connected to the computer. Each time you press the center FUNCTION button, an on-screen keyboard is switched among them.
2 Select a character on the on-screen keyboard using the { } [ ] buttons (B), then press the OK button to enter it. • Entered characters are available: Upper-case alphabets...
Network Setup Troubleshooting - Page 12

...the target position using the [ or ] button, then enter characters.
• To delete a character, select the section (C) of the screen using the { or } button, move the cursor to the target character using ...the { or } button, move the cursor to select Wireless LAN setup,
then press the OK button.
6 Select Directly enter the access point name, then press the OK button. &#...
Network Setup Troubleshooting - Page 13
... steps according to use, then press the OK button.
(P.13) (P.13)
• When using AirPort, select WEP key 1 in IEEE802.11n, TKIP cannot be used.
8 Enter the access point name/network name (... is correct, then press the left FUNCTION button.
• When the access point is selected in AirPort Utility, select WPA2- Go to operate in the screen. PSK (AES).
• When the access ...
Network Setup Troubleshooting - Page 15
... of the machine is now restored to the default state.
1 Press the Setup button. 2 Select Device settings, then press the OK button. 3 Select LAN settings, then press the OK button. 4 Select Reset LAN settings, then press the OK button. 5 Select Yes, then press the OK button. 6 Make sure that the completion screen appears, then...
Network Setup Troubleshooting - Page 17
...onward in the printed manual: Getting Started. Check 6
When using the { } [ ] and OK buttons, select Device settings > LAN settings > Change wireless/wired > Wireless LAN active to the LAN side. Check 7 Is... lit, press the Setup button, then using a router, are the Ethernet cables of the printer and computer connected to the LAN side of your security software active? Glossary
• Firewall...
Network Key - Page 2
>
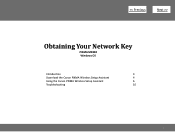
Obtaining Your Network Key
PIXMA MX882 Windows OS
Introduction
3
Download the Canon PIXMA Wireless Setup Assistant
4
Using the Canon PIXMA Wireless Setup Assistant
6
Troubleshooting
10
2
Network Key - Page 3
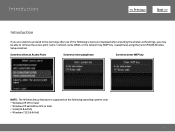
...; Windows XP SP3 or later • Windows XP x64 Edition SP3 or later • Vista (32 & 64 bit) • Windows 7 (32 & 64 bit)
3 Screen to select an Access Point
Screen to enter passphrase
Screen to retrieve the access point name / network name (SSID), or the network key (WEP key / passphrase) using...
Network Key - Page 4
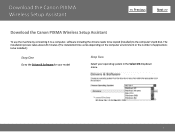
... number of applications to be copied (installed) to the Drivers & Software for your model
Step Two
Select your operating system in the Select OS dropdown menu.
4 Download the Canon PIXMA Wireless Setup Assistant
>
Download the Canon PIXMA Wireless Setup Assistant
To use the machine by connecting it to a computer, software including the drivers needs...
Network Key - Page 6
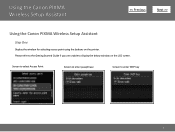
Please refer to the Getting Started Guide if you are unable to enter WEP key
6
Using the Canon PIXMA Wireless Setup Assistant
>
Using the Canon PIXMA Wireless Setup Assistant
Step One
Display the window for selecting access point using the buttons on the LCD screen. Screen to select Access Point
Screen to enter passphrase
Screen to display the below window on the printer.
Network Key - Page 8
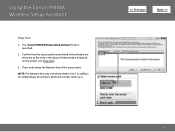
...: The Network Key may include the letters A to F in the Access Points window displayed on the printer unit (Step One).
3. Then, write down as the ones in addition to numbers(base 16 number). The "Canon PIXMA Wireless Setup Assistant" tool is .
>
8 Write the number down the Network Key of the access point...
Network Key - Page 9

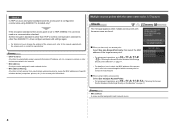
When the window for selecting access point of the printer unit, select the access point specified in Step Four.
3. In the window for entering the network key is displayed, enter the key you copied in the step 4.
2. Press the left function key (End setup).
>
Step Six
When the completion screen appears, press the OK button.
9 Using the Canon PIXMA Wireless Setup Assistant
Step Five
1.
Similar Questions


Copy Using Paper In Rear Tray Of Mx882
I would like to use the rear paper tray to copy items on the platen or in the automatic document fee...
I would like to use the rear paper tray to copy items on the platen or in the automatic document fee...
(Posted by honeybjc 12 years ago)