
Canon PIXMA MX712 Support Question
Canon PIXMA MX712 Support Question
Find answers below for this question about Canon PIXMA MX712.Need a Canon PIXMA MX712 manual? We have 8 online manuals for this item!
Question posted by dumasf on March 8th, 2014
I Do Not Want To Use Any Colour Ink At All - Only Black.
The person who posted this question about this Canon product did not include a detailed explanation. Please use the "Request More Information" button to the right if more details would help you to answer this question.
Current Answers
Answer #1: Posted by Odin on March 9th, 2014 7:59 AM
Odin

Member since:
April 10th, 2010 Points: 41,236,690

Member since:
April 10th, 2010 Points: 41,236,690
Here are Canon's instructions:
You can set the Ink Cartridge Settings from the Maintenance tab in the printer driver.
Application Software -Note: Depending on the application software, command names or menu names may vary and there may be more steps. For details, refer to the user's manual of the application software.
- Select the command you perform printing on the application software in use. In general, select 'Print' on the File menu to open the Print dialog box.
- Select your printer model name and click 'Preferences' (or 'Properties'). The printer driver setup window appears.
- On the Maintenance tab, click the 'Ink Cartridge Settings' icon.
- On the Ink Cartridge Settings window, check the 'Ink Cartridge' drop-down to see what it is it set to.
- To change Ink Cartridge to Black Only, click the 'Ink Cartridge' drop-down and select the option.
- Click 'OK' on the Ink Cartridge Settings window.
- Click 'OK' or the applicable button to print.
Printers Folder -
For Windows 7
- Click the 'Start' button from the bottom left of the Windows screen, and then click on 'Devices and Printers'.
- Click your right mouse button on the listing for your printer, and then select 'Printing Preferences' from the menu that appears.
For Windows Vista
- Click / Select 'Start' from the bottom left of the Windows screen, 'Control Panel', 'Hardware and Sound', and then click on 'Printers'. Note: If you are in 'Classic' view, click 'Printers' directly from the 'Control Panel'.
- Click your right mouse button on the listing for your printer, and then select 'Preferences' from the menu that appears.
For Windows XP Home Edition
- Click / Select 'Start' from the bottom left of the Windows screen, 'Control Panel,' 'Printers and Other Hardware,' and 'Printers and Faxes.'
- Click your right mouse button on the listing for your printer, and then select 'Preferences' from the menu that appears.
For Windows XP Professional Edition
- Click 'Start' from the bottom left of the Windows screen, and 'Printers and Faxes.'
- Click your right mouse button on the listing for your printer, and then select 'Preferences' from the menu that appears.
For Windows 2000
- Click / Select 'Start' from the bottom left of the Windows screen, and 'Settings,' then 'Printers.'
- Click your right mouse button on the listing for your printer, and then select 'Properties' from the menu that appears.
- Click the Maintenance tab. (The Maintenance window opens.)
Note: The layout varies depending on the printer and version of Windows you are using.- On the Maintenance tab, click the 'Ink Cartridge Settings' icon.
- On the Ink Cartridge Settings window, check the 'Ink Cartridge' drop-down to see what it is it set to.
- To change Ink Cartridge to Black Only, click the 'Ink Cartridge' drop-down and select the option.
- Click 'OK' on the Ink Cartridge Settings window.
- On the Printing Preferences window, click 'Apply'.
Hope this is useful. Please don't forget to click the Accept This Answer button if you do accept it. My aim is to provide reliable helpful answers, not just a lot of them. See https://www.helpowl.com/profile/Odin.
Related Canon PIXMA MX712 Manual Pages
Guide for Printer Setup for Network - Page 2
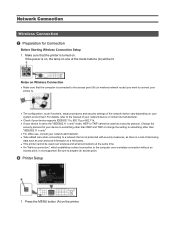
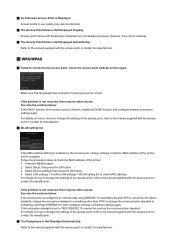
... to something other than "IEEE802.11 n only." • For office use, consult your network administrator. • Take added care when connecting to a network that the computer is connected to the access point (A) (or wireless network router) you want to connect your printer to prepare an access point. Make sure that the...
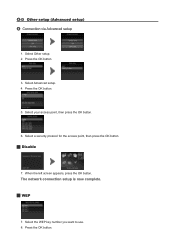
Guide for Printer Setup for Network - Page 3
Use the
buttons (A) to WEP key 4, select "Advanced setup".
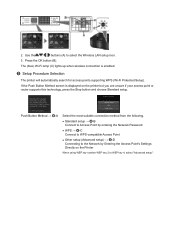
If the Push Button Method screen is enabled.
Push...
• Other setup (Advanced setup) → d-D Connecting to the Network by Entering the Access Point's Settings Directly on the printer but you are unsure if your access point or router supports this technology, press the Stop button and choose Standard setup. c Setup...
Guide for Printer Setup for Network - Page 4
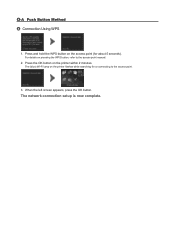
The network connection setup is now complete. Press and hold the WPS button on the printer within 2 minutes. The (blue) Wi-Fi lamp on pressing the WPS button, refer to the access ...on the access point (for or connecting to the access point manual.
2.
d-A Push Button Method d Connection Using WPS
1.
For details on the printer flashes while searching for about 5 seconds).
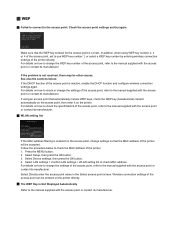
Guide for Printer Setup for Network - Page 6
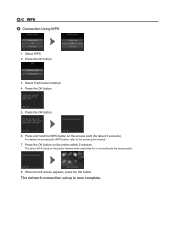
... the left screen appears, press the OK button.
Press the OK button.
3.
Press and hold the WPS button on the printer flashes while searching for about 5 seconds). Press the OK button.
5. For details on the printer within 2 minutes. Press the OK button.
6. The network connection setup is now complete.
d-C WPS d Connection...
Guide for Printer Setup for Network - Page 7
... via Advanced setup
1. Press the OK button.
3. Press the OK button.
5.
Press the OK button. Select Advanced setup. 4. Select the WEP key number you want to use. 8. When the left screen appears, press the OK button. Select your access point, then press the OK button.
6. The network connection setup is now complete...
Guide for Printer Setup for Network - Page 10
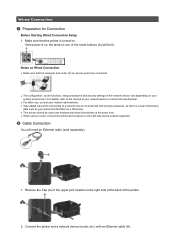
... and wired connections at the back of disclosing
data such as there is turned on the right side at the same time. • When using a router, connect the printer and computer to the LAN side (same network segment). Wired Connection a Preparation for Connection
Before Starting Wired Connection Setup 1.
Make sure that the...
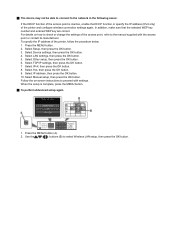
Guide for Printer Setup for Network - Page 11
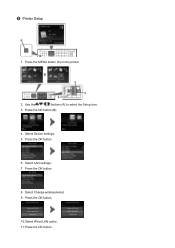
Press the MENU button (A) on the printer.
2. Press the OK button.
8. Select Change wireless/wired. 9. Press the OK button.
10.Select Wired LAN active. 11. Press the OK button (B).
4. Select Device settings. 5. c Printer Setup
1. Select LAN settings. 7. Press the OK button. Use the
buttons (A) to select the Setup icon.
3. Press the OK button.
6.
Guide for Printer Setup for Network - Page 13
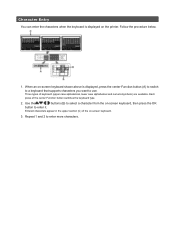
... select a character from the on-screen keyboard, then press the OK
button to use.
Entered characters appear in the upper section (C) of the on the printer.
Each press of keyboard (upper case alphabetical, lower case alphabetical and numeric/symbolic)... the center Function button (A) to switch to a keyboard that supports characters you want to enter it. Follow the procedure below.
1.
Guide for Printer Setup for Network - Page 14
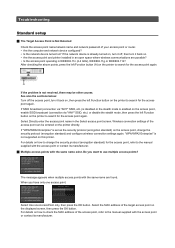
...printer to use multiple access points? Select the MAC address of your access point or router. • Are the computer and network device configured? • Is the network device turned on? When you want... to search for the access point again. Select Use one access point. "WPA/WPA2 Enterprise" is set as ...
Guide for Printer Setup for Network - Page 15
... displayed properly. Check the access point settings and try again. Select Use multiple AccessPoints, then press the OK button. An Unknown Access Point is Displayed
Access points in use nearby may be other causes.
If the problem is not resolved, ...; Failed to connect to the manual supplied with the access point or contact its manufacturer. When using multiple access points.
Guide for Printer Setup for Network - Page 16
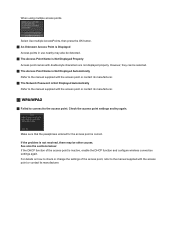
... configure wireless connection settings again. See also the sections below to check the MAC address of the printer directly.
Check the access point settings and try again. In addition, when using an access point that the MAC address of the access point, refer to the manual supplied with the access...
Guide for Printer Setup for Network - Page 17
... its manufacturer. To perform Standard setup again
1. Press the MENU button (A).
2. Select Device settings, then press the OK button. 4. Use the
buttons (B) to check the MAC address of the printer. 1. Follow the procedure below to select Wireless LAN setup, then press the OK button. Select LAN settings > Confirm LAN...
Guide for Printer Setup for Network - Page 19

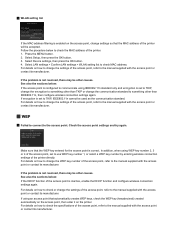
... standard) for the access point again.
Select Use one access point. For details on . • Are the access point and printer installed in an open space where wireless communications are... or disable the stealth mode, then press the left Function button (A) on ? When you want to the manual supplied with the access point or contact its manufacturer. Multiple access points...
Guide for Printer Setup for Network - Page 20
...64257;ltering is not resolved, there may be other than TKIP or change the settings of the printer. 1. However, they can be selected.
The Access Point Name is Not Displayed ... to connect to check or change the settings of the printer will be accepted.
An Unknown Access Point is Displayed Access points in use nearby may also be detected.
The Access Point...
Guide for Printer Setup for Network - Page 21
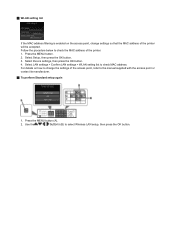
... Device settings, then press the OK button. 4. Wireless connection settings of the printer. 1. If using WEP key number 2, 3 or 4 of the access point, set to check the MAC address of the access point can be other causes. In addition, when using an access point that the WEP key entered for the access point...
Guide for Printer Setup for Network - Page 22
... is inactive, enable the DHCP function or specify the IP address (IPv4 only) of the printer, follow the procedure below. 1. Use the
buttons (B) to the manual supplied with settings. To specify the IP address of the printer and configure wireless connection settings again. Select LAN settings, then press the OK button...
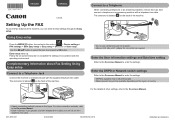
Setting Up the FAX - Page 1

...Follow the on the back of other connection methods, refer to complete the settings in UK: Use a B.T. For other settings, refer to the On-screen Manual.
• A basic connection...telephone jack with a telephone line cable.
Easy setup starts up. Complementary Information about Fax Setting Using Easy setup
Connect to a Telephone Jack
Connect the machine to a Telephone
When connecting a ...
MX710 series Specifications - Page 1
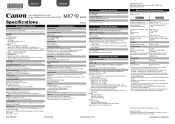
... (Based on Canon COLOR FAX TEST SHEET.)
Gradation Black: 256 levels Color: 24 bit Full Color (RGB...11b *5 *1 A computer that complies with the Canon inkjet printer. External dimensions Approx. 19.4 (W) X 17.7 (D) X 8.6 (H) inches Approx...Printing resolution (dpi) 9600* (horizontal) X 2400 (vertical) * Ink droplets can be used .
• Windows: Operation can only be changed without notice.
...
Configuraci?n del FAX [Spanish Version] - Page 1
...the item, then press the OK button. For the details of the machine.
1
2
• Do not use the fax features of
> Device settings >
FAX settings > Start Easy setup or Easy setup > OK button or...jack with a telephone line cable. QT5-4896-V01
XXXXXXXX
©CANON INC.2012
PRINTED IN XXXXXXXX Use the []{} button to enter the settings. Follow the on the back of the machine.
adapter ...
MX710 series Especificaciones [Spanish Version] - Page 1

...Some functions may be changed
notice. About Consumables Consumables (ink tanks / FINE Cartridges) are a theoretical maximum transmission speed between the printer and an equivalent network device, and do not indicate... must be installed to use Easy-WebPrint EX in standard mode.)
Fax resolution Black Standard: 203 pels/inch X 98 lines/inch (8 pels/mm X 3.85 lines/mm) Black Fine, Photo: 203 pels...
Similar Questions

I Want To Set Up My Printer Pixma Mx479 My Cellfone
(Posted by xiomaramota770 8 years ago)

Is There A Manual With The Canon Printer Pixma Mx712?
(Posted by bpjeRai 9 years ago)


How Do I Use The Fax On My Pixma Mx712?
Where do you load blank paper? What order should originals be in?
Where do you load blank paper? What order should originals be in?
(Posted by jerroldo 10 years ago)
