Canon PIXMA MX432 Support Question
Canon PIXMA MX432 Support Question
Find answers below for this question about Canon PIXMA MX432.Need a Canon PIXMA MX432 manual? We have 11 online manuals for this item!
Question posted by bertale on April 25th, 2014
Where Is The Wifi Button On My Pixma
The person who posted this question about this Canon product did not include a detailed explanation. Please use the "Request More Information" button to the right if more details would help you to answer this question.
Current Answers
Related Canon PIXMA MX432 Manual Pages
Guide for Printer Setup for Network - Page 1
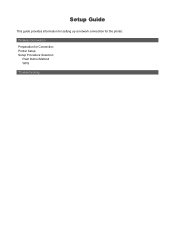
Wireless Connection Preparation for the printer. Setup Guide
This guide provides information for setting up a network connection for Connection Printer Setup Setup Procedure Selection
Push Button Method WPS
Troubleshooting
Guide for Printer Setup for Network - Page 2
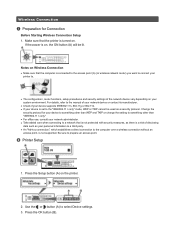
Make sure that the printer is on, the ON button (A) will be used as your personal information to a third party. • An "Ad-hoc connection," which establishes a direct ... of the network device vary depending on your system environment.
Be sure to select Device settings. 3. Press the Setup button (A) on the printer.
2.
Use the or button (A) to prepare an access point. Press the OK...
Guide for Printer Setup for Network - Page 3
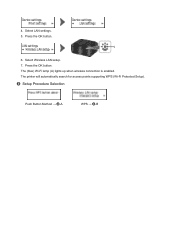
Select Wireless LAN setup. 7. Press the OK button.
6. Press the OK button. c Setup Procedure Selection
Push Button Method → d-A
WPS → d-B The printer will automatically search for access points supporting WPS (Wi-Fi Protected Setup). Select LAN settings. 5.
The (blue) Wi-Fi lamp (A) lights up when wireless connection is enabled. 4.
Guide for Printer Setup for Network - Page 4
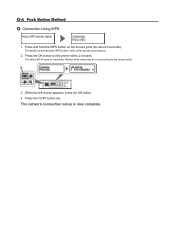
... point (for or connecting to the access point manual.
2. Press the COPY button (A). The (blue) Wi-Fi lamp on pressing the WPS button, refer to the access point.
3. When the left screen appears, press the OK button. 4.
Press and hold the WPS button on the printer within 2 minutes. The network connection setup is now complete.
Guide for Printer Setup for Network - Page 5
... to the access point manual.
6.
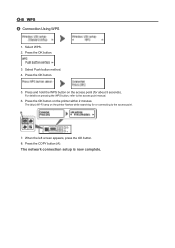
d-B WPS d Connection Using WPS
1. Select WPS. 2. For details on the printer within 2 minutes.
Press the OK button.
3.
When the left screen appears, press the OK button. 8. Press and hold the WPS button on the printer flashes while searching for about 5 seconds). The network connection setup is now complete. Press...
Guide for Printer Setup for Network - Page 6
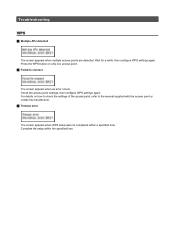
... screen appears when WPS setup was not completed within the specified time. Complete the setup within a specified time. Press the WPS button on how to check the settings of the access point, refer to connect
The screen appears when an error occurs. Wait for a while, then con...
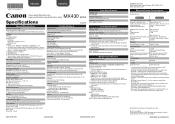
MX430 series Specifications - Page 1
...) are subject to Mac OS X Lion 10.7, install software bundled with the Canon inkjet printer before upgrading from Mac OS X 10.6 to change without notice.
INC. One Canon Plaza... the bundled software again.
• Windows: Some functions may not be available with Numeric buttons) Automatic redialing Manual redialing (max. 10 destinations)
Others Activity report (after production of hard...
MX430 series Especificaciones [Spanish Version] - Page 1

... Port: Wireless LAN: IEEE802.11n/IEEE802.11g/IEEE802.11b *5 *1 A computer that complies with Numeric buttons) Automatic redialing Manual redialing (max. 10 destinations)
Others Activity report (after production of 1/4800 inch ...* These values are a theoretical maximum transmission speed between the printer and an equivalent network device, and do not indicate the actual transmission speed obtained. One ...
Quick Guide - Page 22

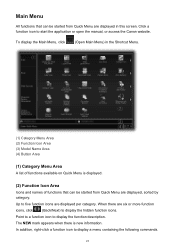
... names of functions that can be started from Quick Menu are displayed in the Shortcut Menu.
(1) Category Menu Area (2) Function Icon Area (3) Model Name Area (4) Button Area
(1) Category Menu Area
A list of functions available on Quick Menu is new information.
22 Click a function icon to display the function description. To display...
Quick Guide - Page 23

... Shortcut Menu.
(3) Model Name Area
The printer/scanner model name registered in the Preferences dialog is displayed. Start Starts the selected application, opens the selected manual, or accesses the Canon website. Add to Shortcut Menu Adds the selected function to display the Preferences dialog.
(4) Button Area
(Preferences Dialog) Displays the Preferences dialog...
Quick Guide - Page 24
... the previous or next item or image.
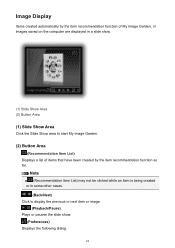
(Playback/Pause) Plays or pauses the slide show .
(1) Slide Show Area (2) Button Area
(1) Slide Show Area
Click the Slide Show area to start My Image Garden.
(2) Button Area
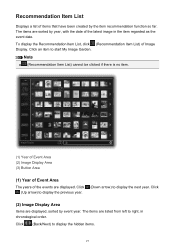
(Recommendation Item List) Displays a list of items that have been created by the item recommendation function so...
Quick Guide - Page 27

Note
(Recommendation Item List) cannot be clicked if there is no item.
(1) Year of Event Area (2) Image Display Area (3) Button Area
(1) Year of Event Area
The years of Image Display. Click
(2) Image Display Area
Items are displayed.
To display the Recommendation Item List, click (Recommendation ...
Quick Guide - Page 28
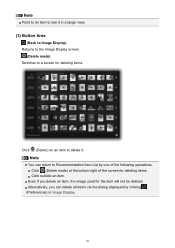
... image used for deleting items. Click outside an item. Note
You can delete all items via the dialog displayed by clicking (Preferences) in a larger view.
(3) Button Area
(Back to Image Display) Returns to the Image Display screen.
(Delete mode) Switches to a screen for deleting items.
Click (Delete) on an item to...
Quick Menu Guide - Page 22
... Menu
All functions that can be started from Quick Menu are displayed in the Shortcut Menu.
(1) Category Menu Area (2) Function Icon Area (3) Model Name Area (4) Button Area
(1) Category Menu Area
A list of functions available on Quick Menu is new information. When there are displayed per category. To display the Main Menu...
Quick Menu Guide - Page 23

... to Shortcut Menu Adds the selected function to display the Preferences dialog box.
(4) Button Area
(Preferences Dialog Box) Displays the Preferences dialog box.
(Help) Opens this... The model name display format varies depending on the registered printer/scanner. Click to the Shortcut Menu.
(3) Model Name Area
The printer/scanner model name registered in the Preferences dialog box is displayed.
Quick Menu Guide - Page 24

... the previous or next item or image.
(Playback/Pause) Plays or pauses the slide show .
(1) Slide Show Area (2) Button Area
(1) Slide Show Area
Click the Slide Show area to start My Image Garden.
(2) Button Area
(Recommendation Item List) Displays a list of items that have been created by the item recommendation function so...
Quick Menu Guide - Page 27
Note
(Recommendation Item List) cannot be clicked if there is no item.
(1) Year of Event Area (2) Image Display Area (3) Button Area
(1) Year of Event Area
The years of the events are sorted by year, with the date of the latest image in chronological order. Click
(2) ...
Quick Menu Guide - Page 28

... box displayed by one of the screen for deleting items.
Click (Delete) on an item to Recommendation Item List by clicking (Preferences) in a larger view.
(3) Button Area
(Back to Image Display) Returns to the Image Display screen.
(Delete mode) Switches to a screen for deleting items. Click outside an item. Note
Point...
Setup Guide - Page 1
AirPrint and Printer Firmware Setup Guide
Check If the AirPrint Firmware Update is necessary PIXMA MX432
1
Setup Guide - Page 2
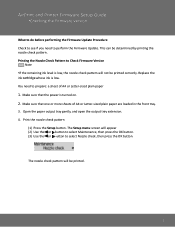
...ink cartridge whose ink is turned on. 2. Print the nozzle check pattern
(1) Press the Setup button. Make sure that the power is low. This can be printed.
2 The nozzle check pattern... will be determined by printing the nozzle check pattern. AirPrint and Printer Firmware Setup Guide
•Checking the Firmware version
What to do before performing the Firmware ...
Similar Questions


