Canon PIXMA MX432 Support Question
Canon PIXMA MX432 Support Question
Find answers below for this question about Canon PIXMA MX432.Need a Canon PIXMA MX432 manual? We have 11 online manuals for this item!
Question posted by jamesyongsoocho on January 17th, 2017
How To Receive Fax.
What do I have to do when telephone rings. I would like to know how to set up. I have a PIXMA 432.
Current Answers
Answer #1: Posted by techyagent on January 18th, 2017 10:30 AM
techyagent

Member since:
June 17th, 2014 Points: 4,799,800

Member since:
June 17th, 2014 Points: 4,799,800
This section describes dialing and sending faxes directly using the Numeric buttons.
Important
- It may be possible that faxes will reach unintended recipients due to the misdialing or incorrect registration of fax/telephone numbers. When you send important documents, it is recommended that you send them after speaking on the telephone. Sending a Fax after Speaking on Telephone
- Make sure that the machine is turned on.
- Press the FAX button.The Fax standby screen is displayed.
- Load documents on the platen glass or in the ADF. Important
- When sending a double-sided document, load the document on the platen glass. Double-sided documents cannot be automatically scanned and sent from the ADF.
- Adjust the scan contrast and resolution as necessary.Adjust the scan contrast and resolution following the procedure below.
- Press the Menu button.The FAX menu screen is displayed.
- Use the button to select FAX TX settings, then press the OK button.
- Use the button to select Scan contrast, then press the OK button.The Scan contrast screen is displayed.
- Use the button to select the scan contrast, then press the OK button.The button decreases the scan contrast, and the button increases the scan contrast.By pressing the OK button, the LCD returns to the FAX TX settings screen.
- Use the button to select Scan resolution, then press the OK button.The Scan resolution screen is displayed.
- Use the button to select the scan resolution, then press the OK button.By pressing the OK button, the LCD returns to the Fax standby screen.The following settings are selectable on Scan resolution.StandardSuitable for text-only documents.FineSuitable for fine-print documents.Extra fineSuitable for detailed illustration or fine-print quality documents.If the recipient's fax machine is not compatible with Extra fine (300 x 300 dpi), the fax will be sent in the Standard or Fine resolution.PhotoSuitable for photographs. Note
- The * (asterisk) on the LCD indicates the current setting.
- When sending a color fax, documents are always scanned in the same resolution (200 x 200 dpi). The image quality (compression rate) is determined by which scan resolution is selected, except that Extra fine and Photo provide the same image quality.
- Use the Numeric buttons to dial the recipient's fax/telephone number.Use the following buttons to dial the recipient's fax/telephone number.Numeric buttons:Enters the number. button:Enters a space. button:Deletes the last character you entered. button:By pressing this button once, "#" is entered. By pressing this button one more time, "P" is entered.
- Press the Color button for color transmission, or the Black button for black & white transmission.The machine starts scanning the document. Important
- Color transmission is available only when the recipient's fax machine supports color faxing.
- Do not open the document cover until scanning is completed.
- Start sending.
- If you load the document in the ADF:The machine scans the document automatically and starts sending the fax. Note
- To cancel a fax transmission, press the Stop button. To cancel a fax transmission while it is in progress, press the Stop button, then follow the instructions on the LCD.
- If documents remain in the ADF after the Stop button is pressed while scanning is in progress, Close the feeder cover [OK]Eject the document is displayed on the LCD. By pressing the OK button, the remaining documents are automatically ejected.
- If you load the document on the platen glass:After scanning the document, the confirmation screen asking you if you load the next document is displayed.To send the scanned document, press the OK button to start sending it. Note
- To send two or more pages, follow the message to load the next page, and press the Color or Black button. After scanning all pages, press the OK button to start sending.
- To cancel sending the fax, press the Stop button.
- If you load the document in the ADF:The machine scans the document automatically and starts sending the fax. Note
Note
- When your machine is connected to a PBX (Private Branch Exchange) system, refer to the operating instructions of the system for details on dialing the recipient's fax/telephone number.
- In case the machine was not able to send a fax, such as when the recipient's line was busy, it has the function to automatically redial the number after a specified interval. Automatic redialing is enabled by default. Automatic Redialing
- Unsent documents, such as those pending redial, are stored in the machine's memory. They are not stored in the case of a sending error. Document Stored in Machine's Memory
- Do not disconnect the power plug until all documents are sent. If you disconnect the power plug, all unsent documents stored in the machine's memory are lost.
Thanks
Techygirl
Related Canon PIXMA MX432 Manual Pages
Guide for Printer Setup for Network - Page 1
Setup Guide
This guide provides information for setting up a network connection for Connection Printer Setup Setup Procedure Selection
Push Button Method WPS
Troubleshooting Wireless Connection Preparation for the printer.
Guide for Printer Setup for Network - Page 2
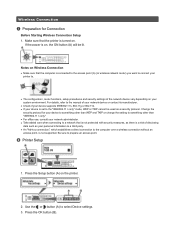
... button (B). If the power is connected to the access point (A) (or wireless network router) you want to connect your printer to.
• The configuration, router functions, setup procedures and security settings of the network device vary depending on your personal information to a third party. • An "Ad-hoc connection," which...
Guide for Printer Setup for Network - Page 3
4. Select Wireless LAN setup. 7. Press the OK button.
The (blue) Wi-Fi lamp (A) lights up when wireless connection is enabled. c Setup Procedure Selection
Push Button Method → d-A
WPS → d-B The printer will automatically search for access points supporting WPS (Wi-Fi Protected Setup). Press the OK button.
6. Select LAN settings. 5.
Guide for Printer Setup for Network - Page 4
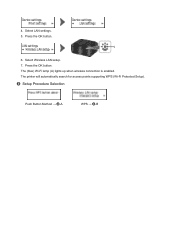
... button, refer to the access point.
3. Press the COPY button (A).
The network connection setup is now complete. Press and hold the WPS button on the printer within 2 minutes.
Press the OK button on the access point (for or connecting to the access point manual.
2. d-A Push Button Method d Connection Using WPS
1. When...
Guide for Printer Setup for Network - Page 5
... on the access point (for or connecting to the access point manual.
6. Press and hold the WPS button on the printer within 2 minutes. Press the OK button.
3.
For details on the printer flashes while searching for about 5 seconds). The (blue) Wi-Fi lamp on pressing the WPS button, refer to the...
MX430 series Specifications - Page 1
... 20 destinations) Group dial (max. 19 destinations) Regular dialing (with the Canon inkjet printer.
installation. Microsoft .NET Framework 4 Client Profile must be installed to PC *2 The wait...up to 0.04 inches/1 mm in height Other sizes: 1 sheet
K10375
Fax Specifications
Applicable line Public Switched Telephone Network (PSTN)
Communication mode Super G3, G3
Data compressing system Black: MH...
MX430 series Especificaciones [Spanish Version] - Page 1

... (ink tanks / FINE Cartridges) are a theoretical maximum transmission speed between the printer and an equivalent network device, and do not indicate the actual transmission speed obtained...up to 0.16 inches/4 mm in height Other sizes: 1 sheet
K10375
Fax Specifications
Applicable line Public Switched Telephone Network (PSTN)
Communication mode Super G3, G3
Data compressing system Black:...
Quick Guide - Page 8
... the license agreement. Read the displayed license agreement, then click I Agree. 3. The screen for products supporting Quick Menu.
• Available functions and settings vary depending on your scanner or printer. When you agree to the license agreement by following restrictions. You can download My Image Garden from the Canon website.
Keep these...
Quick Guide - Page 23

The model name display format varies depending on the registered printer/scanner. Click to the Shortcut Menu.
(3) Model Name Area
The printer/scanner model name registered in the Preferences dialog is displayed. Add to Shortcut Menu Adds the selected function to display the Preferences dialog.
(4) Button Area
(...
Quick Guide - Page 29

... model, region, etc. Note
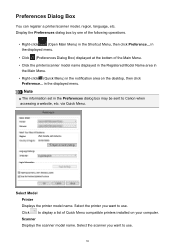
The information set in the Shortcut Menu, then click Preference... Select Model Printer Displays the printer model name. from the Canon Quick Menu. Click to use . in the Main Menu.
• Click Preference... Display the Preferences dialog by one of Quick Menu compatible printers installed on your computer.
Select the...
Quick Guide - Page 30

...
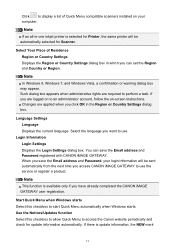
If your machine supports network connection, the scanner may appear for Scanner.
In that case, select one inkjet printer is update information, the NEW mark
appears on
(Notices) in the Region or Country Settings dialog. For USB connection: Canon XXX series For network connection: Canon XXX series Network (Where XXX is available...
Quick Guide - Page 31
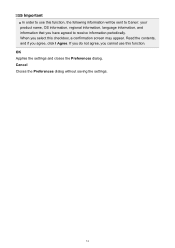
..., OS information, regional information, language information, and information that you have agreed to receive information periodically. Read the contents, and if you select this checkbox, a confirmation screen may appear. Cancel Closes the Preferences dialog without saving the settings.
31 If you do not agree, you cannot use this function. When you agree...
Quick Guide - Page 32

... computer while installing the driver. The printer/scanner was off while installing the driver.
32 The printer/scanner was not connected to install the printer/scanner driver. The printer/scanner driver installation may not be complete in the following cases.
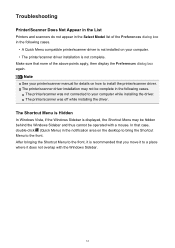
Troubleshooting
Printer/Scanner Does Not Appear in the List
Printers and scanners do not appear in...
Quick Menu Guide - Page 8

... agree to the license agreement. click OK.
• When Image Display is required for products supporting Quick Menu.
• Available functions and settings vary depending on your scanner or printer. Internet connection fees apply.
• In this guide, descriptions are mainly based on the screens displayed when using Image Display for selecting...
Quick Menu Guide - Page 23

... Box) Displays the Preferences dialog box.
(Help) Opens this guide.
(Close) Closes the Main Menu.
23 Click to the Shortcut Menu.
(3) Model Name Area
The printer/scanner model name registered in the Preferences dialog box is displayed. The model name display format varies depending on the registered...
Quick Menu Guide - Page 30
...box by one of Quick Menu compatible printers installed on the desktop, then click Preference... Select Model Printer Displays the printer model name. Note
The information set in the displayed menu. in the...(Preferences Dialog Box) displayed at the bottom of the Main Menu.
• Click the printer/scanner model name displayed in the Registered Model Name area in the Main Menu.
• ...
Quick Menu Guide - Page 31
... may appear.
Select the language you click OK in -one inkjet printer is selected for Printer, the same printer will be automatically selected for update information automatically.
Such dialog box appears... address and Password registered with CANON iMAGE GATEWAY.
Login Information Login Settings Displays the Login Settings dialog box. Note
This function is update information, the NEW mark...
Quick Menu Guide - Page 32
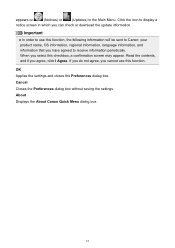
..., click I Agree. Cancel Closes the Preferences dialog box without saving the settings. If you do not agree, you cannot use this function, the following...regional information, language information, and information that you have agreed to receive information periodically. When you select this function. OK Applies the settings and closes the Preferences dialog box.
Click the icon to use ...
Quick Menu Guide - Page 33
...the Shortcut Menu may not be operated with the Windows Sidebar.
33 The printer/scanner was not connected to your printer/scanner manual for details on the desktop to bring the Shortcut Menu to the... a mouse.
After bringing the Shortcut Menu to the front. Troubleshooting
Printer/Scanner Does Not Appear in the List
Printers and scanners do not appear in the Select Model list of the ...
Setup Guide - Page 1
AirPrint and Printer Firmware Setup Guide
Check If the AirPrint Firmware Update is necessary PIXMA MX432
1
Similar Questions


Send/receive Fax
Canon Pixma Mx410 All In One Printer
HOW DO I SEND/RECEIVE FAX?
HOW DO I SEND/RECEIVE FAX?
(Posted by princevontee2 12 years ago)