
Canon PIXMA MX330 Support Question
Canon PIXMA MX330 Support Question
Find answers below for this question about Canon PIXMA MX330.Need a Canon PIXMA MX330 manual? We have 2 online manuals for this item!
Question posted by WELLS909 on May 6th, 2011
How Can I Print In Color When My B/w Cartridge Is Empty.
why can't I fax or scan when B/W cartridge is empty?
Current Answers
Related Canon PIXMA MX330 Manual Pages
Guía de inicio [Spanish Version] - Page 10

... la cubierta de bloqueo del cartucho de tinta
del lado derecho.
Extraiga el cartucho FINE de la caja.
Remove the Black FINE Cartridge from its box. 5
2
3
4
G
Open the Ink Cartridge Locking Cover on the removed protective tape.
• Tenga cuidado de no mancharse las manos ni el área de trabajo circundante...
Guía de inicio [Spanish Version] - Page 41
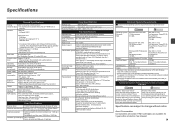
... Cartridges) are subject to date. USB Port: Hi-Speed USB*1
Direct Print Port: PictBridge Bluetooth v2.0 (Option)*2 *3 *4 USB flash drive
Print ...printer. • Macintosh: Hard Disk must be placed with Windows Vista, XP or 2000 pre-installed.
• Some functions may not be formatted as Mac OS Extended (Journaled) or
Mac OS Extended.
The on Canon COLOR FAX TEST SHEET.)
Scanning...
Getting Started - Page 2
.... Contents
1 Preparation 2 Remove the Protective Material 3 Connect the Telephone Line 4 Turn the Power On 5 Install the FINE Cartridges 6 Set Up for safe operation.
Model Number: K10332 (MX330)
Descriptions for operations that must be observed for Fax Reception 7 Install the Software 8 Loading Paper
After Installing the Machine
■ Symbols
The following symbols are trademarks...
Getting Started - Page 3

.... 1 Preparation
■ Check the Included Items
Before turning on the machine, remove all the orange tapes and the protective sheets.
12 3 4 5 6 7 8
□ Choosing a Location
Color
Black
FINE cartridges
power cord
telephone line cable
• Manuals • Setup CD-ROM (containing the drivers, applications and on-screen manuals) • Warranty
• Do not...
Getting Started - Page 4
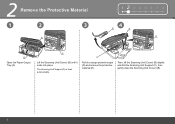
... Unit (Cover) (B) slightly and fold the Scanning Unit Support (C), then gently close the Scanning Unit (Cover) (B).
The Scanning Unit Support (C) is fixed automatically. 2 Remove the Protective Material
1
2
3
B
123 4 5 6 7 8
4
E
B
C
A
Open the Paper Output Tray (A).
C
Lift the Scanning Unit (Cover) (B) until it locks into place.
D
Pull the orange protective tape (D) and...
Getting Started - Page 5

... using a distribution adapter. For other connection methods, refer to the onscreen manual: Basic Guide.
1 234 5 6 7 8
2 Only when connecting a telephone:
B
When not using as a fax:
When using as both a fax and telephone:
When using as a fax only: Go to "4 Turn the Power On" on page 4.
3 Connect the Telephone Line
To use the machine as...
Getting Started - Page 7

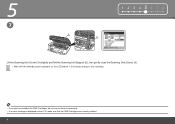
...and reopen it locks into place. The FINE Cartridge Holder (F) comes out. (This is fixed automatically. The Scanning Unit Support (E) is where you install the cartridges.)
• Handle the FINE Cartridges carefully. 5 Install the FINE Cartridges
1
A
D
1 2 3 456 7 8
E
F
Lift the Scanning Unit (Cover) (A) until it . • If the FINE Cartridge Holder does not come out, make sure that...
Getting Started - Page 8

on the removed protective tape. Remove the Black FINE Cartridge from its box.
H
Pull the orange protective tape (H) in the direction of the arrow and remove it gently.
• Be careful not to stain your hands or surrounding work area with ink on the right side.
5
2
3
4
G
Open the Ink Cartridge Locking Cover Pinch (G) firmly and pull up the cover.
Getting Started - Page 9
...; Install in the same way.
• Do not knock the FINE Cartridge against the sides of the Ink Cartridge Locking Cover until you hear a click to close it is locked correctly (not at an angle). Insert the Color FINE Cartridge into the left FINE Cartridge Holder in a well-lit environment. • Install the Black FINE...
Getting Started - Page 10
5
7
1 2 3 456 7 8
A E
Lift the Scanning Unit (Cover) (A) slightly and fold the Scanning Unit Support (E), then gently close the Scanning Unit (Cover) (A). • Wait until the standby screen appears on the LCD (about 1-2 minutes) and go to the next step.
• Once you have installed the FINE Cartridges, do not remove them unnecessarily. • If an error...
Getting Started - Page 18
Refer to "When Printing Becomes Faint or Colors Are Incorrect" in step , then confirm the message.
• If straight lines are misaligned or print quality is recognized by the computer, a message appears on the screen.
Click Next....
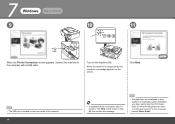
Turn on -screen manual: Basic Guide. 7
Windows
Macintosh
9
10
11
A
When the Printer Connection screen appears, connect the machine to align the...
Getting Started - Page 23

... 8
Click Install.
Read the License Agreement screen carefully and click Yes. Refer to "When Printing Becomes Faint or Colors Are Incorrect" in the on -screen instructions to install the software.
• If straight lines are misaligned or print quality is not satisfactory after installation, you may need to display explanations.
• During installation...
Getting Started - Page 26
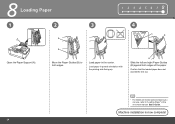
...: Basic Guide. B
Slide the left and right Paper Guides (B) against both edges.
Machine installation is now complete!
24
Load paper in portrait orientation with the printing side facing up.
Getting Started - Page 28
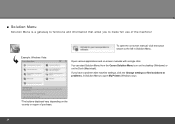
... -screen manual, click the button shown to the left in Solution Menu to open the on the Dock (Macintosh). Example: Windows Vista
To open My Printer (Windows only).
*The buttons displayed vary depending on the country or region of the machine! ■ Solution Menu
Solution Menu is a gateway to functions and...
Getting Started - Page 29

... items by correcting/ enhancing photos using the applications. Alternatively, use the application software and the machine, refer to print your own items easily. For details on how to use the Operation Panel on the computer along with the drivers. Try Using the Machine! Various ...
Getting Started - Page 30
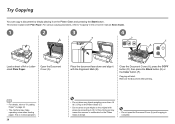
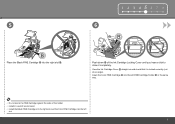
...Close the Document Cover (A), press the COPY button (D), then press the Black button (E) or the Color button (F). Doing so may make operating noise when feeding paper. This is complete. Try Copying
You... Platen Glass and pressing the Start button.
Open the Document Cover (A). Remove the document after printing.
• For details, refer to break.
• Do not open the Document Cover...
Getting Started - Page 31
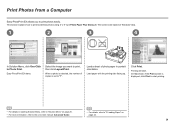
... easily.
Easy-PhotoPrint EX starts. When a photo is selected, the number of photo paper in portrait orientation. Printing will start printing.
• For details on starting Solution Menu, refer to "Solution Menu" on page 26. • For more information, refer to the on-screen manual: Advanced ...
Getting Started - Page 34

If the Scanning Unit (Cover) is recommended that you clean the Ink Cartridge Locking Cover (A) and the inside of the tray (B) with a dry cloth as required. To avoid staining your hands or clothes with ink. ... use, the inside of the machine may become stained with ink, it is left open for more than 10 minutes, the FINE Cartridge Holder moves to the right automatically. A
B
32
Getting Started - Page 35
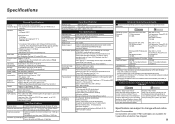
... Approx. 8.6 kg (Approx. 18.9 lb) * With the FINE Cartridges installed. Minimum System Requirements
Conform to PC
Approx. 18.1 (W) x ...the Canon inkjet printer. • ...Printing resolution (dpi)
Interface
4800* (horizontal) x 2400 (vertical) * Ink droplets can be placed with a pitch of 1/4800 inch at 33.6 Kbps, ECM-JPEG, transmitting from memory (Based on Canon COLOR FAX TEST SHEET.)
Scanning...
Getting Started - Page 36
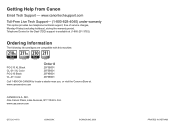
... (TDD) support is available at www.canonestore.com
CANON U.S.A.
Ordering Information
The following ink cartridges are compatible with this machine. One Canon Plaza, Lake Success, NY 11042 U.S.A. INC. ...com
QT5-2134-V01
XXXXXXXX
©CANON INC.2009
PRINTED IN VIETNAM
PG-210 XL Black CL-211 XL Color PG-210 Black CL-211 Color
Order #
2973B001 2975B001 2974B001 2976B001
Call 1-800-...
Similar Questions


How To Fix A Paper Jam On A Canon Printer Pixma Mx882
(Posted by JWManbabolo 9 years ago)


How To Get A Canon Printer Pixma 410 Wireless Fax To Send And Receive
(Posted by gsSpri 10 years ago)